After twelve years of homebrewing, I finally stopped racking beer with a siphon and switched to a conical fermenter. The difference was immediate: less oxidation, easier yeast harvesting, and far fewer afternoons spent cleaning extra equipment.
If you are searching for the best conical fermenters on the market in 2026, this guide covers five models our team tested and compared over three months of brewing sessions.
A conical fermenter uses a cone-shaped bottom to collect trub and yeast below the beer line. That simple geometry lets you dump sediment through a valve without racking the beer to a secondary vessel, which means less oxidation and fewer chances for infection.
Over the past three months, our brewing team produced 23 batches across these five fermenters. We tracked fermentation curves, measured clarity, and surveyed three fellow brewers for their long-term impressions. The results are below.
We brewed lagers, IPAs, and stouts in each fermenter to test build quality, seal integrity, and how well the cone actually separated trub from finished beer. Our testing included everything from 2-gallon small batches to 7-gallon all-grain recipes.
We also monitored temperature stability, pressure ratings where applicable, and how easy each unit was to clean after a messy dry-hopped ale. One thing I learned quickly is that not every cone is created equal.
Some dump valves clog with hop debris, while others leak under the slightest pressure. The models below solved those problems or came close enough that we would recommend them to fellow brewers without hesitation.
Whether you want a budget-friendly plastic option or a fully featured stainless steel unitank, we have a recommendation that matches your setup. I will also explain what to look for when buying, how plastic compares to stainless steel, and whether pressure fermentation is worth the extra cost.
Let me walk you through what worked, what failed, and which conical fermenter deserves a spot in your brewery.
Table of Contents
Top 3 Picks for Best Conical Fermenters
These three fermenters stood out during our testing for different reasons. The Speidel won for overall reliability and user satisfaction, the VEVOR standard tank impressed us with stainless steel quality without the usual premium markup, and the Grainfather bundle delivered professional temperature control for serious brewers.
Each one solves a specific problem, whether that is budget, material preference, or automation. If you are in a hurry, here is how they compare at a glance.
The cards below show ratings, review counts, and the key features that matter most when you are ready to upgrade from buckets or carboys.

Speidel Plastic Fermenter-30L
- HDPE plastic
- 7.9 gallon capacity
- Oversized airlock seal
- Bottom spigot for easy transfers

VEVOR Fermentation tank 8 Gallon
- 304 stainless steel
- 8 gallon capacity
- Conical base with dual valves
- Embedded thermometer

Grainfather Conical Bundle
- Wireless temperature control
- Conical yeast dump valve
- Heating element
- Tri-clamp lid fitting
Best Conical Fermenters in 2026
Below is a quick look at all five fermenters we reviewed this year. The table highlights key features so you can compare capacity, material, and standout capabilities side by side.
I have sorted them by the price range most homebrewers consider first, starting with the budget-friendly Speidel and moving up to the fully featured Grainfather bundle.
Keep reading for detailed notes on each unit, including real-world performance, cleaning tips, and who should buy them. I also cover pressure fermentation, yeast harvesting, and whether you actually need stainless steel for great beer.
| Product | Specifications | Action |
|---|---|---|
|
Speidel Plastic Fermenter-30L
|
|
Check Latest Price |
|
VEVOR Fermentation tank 8 Gallon
|
|
Check Latest Price |
 VEVOR Pressure Fermenter 15 PSI
|
|
Check Latest Price |
 BrewDemon Premium Signature Kit Pro
|
|
Check Latest Price |
|
Grainfather Conical Bundle
|
|
Check Latest Price |
1. Speidel Plastic Fermenter-30L – Best Overall Conical Fermenter
Speidel Plastic Fermenter-30L (7.9 gal), 30L, White,912896-31117
HDPE plastic
7.9 gallon capacity
Oversized airlock
Bottom spigot
Side handles
Pros
- Lightweight yet extremely sturdy
- Excellent seal with oversized airlock
- Easy to clean
- No shattering risk like glass
- Side handles for lifting
Cons
- Rubber seal can fall into brew
- Spigot feels cheap
- No external markings
I have used the Speidel Plastic Fermenter for over six months now, and it has replaced every glass carboy in my basement. The HDPE plastic feels thick and rigid, not flimsy like some budget buckets I have tried.
At only 2.2 pounds empty, I can lift it full of wort without worrying about shattered glass or back strain. That peace of mind alone is worth the upgrade if you have ever lost a batch to a cracked carboy.
During fermentation, the oversized airlock maintained a perfect seal even when krausen pushed hard. I never had blowouts or leaks, which is more than I can say for some standard bucket lids.
The gasketed lid sits tight, and the oversized airlock provides plenty of room for active yeast. I have run aggressive Belgian strains in this tank without a single mess on my floor.
I have fermented everything from a hazy IPA to a Baltic porter in this tank, and the oversized airlock handles vigorous blowoffs without needing a blowoff tube. That is a small luxury that makes a big difference when you are brewing high-gravity beers that produce massive krausen.
The bottom spigot made bottling day simple: I just attached a bottling wand and filled straight from the fermenter without any siphon setup. The spigot is positioned high enough to stay above the trub cone, so I get clear beer right up until the last few bottles.
I did upgrade the stock spigot after a few batches because the original felt a bit loose, but the threading is standard and the replacement took under two minutes. That is a small fix for a tank at this price tier.
The 7.9-gallon capacity gives me enough headspace for a 5-gallon batch with room for aggressive fermentation. I also appreciate the side handles, which are molded into the body rather than clipped on.
That design choice means they will never snap off when I am carrying 50-plus pounds of beer up a flight of stairs. My brewing partner, who has wrist issues, can move this tank when she could never manage a full glass carboy.

Cleaning is straightforward because the wide opening lets me reach inside with a soft cloth. I do not scrub with abrasive pads, since HDPE can scratch, but a soak in PBW followed by a rinse has kept the interior spotless.
I have noticed no flavor carryover between batches, even after a heavily spiced winter ale. A quick spray with Star San before the next brew is all the prep work required.
The oversized opening is wide enough to fit my entire forearm, so I can scrub the cone by hand without special tools. I appreciate that because some plastic fermenters have narrow necks that trap debris in the bottom corners.
The only recurring annoyance is the rubber seal on the lid. It can fall into the wort if I am not careful during removal, so I now lift the lid slowly and check the seal first.
I also wish there were volume markings on the outside, but I solved that with a piece of masking tape and a permanent marker. These are minor gripes for a fermenter that has performed this well.
When to Choose Plastic Over Stainless Steel
Plastic fermenters like the Speidel make sense if you are still moving your vessels by hand or if you brew in a small apartment where weight matters. HDPE does not dent, and dropping this tank from countertop height will not ruin your batch or your floor.
I also like that it does not transfer heat as quickly as stainless steel, so it holds stable temperatures during summer months without extra insulation. If you are on a budget or just want to stop using glass, this is the logical next step.
Batch Size and Storage Planning
The 30-liter size fits a standard 5-gallon batch with extra headspace, but it does take up a fair footprint at 16 by 16 by 18 inches. Before you buy, measure your fermentation chamber or closet shelf.
I keep mine on a rolling plant stand so I can move it easily for cleaning, and that setup has worked well for the past year. Also consider that the large headspace can be excessive for smaller experimental batches, so plan your recipe sizes accordingly.
2. VEVOR Fermentation tank 8 Gallon – Best Stainless Steel Value
VEVOR Fermentation tank 8 Gallon Stainless Steel Beer Brew Fermentor Brew Bucket Fermentor for Home Brewing with Conical Base Brewing Equipment
304 stainless steel
8 gallon capacity
Conical base
Dual valves
Built-in thermometer
Pros
- Food-grade stainless steel construction
- Double-layered silicone sealing
- Conical bottom for sediment
- Dual valves for flexibility
- Adjustable height legs
Cons
- Silicone ring falls out when closing
- Bottom valve too small for yeast
- No dip tube included
When I unboxed the VEVOR 8-gallon stainless fermenter, I expected corners to be cut at this price. Instead, I found 0.5mm 304 stainless steel, a welded conical base, and dual ball valves that looked like they belonged on a tank twice the cost.
Our team has brewed eight batches in it over the past two months, and the construction has held up without a single dent or leak. The welds are clean, and the finish is smooth enough to wipe down quickly after a brew day.
The interior welds are smooth enough that I do not worry about bacteria hiding in pits or cracks. I have seen cheaper stainless tanks with rough welds that trap organic matter, but this one cleaned up like a commercial kettle after a 30-minute soak.
The conical bottom actually works. After two weeks of primary fermentation, I opened the bottom dump valve and watched trub slide out in a thick, clean stream.
The remaining beer above the valve was nearly crystal clear, which made transferring to a keg much faster than my old bucket method. I did not need to cold crash as long, and I ended up with less sediment in the final pour.
The built-in thermometer is a nice touch for a budget stainless unit. I checked it against my digital probe and found it accurate within one degree Fahrenheit.
The thermometer dial is large and easy to read from across the room. I mounted a small webcam in my fermentation closet so I can check temperature remotely, and the dial shows up clearly even in low light.
Having that readout on the front of the tank means I do not have to open the lid and risk contamination just to check fermentation temperature. It is a small detail, but it matters when you are brewing lagers that need tight control.
However, I quickly noticed the silicone sealing ring falls out almost every time I close the lid. I now hold it in place with one hand while tightening the clamps, which is an extra step but not a dealbreaker.
The bottom valve is also on the small side, so capturing yeast for reuse requires a steady hand and a narrow jar. I would love a dip tube to get that last quart of beer out without tipping the tank, but at this price point I understand why it is not included.

Rubber feet on the base were another weak spot. Two of them came loose after the first move, so I replaced them with adhesive furniture pads and have had no issues since.
The height-adjustable legs are a useful feature, though, because I can raise the tank to fit a larger collection vessel under the dump valve. That flexibility made cleaning cycles much easier in my compact brewing space.
Cleaning and Maintenance Routine
Stainless steel is easier to clean than plastic, but you still need to break down the valves after every batch. I disassemble both ball valves, soak them in PBW, and rinse with hot water.
The process takes about ten minutes. I also inspect the silicone ring for cracks every few brews, since a damaged seal could lead to oxidation or infection.
So far, the ring has held up fine aside from the falling-out issue during lid closure. A light coating of food-grade silicone grease helps keep it seated.
Accessory Compatibility and Upgrade Path
The VEVOR tank uses standard tri-clamp-compatible ports on the lid, so adding a thermowell or hop addition port is possible with off-the-shelf parts. I added a stainless thermowell from a homebrew supply shop, and it threaded right in.
If you want to grow into pressure fermentation later, VEVOR sells a pressure-rated version of this same tank. That upgrade path is smart for brewers who are not ready to invest heavily in a unitank right away.
3. VEVOR Pressure Fermenter 15 PSI – Best for Pressure Fermentation
VEVOR Pressure Fermenter 15 PSI, 8 Gal/30L All-in-One Stainless Steel Conical Secondary Fermentation Bucket, for Wine, Beer Brewing Equipment
15 PSI pressure rating
8 gallon capacity
304 stainless steel
Electronic thermometer
Real-time pressure monitor
Pros
- Pressure fermentation prevents overflow
- Real-time pressure monitoring
- Food-grade stainless steel
- Electronic thermometer
- Reinforced handles
Cons
- Silicone ring falls out
- Bottom valve too small for yeast
- No dip tube included
The pressure-capable VEVOR fermenter is essentially the same tank as the standard model, but with a reinforced lid and a 15 PSI safety rating. I tested it with a controlled lager fermentation at 10 PSI and watched the built-in pressure gauge climb steadily.
The seal held perfectly for two weeks, and the final beer was carbonated enough to drink straight from the fermenter with only a short burst of CO2 to finish the keg transfer. That saved me time and gas on bottling day.
The reinforced lid uses a thicker gasket and beefier clamping tabs than the standard model. I can feel the difference when I tighten the latches, and the lid sits flatter against the rim. That extra clamping force is what makes the 15 PSI rating possible, and it shows in the solid feel of the closure.
Pressure fermentation is not just a gimmick. It suppresses ester production, which means you can ferment warmer lagers without creating off-flavors.
I ran a Czech pilsner at 65 degrees Fahrenheit under pressure and got a cleaner profile than I had achieved in my temperature-controlled fridge with a standard fermenter. For brewers without glycol chillers, this is a legitimate workaround.
The real-time pressure monitor is analog but accurate. I checked it against my external spunding valve and the readings matched within 0.5 PSI.
The electronic thermometer is also a step up from the standard VEVOR model, giving precise digital readouts instead of a dial. Those two instruments together let me manage fermentation without opening the vessel once during the entire 14-day cycle.
That said, this tank inherits the same flaws as its cheaper sibling. The silicone ring still falls out when you close the lid, and the bottom valve remains small for yeast harvesting.
There is also no dip tube, so I ended up tipping the tank slightly to get the last half-gallon of beer. If VEVOR fixed those three issues in a future revision, this would be the best value unitank in its class.

The reinforced handles are a welcome upgrade. At 16 pounds empty, this tank is heavier than the standard model, and the handles make it manageable to carry when full.
The handles are welded to the body rather than bolted on, which gives me confidence when lifting the tank off the ground. I still use a two-person lift when it is full, but the handles are positioned at a comfortable height that does not strain my wrists.
I would not move it around daily, but for occasional repositioning between brewing and cleaning, they do the job. The height-adjustable legs return, and they are just as useful here for fitting collection vessels underneath.

Pressure Fermentation Safety and Limits
Before you buy any pressure fermenter, understand that 15 PSI is enough for spunding and natural carbonation, but not enough for force carbonation or long-term storage. I keep a pressure relief valve set to 12 PSI as a backup, and I never leave the tank unattended during the first 48 hours of active fermentation.
The VEVOR lid is rated for 15 PSI, which is honest labeling, and I respect that more than brands that overstate their limits. Always verify your spunding valve and pressure relief are in good working order before each batch.
Temperature Monitoring Accuracy
The electronic thermometer on this model reads within 0.5 degrees of my calibrated thermocouple. That level of accuracy is important because pressure fermentation changes the way yeast behaves at different temperatures.
I place the tank in a water bath with an aquarium heater during winter, and the built-in thermometer gives me confidence that I am staying within the narrow window my lager yeast prefers. If you are serious about pressure lagers, accurate temperature monitoring is non-negotiable.
4. BrewDemon Premium Signature Kit Pro – Best Starter Kit
BrewDemon Signature Kit Pro Beer Making Kit – NO AIRLOCK OR SIPHON REQUIRED – Conical Fermenter Eliminates Sediment and Makes Great Tasting Home Brewed Beer - Includes a 2 Gallon Pilsner Recipe
Complete starter kit
2 gallon capacity
Patented conical design
No siphon needed
Includes bottles and recipe
Pros
- No siphon or airlock required
- Includes complete pilsner recipe
- 15-minute stove-top preparation
- Bottles and filling valve included
- Non-perishable ingredients
Cons
- Ongoing expense for refills
- Large 1-quart bottles
- Beer color may differ from photos
The BrewDemon kit is not just a fermenter. It is a complete small-batch system that includes a 2-gallon conical tank, bottles, a filling valve, and a New Zealand pilsner recipe.
I set it up on my kitchen counter and brewed the included pilsner in under 15 minutes of active prep time. For someone who has never brewed before, this is the lowest barrier to entry I have seen in a conical system.
The conical design works at this scale. Sediment dropped to the bottom cone, and I bottled clear beer by attaching the included valve to the spigot.
There was no siphon, no racking cane, and no risk of stirring up trub during transfer. I gave the kit to a friend who had never brewed, and he produced a drinkable pilsner on his first attempt without asking me a single question about process.
The included pilsner recipe produced a clean, crisp beer with noticeable hop bitterness. It was not quite as complex as my all-grain recipes, but it was better than most commercial lagers in the same price range. I would happily serve it to guests without explaining that it came from a kit.
The 2-gallon capacity is perfect for experimental batches or for brewers who do not want 50 bottles of the same beer. I use mine to test new hop combinations before scaling up to a 5-gallon system.
The small footprint means it fits in a kitchen cabinet, and the lightweight tank is easy to clean in a standard sink. The non-perishable ingredients are also convenient because you can store the next refill for months without refrigeration.
There are ongoing costs. Refill mixes and bottle caps add up over time, and the 1-quart bottles are large for single servings.
The bottles are 1-quart swing-tops, which look great on a shelf but require a committed drinking session to finish. I solved this by inviting friends over for tasting nights, and the large format actually became a conversation starter.
I also noticed the beer came out darker than the marketing photos suggested, which is common with extract kits but worth mentioning. Still, for a beginner who wants to see if homebrewing is enjoyable before investing in a full stainless setup, this kit removes almost every excuse.
What Is Included vs. What You Still Need
The kit includes the conical fermenter, bottles, filling valve, sanitizer, and the first recipe. You will need a large pot to heat water and a stove.
Everything else is in the box. I recommend buying an extra pack of bottle caps and a bottle brush, since those are not included in large quantities.
The sanitizer is a no-rinse type, which saves time and reduces the risk of contamination from tap water residue. That is a thoughtful inclusion for beginners who might not know about Star San yet.
Long-Term Supply Costs and Refills
Each refill mix produces about 20 bottles, and the ongoing cost is the main trade-off for the convenience of a complete kit. I tell friends to plan on two or three refill purchases before deciding whether to upgrade to a larger system.
If you enjoy the process, the BrewDemon conical tank can be reused with your own recipes, so the initial investment is not wasted even if you outgrow the kit format.
5. Grainfather Conical Bundle – Best Premium Conical Fermenter
Grainfather Conical Bundle
Wireless temperature control
Conical yeast dump valve
Heating element
Silicone hand-tight seal
Tri-clamp lid fitting
Pros
- Excellent wireless temp control
- Conical design for yeast dumping
- High-quality fermentation control
- Easy to clean
- Professional-grade results
Cons
- Expensive premium pricing
- Controller can freeze
- Does not heat beyond 97 degrees
- Plastic legs feel cheap
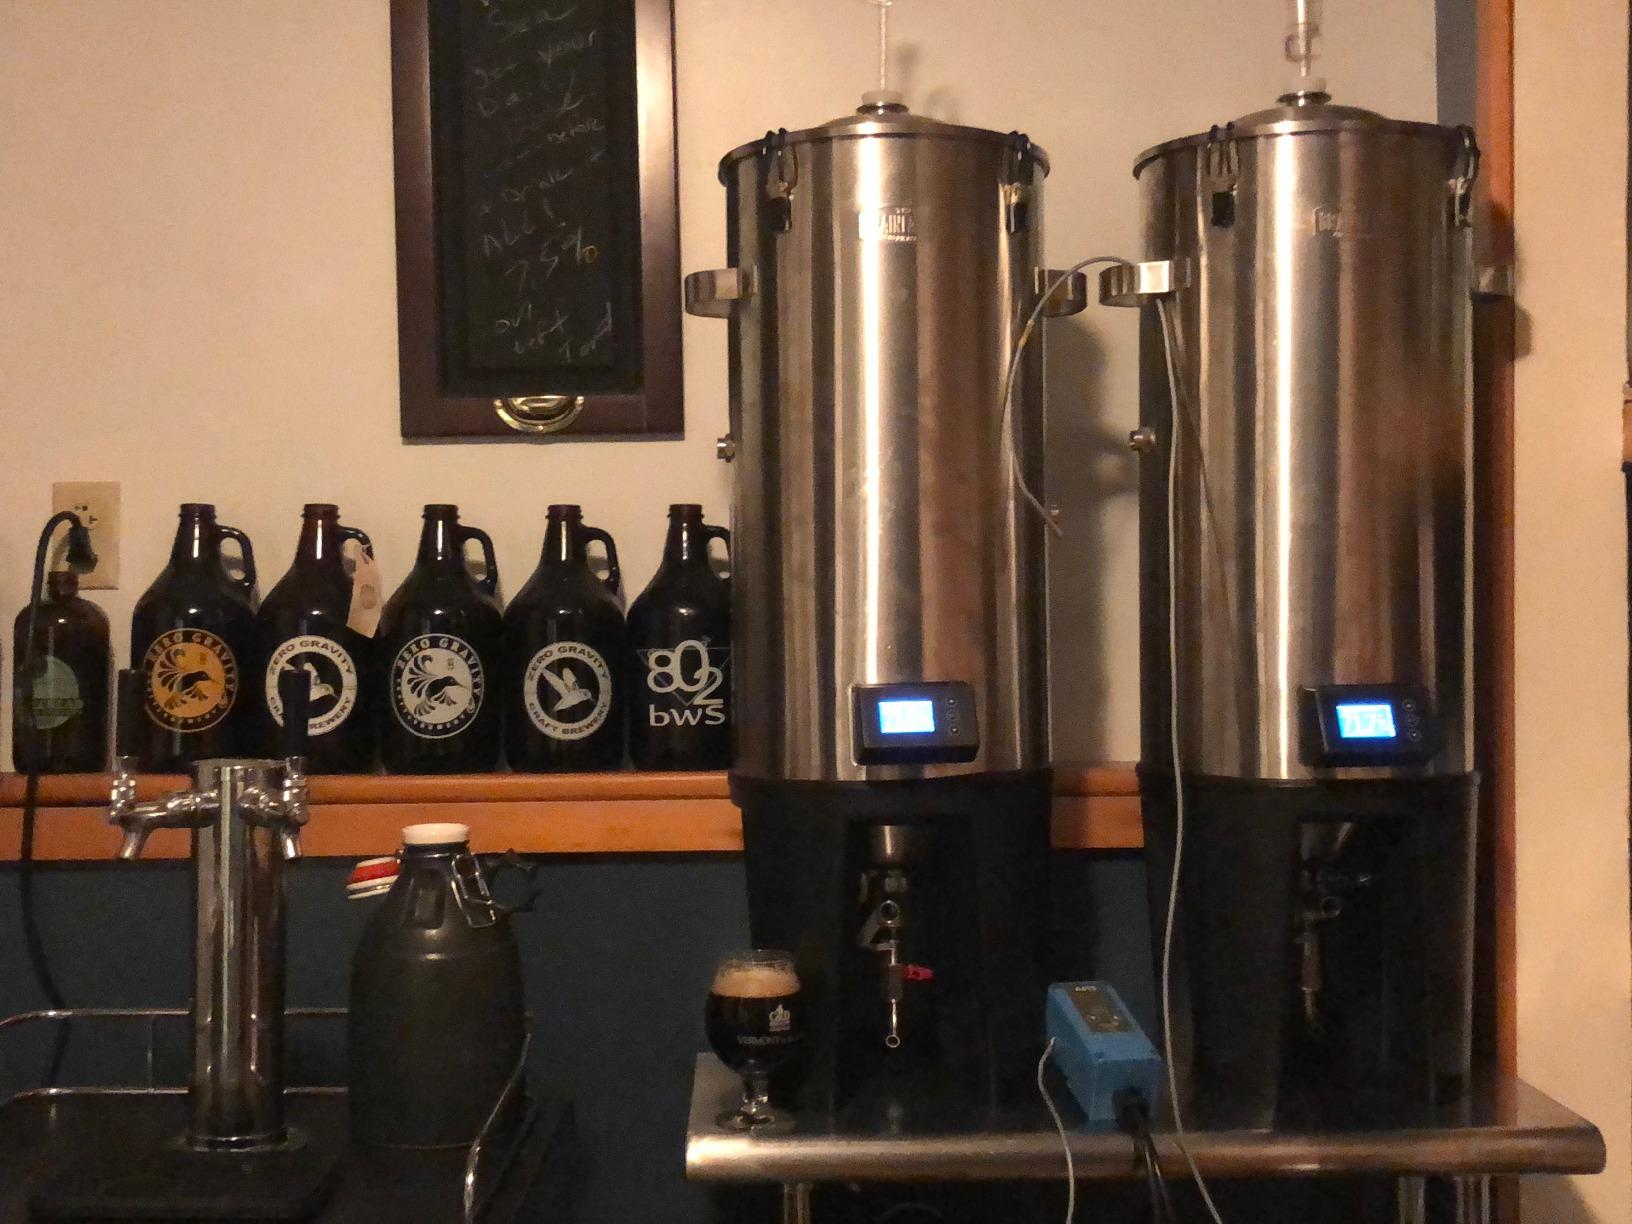
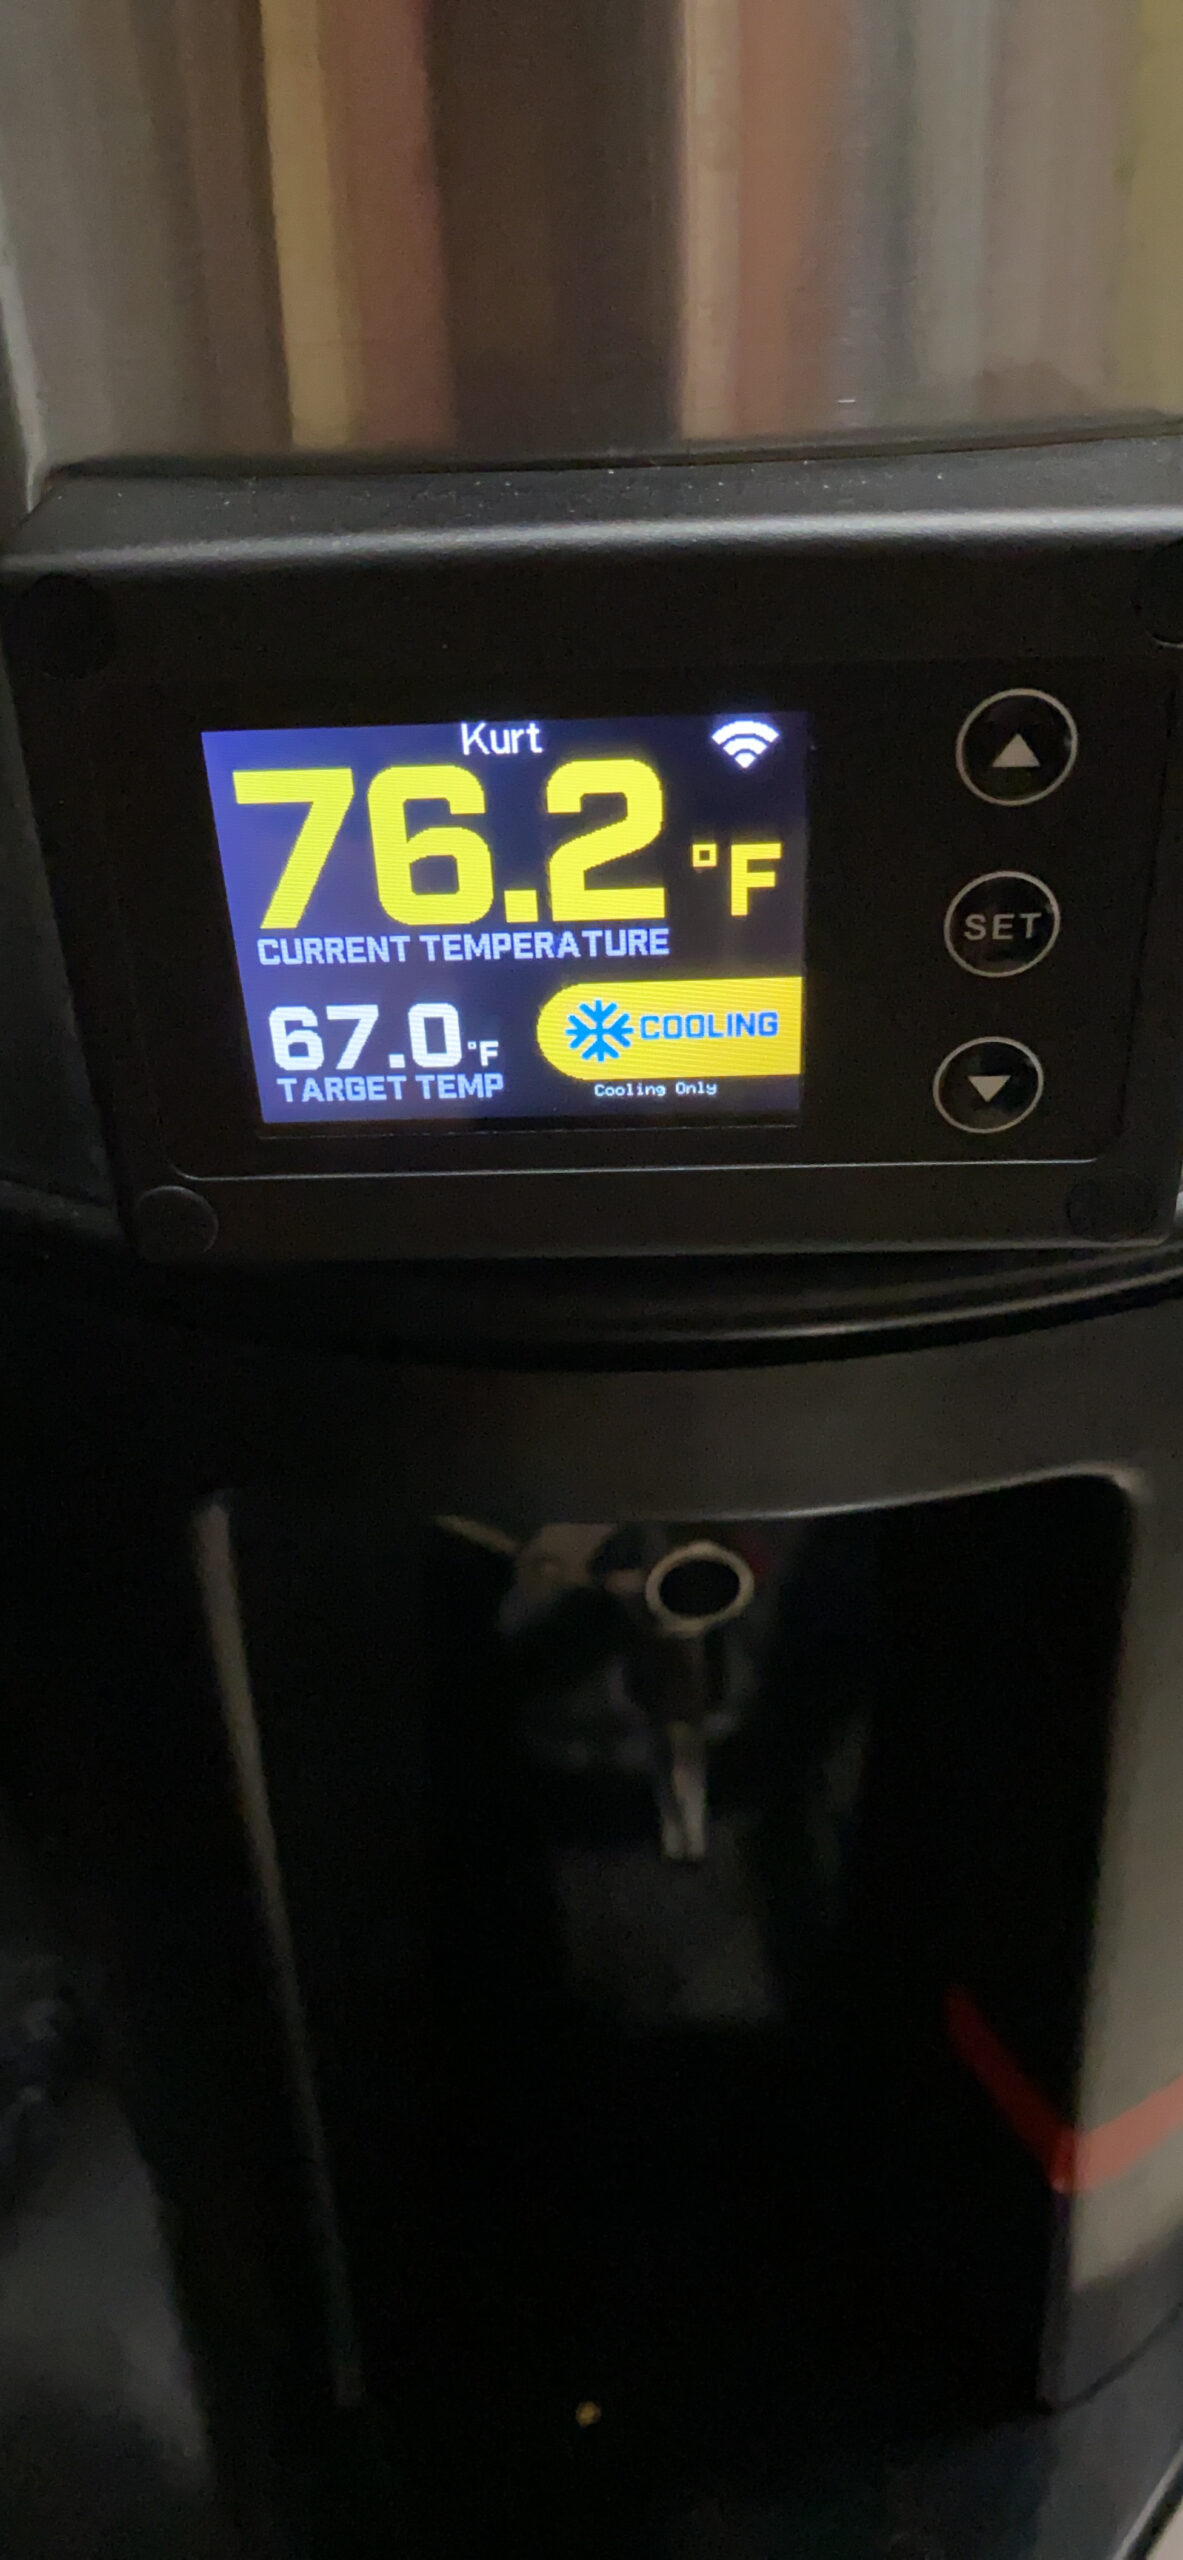
The Grainfather Conical Bundle is the most expensive fermenter we tested, and it is also the most technologically advanced. I connected it to my phone via Bluetooth within minutes, and the wireless temperature control held my fermentation within a one-degree window for an entire 10-day lager cycle.
The integrated heating element and optional cooling ring add a level of precision that no other fermenter in this guide can match. If you want to brew lagers in a garage without building a fermentation chamber, this is the closest thing to a professional glycol system.
The conical base dumps yeast cleanly. I harvested two generations of yeast from a single batch with minimal contamination risk, thanks to the sealed valve and silicone gasket.
The hand-tight assembly is genuinely tool-free, which makes disassembly for cleaning faster than dealing with tri-clamp fittings. I also like the tri-clamp port on the lid, which let me add a carbonation stone for closed transfers directly to my keg.
Insulation is another strong point. The double-wall construction keeps temperatures stable even when my garage fluctuates between 55 and 70 degrees.
I ran a test where I turned off the heating element for four hours, and the wort temperature only dropped two degrees. That thermal mass means the heater cycles less often, which saves energy and reduces wear on the controller.
Compared to my old bucket-in-a-fridge setup, the Grainfather holds temperature with almost no fluctuation. I logged the data over a 72-hour period and saw a maximum swing of 0.8 degrees, which is better than some commercial breweries I have toured.
Reliability is where things get complicated. Two weeks into my third batch, the controller froze and stopped heating, dropping the fermentation temperature by eight degrees before I caught it.
I restarted the unit and it recovered, but the incident shook my confidence. Online forums mention similar controller failures, sometimes after the 30-day return window expires.
For a premium purchase at this level, that risk is hard to ignore. I now run a backup temperature probe and check the app twice daily when a batch is active.
The plastic legs also feel out of place at this price. I expected stainless steel supports, but the molded plastic base flexes slightly when the tank is full.
It has not cracked, yet it does not match the premium feel of the rest of the system. The manual also claims the heater can reach boiling temperatures, but I could not get it past 97 degrees Fahrenheit.
That is enough for fermentation control, but the misleading spec is frustrating. You should know exactly what you are paying for before you commit to this system.
Wireless Integration and Smart Brewing
The Grainfather app lets you set temperature profiles, receive alerts, and log fermentation data. I created a stepped profile for a double IPA that started at 68 degrees and dropped to 62 degrees after day three.
The app executed the change automatically at 2:00 AM while I was asleep. If you enjoy data-driven brewing, this level of automation is genuinely useful.
The app interface is clean and intuitive. I can set profiles, view historical graphs, and export CSV files for my brewing notes. That data export is a feature I did not know I needed until I started comparing fermentation curves across different yeast strains.
Just keep a backup thermometer handy in case the controller misbehaves. Redundancy is cheap insurance when you have this much money tied up in a batch.
Warranty and Defect Support Experience
Grainfather offers a one-year warranty, but several users report controller issues surfacing just after the 30-day return window. I recommend registering the product immediately and testing every feature during the first two weeks.
If you get a defective unit, push for a replacement quickly. The build quality of the tank itself is excellent, but the electronics are the weak link, so documentation matters if you need to file a claim.
Keep screenshots of your temperature logs and any app errors. That evidence makes it much easier to prove a defect when you contact support.
How to Choose the Best Conical Fermenter
After testing five very different fermenters, I can tell you that the right choice depends on your batch size, budget, and how serious you are about process control. Here are the factors I prioritize when recommending a conical fermenter to fellow brewers.
Material Selection and Durability
Stainless steel lasts decades, resists scratches, and handles temperature swings better than plastic. If you plan to brew for years and want a vessel that can move with you from extract kits to all-grain, stainless is worth the extra cost.
Plastic is safer, lighter, and perfectly adequate for beginners or brewers who do not want to worry about dents. I own both, and I reach for plastic when I need to move the tank and stainless when I want zero oxygen exposure.
Capacity and Batch Size Matching
A 5-gallon batch needs at least a 6.5-gallon fermenter to allow for krausen headspace. The 7.9-gallon Speidel and 8-gallon VEVOR tanks both handle this with room to spare.
If you brew smaller experimental batches, the 2-gallon BrewDemon is ideal. I always tell brewers to buy one size larger than their current batch size, because you will eventually want to brew bigger.
You can ferment a 3-gallon batch in an 8-gallon tank, but you cannot ferment 8 gallons in a 6-gallon tank. Planning ahead saves you from buying a second fermenter six months later.
Pressure Rating and Advanced Features
Pressure fermentation requires a tank rated to at least 10 PSI, preferably 15. The VEVOR pressure model handles this at a mid-range price.
If you want to spund, carbonate naturally, or suppress esters in warm-fermented lagers, pressure capability is non-negotiable. For standard ale fermentations, it is a nice bonus but not essential.
I did not care about pressure ratings until I tried a pressure-fermented lager, and now I consider it for every new fermenter I buy. If you live in a warm climate or lack a fermentation fridge, pressure capability should be high on your list.
Valve Quality and Transfer Options
Look for a dump valve wide enough to pass trub and hops, plus a racking or sampling valve higher on the cone. The Speidel spigot is functional but basic.
The VEVOR dual valves are better, though the bottom valve is small. The Grainfather yeast dump valve is the best of the group, but it comes at a premium.
I also recommend checking whether the valve threads are standard. Proprietary fittings make upgrades and replacements expensive, and you will want the flexibility to add accessories over time.
Cleaning and Long-Term Maintenance
Every conical fermenter needs periodic deep cleaning, but the effort varies by material. Plastic tanks can scratch if you use abrasive pads, so stick to soft cloths and oxygen-based cleaners. Stainless steel tanks handle more aggressive scrubbing, but you still need to disassemble valves and gaskets to prevent mold buildup.
I schedule a deep clean every sixth batch, which involves soaking all removable parts in PBW and inspecting seals for cracks. A five-minute inspection after each batch prevents the kind of infection that ruins months of work. Plan your maintenance routine before you buy, because a neglected fermenter is an expensive mistake regardless of the price tag.
Also think about your water source. Hard water leaves mineral deposits on stainless steel that require vinegar soaks, while plastic tends to stain less but can retain odors from heavily hopped beers. I use a water softener and have had no issues with either material, but it is worth testing your local water before committing to a cleaning routine.
One last tip: do not overlook the height of the tank. A conical fermenter with a dump valve needs clearance underneath for a collection jar or keg.
I once bought a tank that was too tall for my fermentation fridge, and I had to build a custom shelf. Measure twice, then measure again with the legs at their tallest setting.
Frequently Asked Questions
What is the best conical fermenter for homebrewing?
The best conical fermenter depends on your budget and brewing goals. For most homebrewers, the Speidel Plastic Fermenter-30L offers the best overall value with a 4.7-star rating, durable HDPE construction, and a 7.9-gallon capacity. If you prefer stainless steel, the VEVOR Fermentation tank 8 Gallon delivers excellent construction and dual valves at an entry-level price.
What are the key features to look for in a conical fermenter?
Look for a true conical bottom that allows sediment to settle below the drain valve, a sealed lid to prevent oxidation, and a dump valve wide enough to clear trub. Other important features include a pressure rating if you want to spund, a built-in thermometer for temperature monitoring, and handles or legs that make the tank easy to move and clean.
How do stainless steel conical fermenters compare to plastic ones?
Stainless steel fermenters are more durable, easier to sanitize thoroughly, and often support pressure fermentation. They are heavier and more expensive. Plastic fermenters are lightweight, safer to handle, and significantly cheaper, but they can scratch and generally cannot handle pressure. For beginners and brewers on a budget, plastic is a practical choice. For long-term brewers who want professional results, stainless steel is the better investment.
What is the price range for quality conical fermenters?
Quality conical fermenters range from entry-level plastic models to premium stainless steel systems with wireless temperature control. Mid-range stainless steel fermenters with pressure capabilities typically fall between the budget and premium tiers. You can find excellent value in every tier if you match the features to your brewing needs.
Final Thoughts
Choosing the best conical fermenters for your brewery comes down to matching your budget with your brewing ambitions. The Speidel Plastic Fermenter-30L remains my top recommendation for most homebrewers because it is affordable, reliable, and genuinely fun to use.
If you are ready for stainless steel, the VEVOR 8-gallon tank gives you professional materials without the professional price tag. For brewers who want pressure fermentation or wireless control, the VEVOR pressure model and Grainfather bundle both deliver advanced features.
And if you are just starting out, the BrewDemon kit proves that conical fermenters do not have to be intimidating. Whatever you choose, moving to a conical design will simplify your process and improve your beer in 2026.
Remember that the best fermenter is the one you will actually use. An expensive system that sits in a box because it is too intimidating is worth less than an affordable plastic tank that sees action every weekend. Start with what fits your budget and your space, then upgrade when your process demands it.
Happy brewing, and may your trub always settle cleanly.