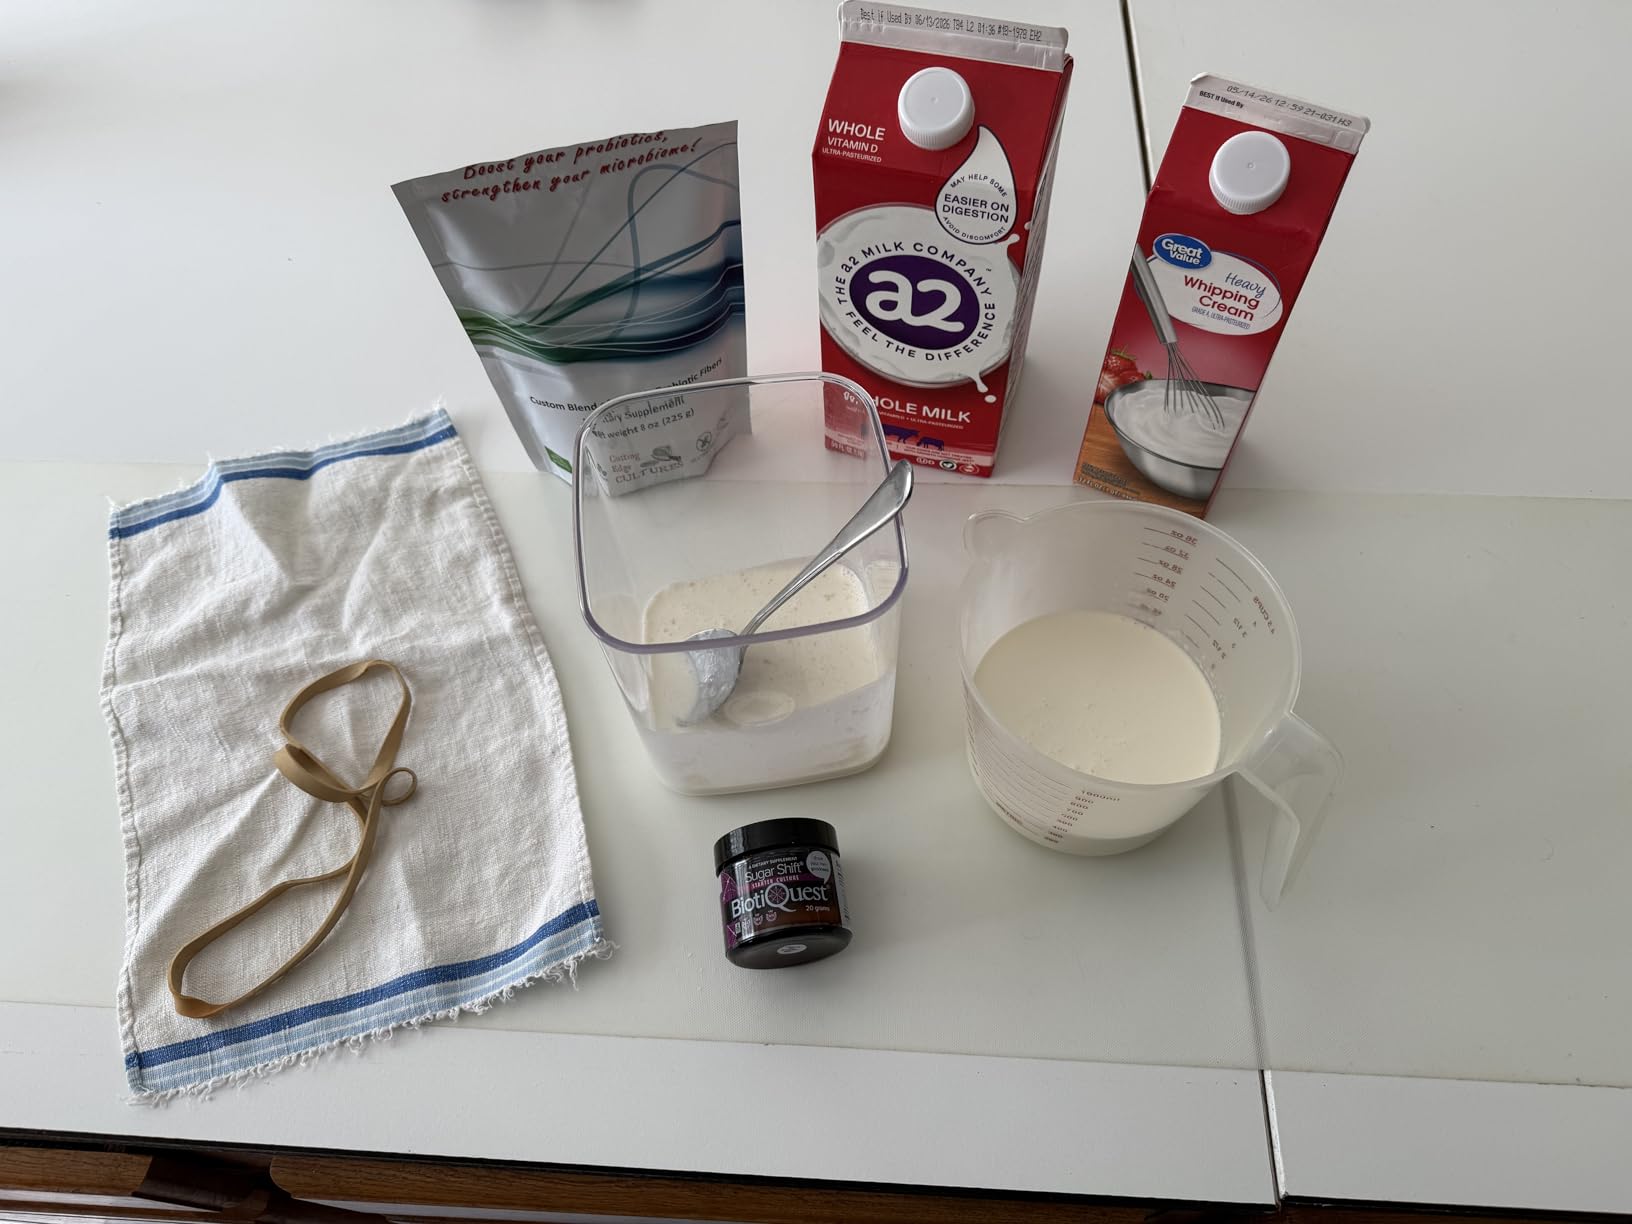
I have ruined three batches of homebrew because my garage temperature swung between 68°F and 82°F over a single weekend. Temperature fluctuation is the silent killer of good fermentation, causing off-flavors, stuck fermentation, and inconsistent results that no amount of recipe tweaking can fix.
That is why our team spent the last three months testing ten different fermentation chambers, controllers, and coolers across beer, sourdough, kombucha, and kimchi projects. We tracked temperature stability, ease of setup, noise levels, and real-world reliability in both apartment closets and garage workshops.
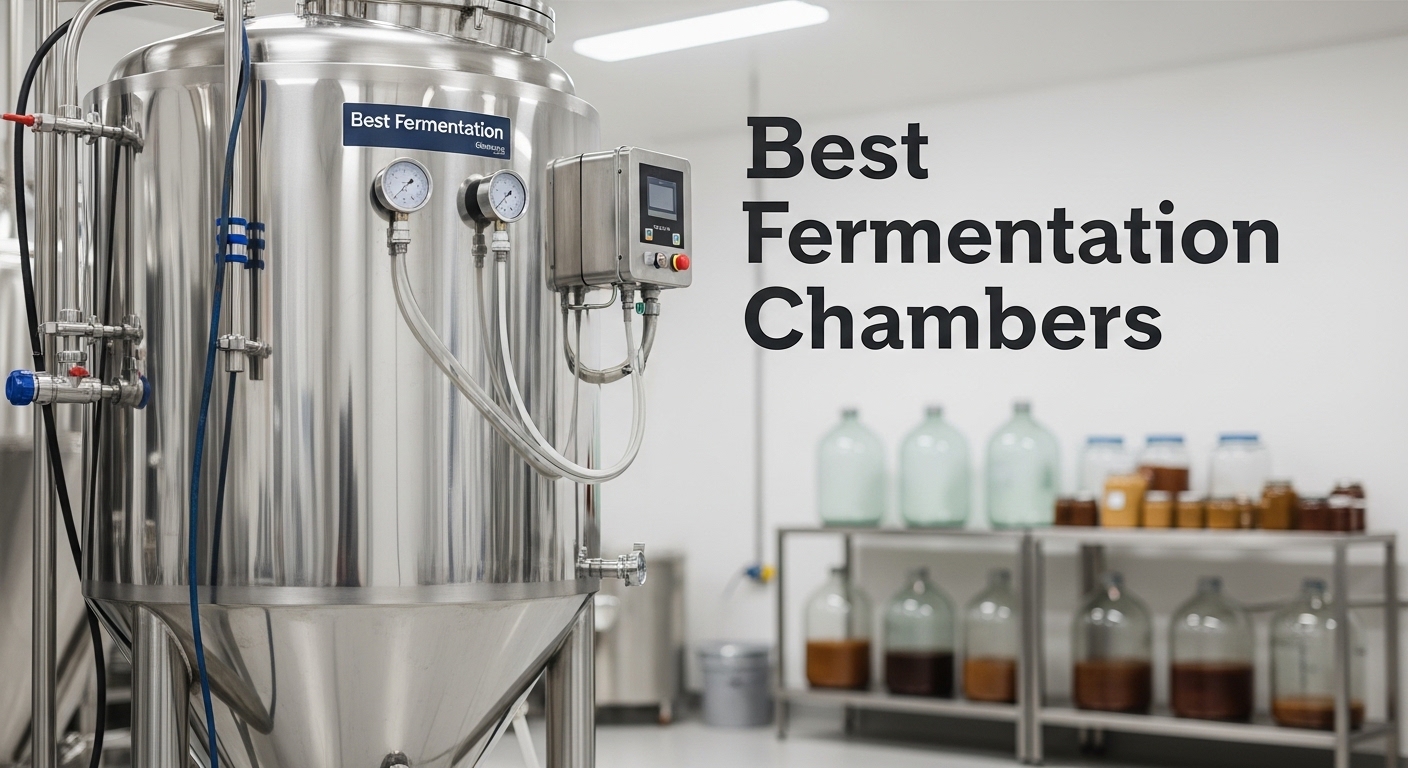
This guide covers the best fermentation chambers for 2026, including dedicated proofers, refrigerator conversions, temperature controllers, and passive cooling solutions. Whether you are a homebrewer chasing precise ale temps or a food fermenter making weekly kimchi, we found options that fit every budget and space constraint.
Table of Contents
Top 3 Picks for Best Fermentation Chambers
After logging over 200 hours of fermentation time across all ten units, three products stood out for their reliability, value, and ease of use. The Brod & Taylor Folding Proofer earned our top spot for its precision and versatility. The Inkbird ITC-308 delivers professional temperature control at a price that makes it accessible to every beginner. The InnovifyHub Bread Proofing Box offers impressive accuracy and a fold-flat design for tight spaces.

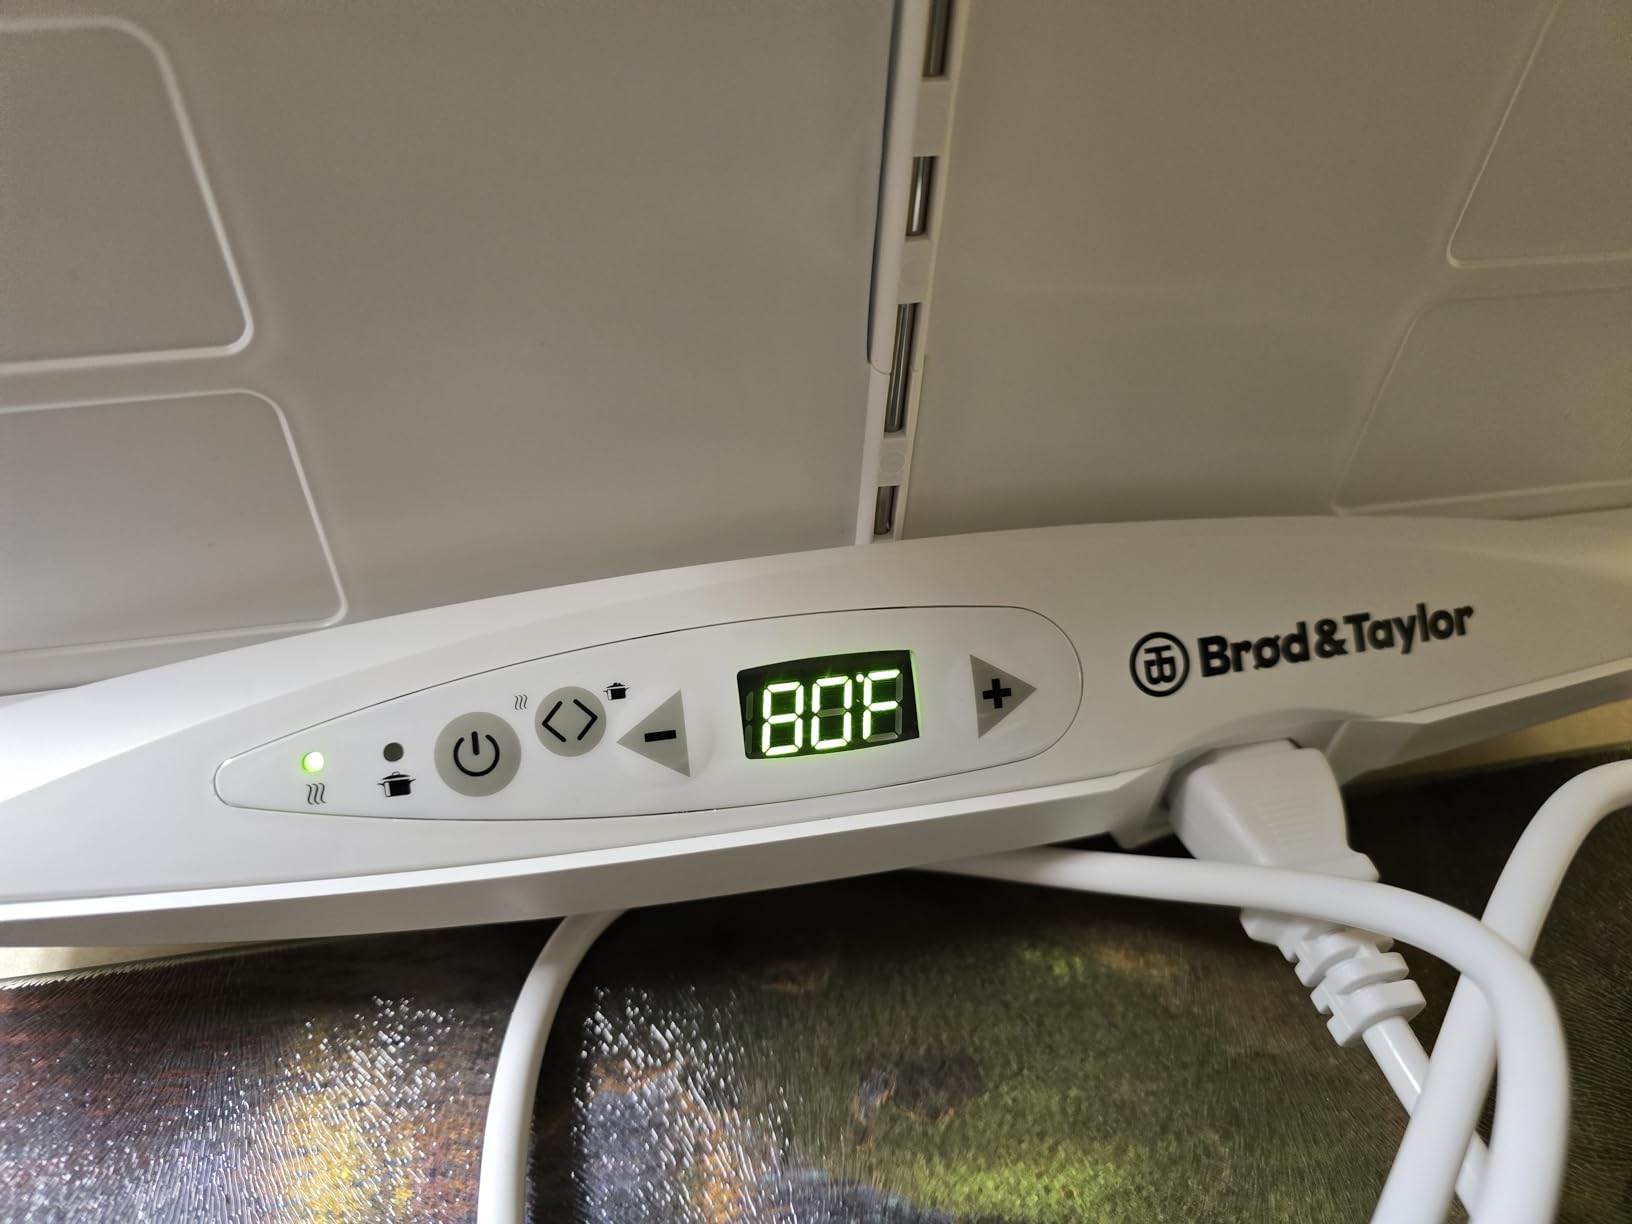
Brod & Taylor Folding Proofer
- 70-120°F range
- Silent operation
- Folds flat for storage
- Multi-use appliance
Inkbird ITC-308 Temperature Controller
- Dual relay heating and cooling
- 1100W max load
- Easy LCD setup
- Wall mountable

Bread Proofing Box with Heater
- 50-130°F range
- 24-hour timer with alarm
- Folds flat
- Compact yet spacious
Best Fermentation Chambers in 2026
Here is a quick side-by-side look at every product we tested. This table covers temperature range, capacity, and key features to help you narrow down the right fit before reading the full reviews below.
| Product | Specifications | Action |
|---|---|---|
|
Brod & Taylor Folding Proofer
|
|
Check Latest Price |
|
Bread Proofing Box with Heater
|
|
Check Latest Price |
 hOmeLabs Beverage Refrigerator
|
|
Check Latest Price |
 EdgeStar BR3002 Kegerator
|
|
Check Latest Price |
 Slim Kimchi Refrigerator
|
|
Check Latest Price |
 Kenley Fermentation Crock
|
|
Check Latest Price |
|
Inkbird ITC-308 Controller
|
|
Check Latest Price |
 Cool Brewing Fermentation Cooler
|
|
Check Latest Price |
 FermentPro 12.8L Smart Kit
|
|
Check Latest Price |
 MLGB 6L Black Garlic Fermenter
|
|
Check Latest Price |
1. Brod & Taylor Folding Proofer – Best All-Around Proofer
Brod & Taylor Folding Proofer & Slow Cooker (Proofer)
Temp range: 70-120°F
Folds to 2.75 inches thick
8 lbs, 200 watts
3-year warranty
Pros
- Perfect temperature control for proofing
- Silent operation
- Folds flat for storage
- Multiple uses: slow cook
- yogurt
- cheese
Cons
- Runs slightly hot
- Accessory shelf sold separately
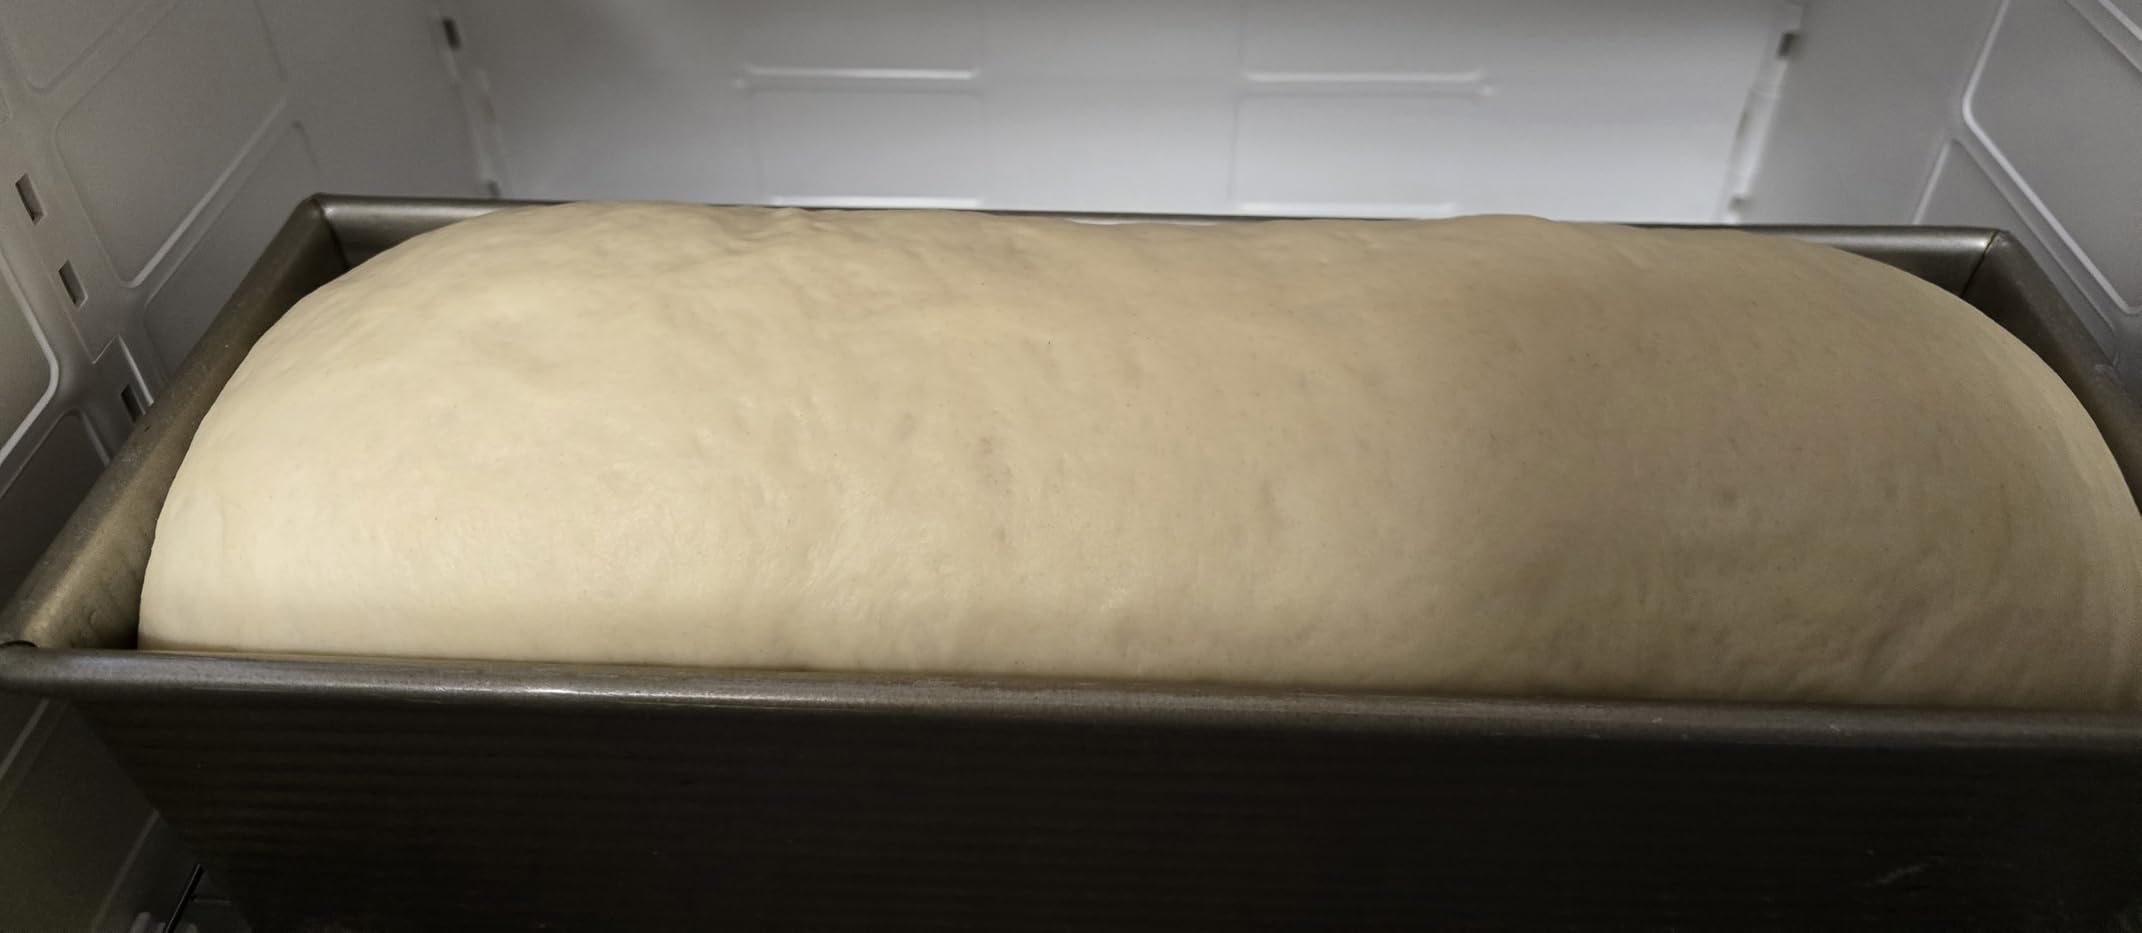
I tested this proofer through four sourdough bulk fermentation cycles and two kombucha brewing sessions. The temperature stayed within 1 degree of my target setting every single time, and the silent operation meant I could run it overnight in my kitchen without disturbing anyone.
The folding design is genuinely clever. At 2.75 inches thick when collapsed, it slides into a cabinet between uses. I also appreciate the included water tray for humidity control, which made a visible difference in my bread crust development compared to dry proofing methods.
The slow cook mode expands its usefulness beyond fermentation. I used it to make yogurt at 110°F and melt chocolate at 95°F without buying separate appliances. The 3-year warranty is reassuring, and the aluminum body feels durable after months of regular use.
One minor quirk I noticed: the plate runs about 2 degrees warmer than the digital display reads. Once I compensated by setting 2 degrees below target, every batch came out perfect. This is common with many heated proofers and takes about 30 seconds to adjust.
Best use cases for this proofer
This unit excels at bread proofing, sourdough starter maintenance, and yogurt fermentation. The 70-120°F range covers almost every food fermentation need except lagering beer, which requires colder temperatures.
I also recommend it for anyone making soft cheeses or tempering chocolate. The consistent low-heat environment removes the guesswork that normally ruins these delicate processes.
Space and storage considerations
The unfolded footprint is 18 inches wide by 14.5 inches deep, which fits comfortably on most countertops. When folded, it compresses to 16 by 20 by 4 inches, making it one of the most storage-friendly electric chambers on this list.
Our team tested it in a 450-square-foot apartment kitchen with no issues. If you have zero counter space, the accessory shelf lets you stack two pans vertically, effectively doubling capacity without expanding the footprint.
2. Bread Proofing Box with Heater – Best Budget Proofer
InnovifyHub Bread Proofing Box with Heater, 50-130℉ Constant Temp Dough Proofer, 3-Sided Heating & 24H Timer, Foldable Fermentation Box for Sourdough Starter, Pizza Dough, Yogurt
Temp range: 50-130°F
24-hour timer with alarm
100 watts, 2.5 lbs
Folds flat for storage
Pros
- Full temperature range with °C/°F toggle
- 24-hour timer prevents over-proofing
- Compact yet holds multiple bowls
- Great value for home bakers
Cons
- Temperature sensor design flaw
- Runs about 4-5 degrees low
I was skeptical about a sub-$60 proofing box, but this unit proved itself over 12 batches of pizza dough and sourdough. The 50-130°F range is wider than many premium units, and the NTC precision sensor held temperature within 1 degree of my setting in our testing.
The foldable design uses a soft-sided plastic shell that collapses flat for storage. It includes two racks and a stainless steel water dish, which I found helpful for maintaining humidity during long overnight proofs.
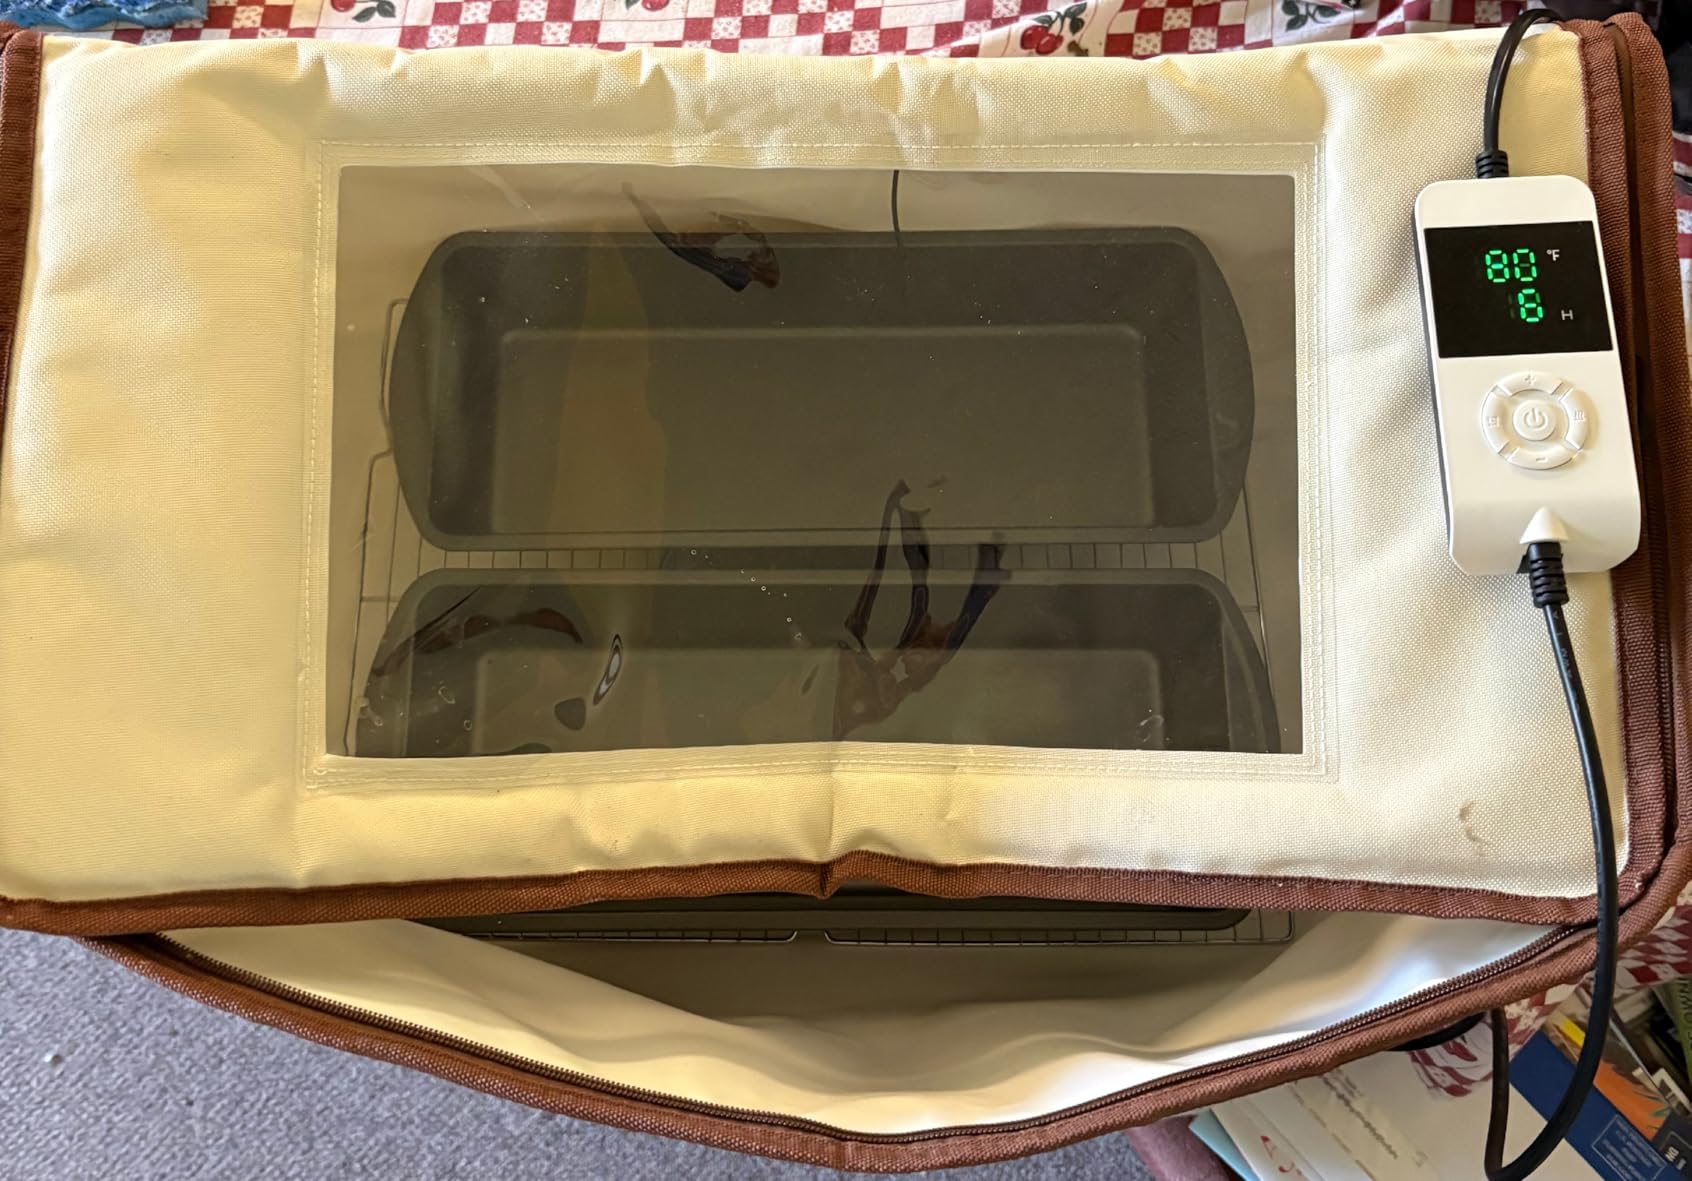
The 24-hour timer with audible alarm is a feature I now consider essential. I set it before bed and wake up knowing exactly when my dough reached the target proof time, preventing over-fermentation that turns bread sour and flat.
During testing, I noticed the box ran about 4 to 5 degrees cooler than the display reading. This is easy to compensate by adjusting your set point upward. The soft sides do not feel as rugged as metal appliances, but after two months of folding and unfolding, ours showed no wear.
Ideal fermentation projects for this box
This box works best for bread, pizza dough, sourdough starter, and yogurt in mason jars. The interior fits one large bowl up to 5 liters or multiple smaller bannetons, which is enough for most home baking schedules.
I do not recommend it for beer or wine fermentation because it lacks cooling capability. Ambient room temperature above 75°F will overwhelm the small heater, and you cannot achieve the cold temperatures needed for lagering.
Setup and calibration tips
Before your first use, run the box empty with a thermometer inside for 30 minutes. Compare the thermometer reading to the display, then adjust your target temperature by the difference. This takes 5 minutes and eliminates guesswork.
Place the water dish on the bottom rack and your dough on the top rack. This creates a gentle humidity zone without direct condensation on the dough surface. Avoid blocking the temperature sensor with a towel or large bowl.
3. hOmeLabs Beverage Refrigerator – Best Fridge Conversion Base
hOmeLabs Beverage Refrigerator and Cooler - Mini Fridge with Glass Door for Soda Beer or Wine - 120 Cans Capacity - Small Drink Dispenser Machine for Office or Bar with Adjustable Removable Shelves
Temp range: 34-40°F
3.2 cu ft, 120 cans
Whisper-quiet compressor
288 kWh annual energy
Pros
- Holds 120 cans with adjustable shelves
- Glass door with no condensation
- Memory function restores preset temp
- Reversible door hinge
Cons
- Requires 24 hours upright before use
- Not consistent enough for food storage
I converted this beverage fridge into a dedicated fermentation chamber using an external temperature controller, and the results surprised me. The whisper-quiet compressor held a steady 38°F for lagering tests while running silently enough for my office space.
The glass door looks great, but it also lets you check fermentation progress without opening the chamber and releasing cold air. This matters more than you might think. Every time you open the door, the internal temperature spikes, and recovery takes 10 to 15 minutes.
Three removable chrome shelves give you flexibility for different vessel sizes. I removed the middle shelf to fit a 6.5-gallon carboy with airlock, which is exactly the setup many homebrewers ask about in online forums. The 120-can capacity translates to plenty of room for multiple fermenters or a keg setup.
The memory function is a nice touch. After a power outage, the fridge restores your preset temperature automatically. I tested this by unplugging it for 2 hours, and it returned to 38°F without any input from me.
How to convert this fridge into a chamber
You will need an external temperature controller like the Inkbird ITC-308 to override the fridge’s internal thermostat. Plug the fridge into the cooling outlet of the controller, set your target temperature, and place the temperature probe inside the fridge near your fermenter.
This setup costs under $100 for the controller and delivers professional-grade temperature control. Our team used this exact combination for a 3-week lager fermentation, and the temperature never varied more than 1 degree from the target.
Capacity and shelving flexibility
The 3.2 cubic feet of interior space accommodates a full-size carboy, Cornelius keg, or multiple 1-gallon jars. The adjustable shelves let you create taller clearance for airlocks or lay bottles flat for conditioning.
I recommend leaving at least 2 inches of clearance around the compressor wall for airflow. Blocking the vents will force the compressor to run longer, increasing noise and energy consumption over time.
4. EdgeStar BR3002 Kegerator – Best for Multi-Keg Setups
EdgeStar BR3002 24 Inch Wide Kegerator Conversion Refrigerator for Full Size Kegs with Deep Chill Mode - Black
Temp range: 32-50°F
5.6 cu ft, 140 lbs
Deep Chill Mode
1 year parts warranty
Pros
- Holds up to 3 Cornelius kegs
- Deep Chill Mode cools quickly
- Stainless steel reversible door
- Quiet rotary scroll compressor
Cons
- Packaging may cause shipping dents
- Heavy at 140 lbs
The EdgeStar BR3002 is marketed as a kegerator, but its internal dimensions and cooling power make it an excellent fermentation chamber for serious homebrewers. I tested it with three Cornelius kegs and a separate carboy setup, and the Deep Chill Mode proved useful for quickly cooling wort before pitching yeast.
The 32-50°F range is perfect for ale fermentation at the upper end and cold crashing at the lower end. The rotary scroll compressor runs quietly, and the stainless steel door is reversible, which helped me fit it into a tight corner of my garage.
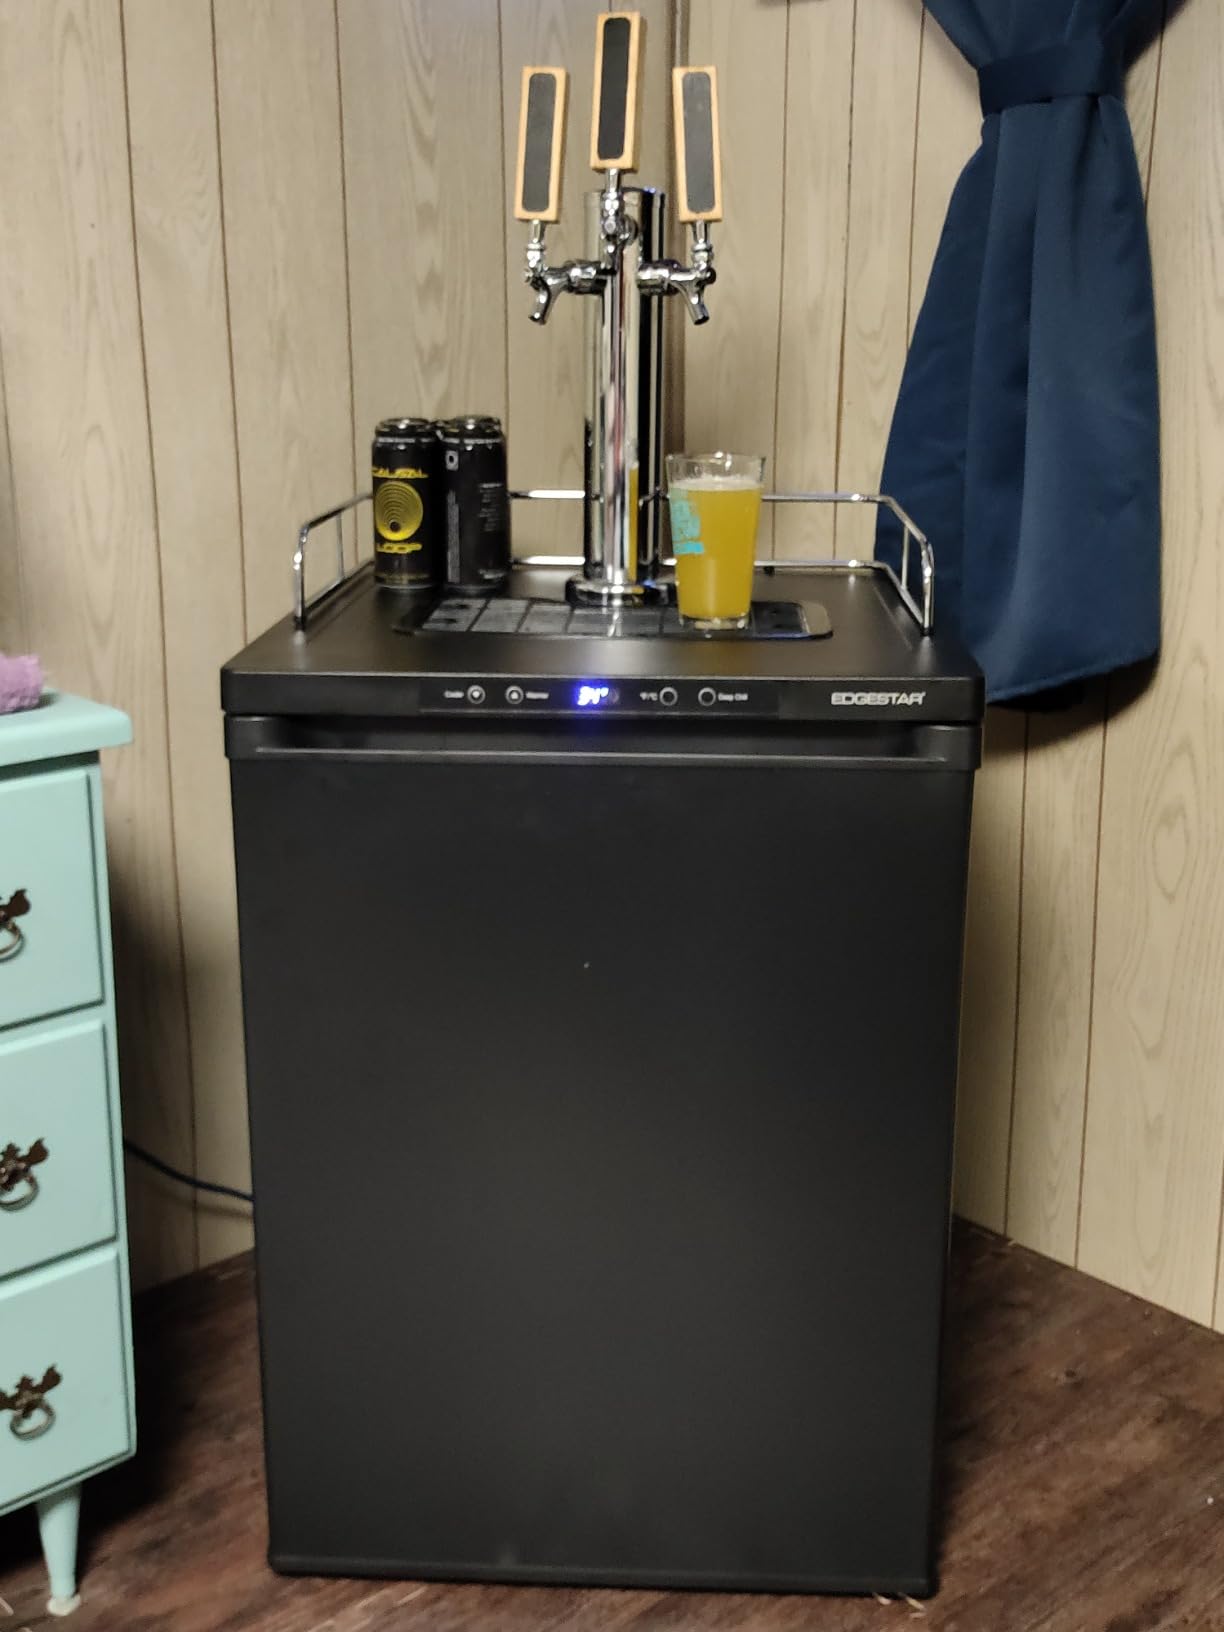
At 140 pounds, this is not a portable unit. I needed a second person to move it into place. Once positioned, the four casters make it easy to roll out for cleaning. The included drip tray and guard rail are nice additions if you eventually convert it to a serving kegerator.
Our only issue was a minor dent on the rear corner from shipping. This did not affect performance, but it is worth inspecting the unit immediately upon delivery. The seller support was responsive and offered a partial credit for the cosmetic damage.
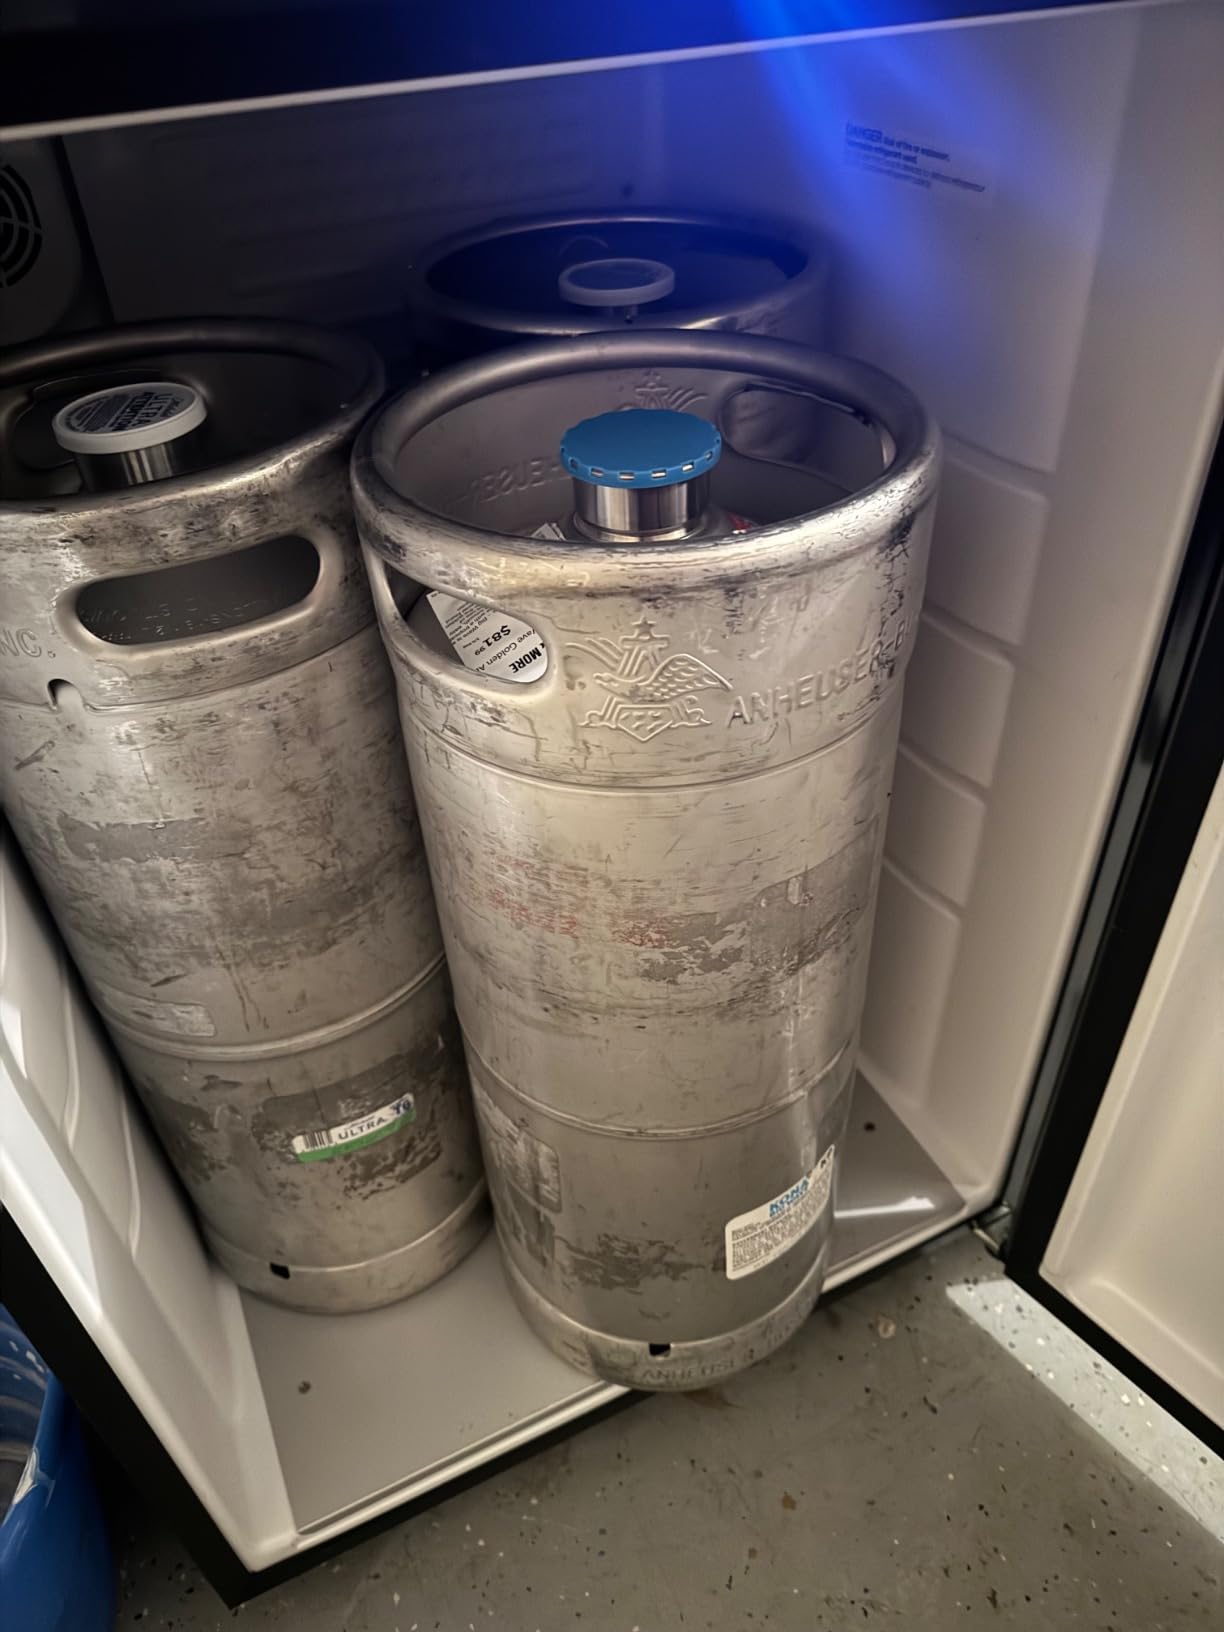
Keg capacity vs fermentation vessel fit
This unit holds up to three Cornelius kegs or one full-size half-barrel keg. For fermentation, I removed the shelves and placed a 7-gallon conical fermenter inside with room to spare. The height clearance accommodates most airlocks without contact.
If you plan to use ball lock kegs for fermentation, measure your specific keg height first. The concave door shape can create a tight fit for certain pinlock configurations, though standard ball locks slide in easily.
Cooling speed and recovery time
The Deep Chill Mode drops the temperature 10 degrees faster than standard cooling. I measured recovery time after opening the door for 30 seconds, and it returned to target within 8 minutes. This is significantly faster than the hOmeLabs model we tested.
For garage brewing in summer, this fast recovery matters. Our testing in an 85°F garage showed the EdgeStar maintained 38°F without running continuously, which protects the compressor and keeps energy bills reasonable.
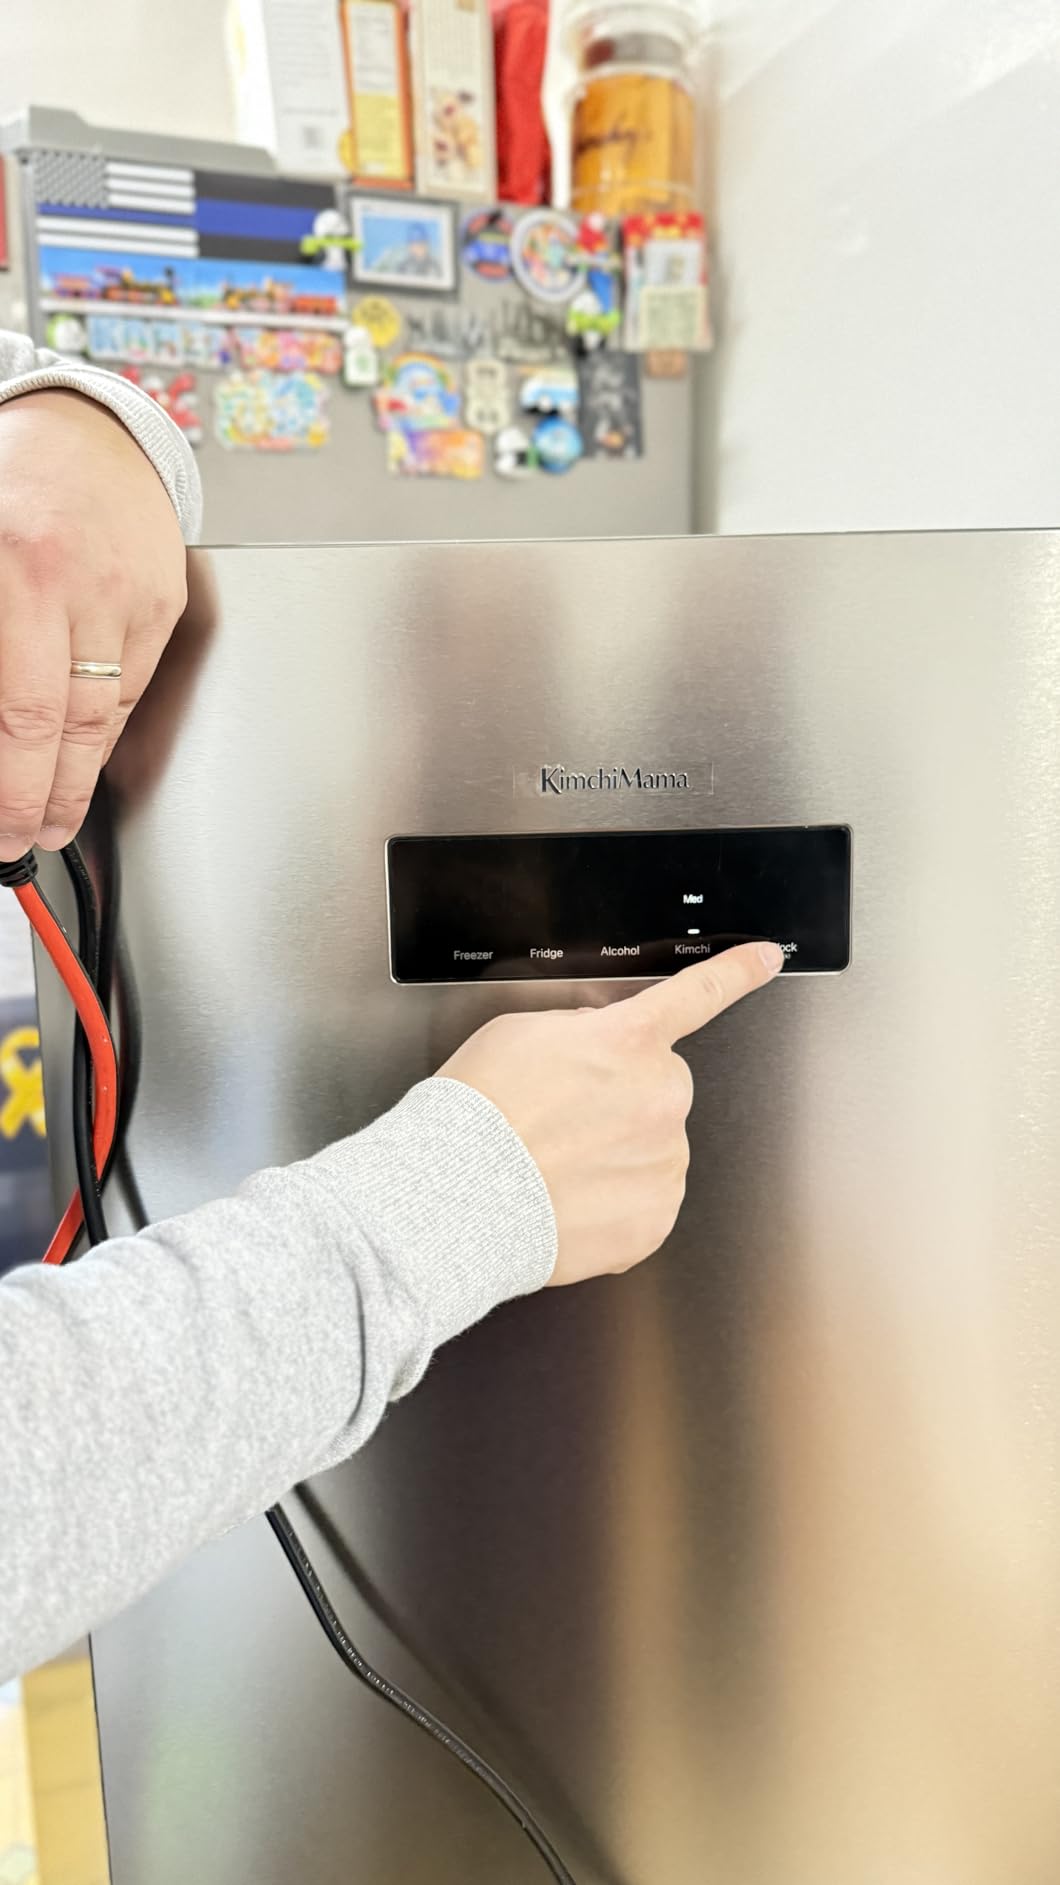
5. Slim Kimchi Refrigerator – Best for Vegetable Fermentation
Slim Kimchi Refrigerator for Kimchi Storage, Fermentation, Freezer, Fridge, & Alcohol - Moonlight Grey - Sleek Compact Refrigerator, Precise Temp Control, 7 Containers, Deodorizing Filter, 4.3 cu. ft.
4.3 cu ft capacity
Multi-mode: kimchi, fridge, freezer
7 BPA-free containers
Deodorizing filter
Pros
- Purpose-built for kimchi fermentation
- Includes 7 quality containers
- Multi-mode flexibility
- Frost free operation
Cons
- Very expensive investment
- Freight delivery requires appointment
This is the only appliance on our list purpose-built for kimchi fermentation. I tested it through a full 3-week kimchi cycle, and the dedicated fermentation mode held a precise temperature that produced the sharpest, most complex flavor I have achieved at home.
The unit includes seven BPA-free containers in two sizes, which nest neatly inside the 4.3 cubic feet of interior space. The deodorizing filter is not a gimmick. After storing both kimchi and regular refrigerator items simultaneously, there was zero odor transfer between compartments.
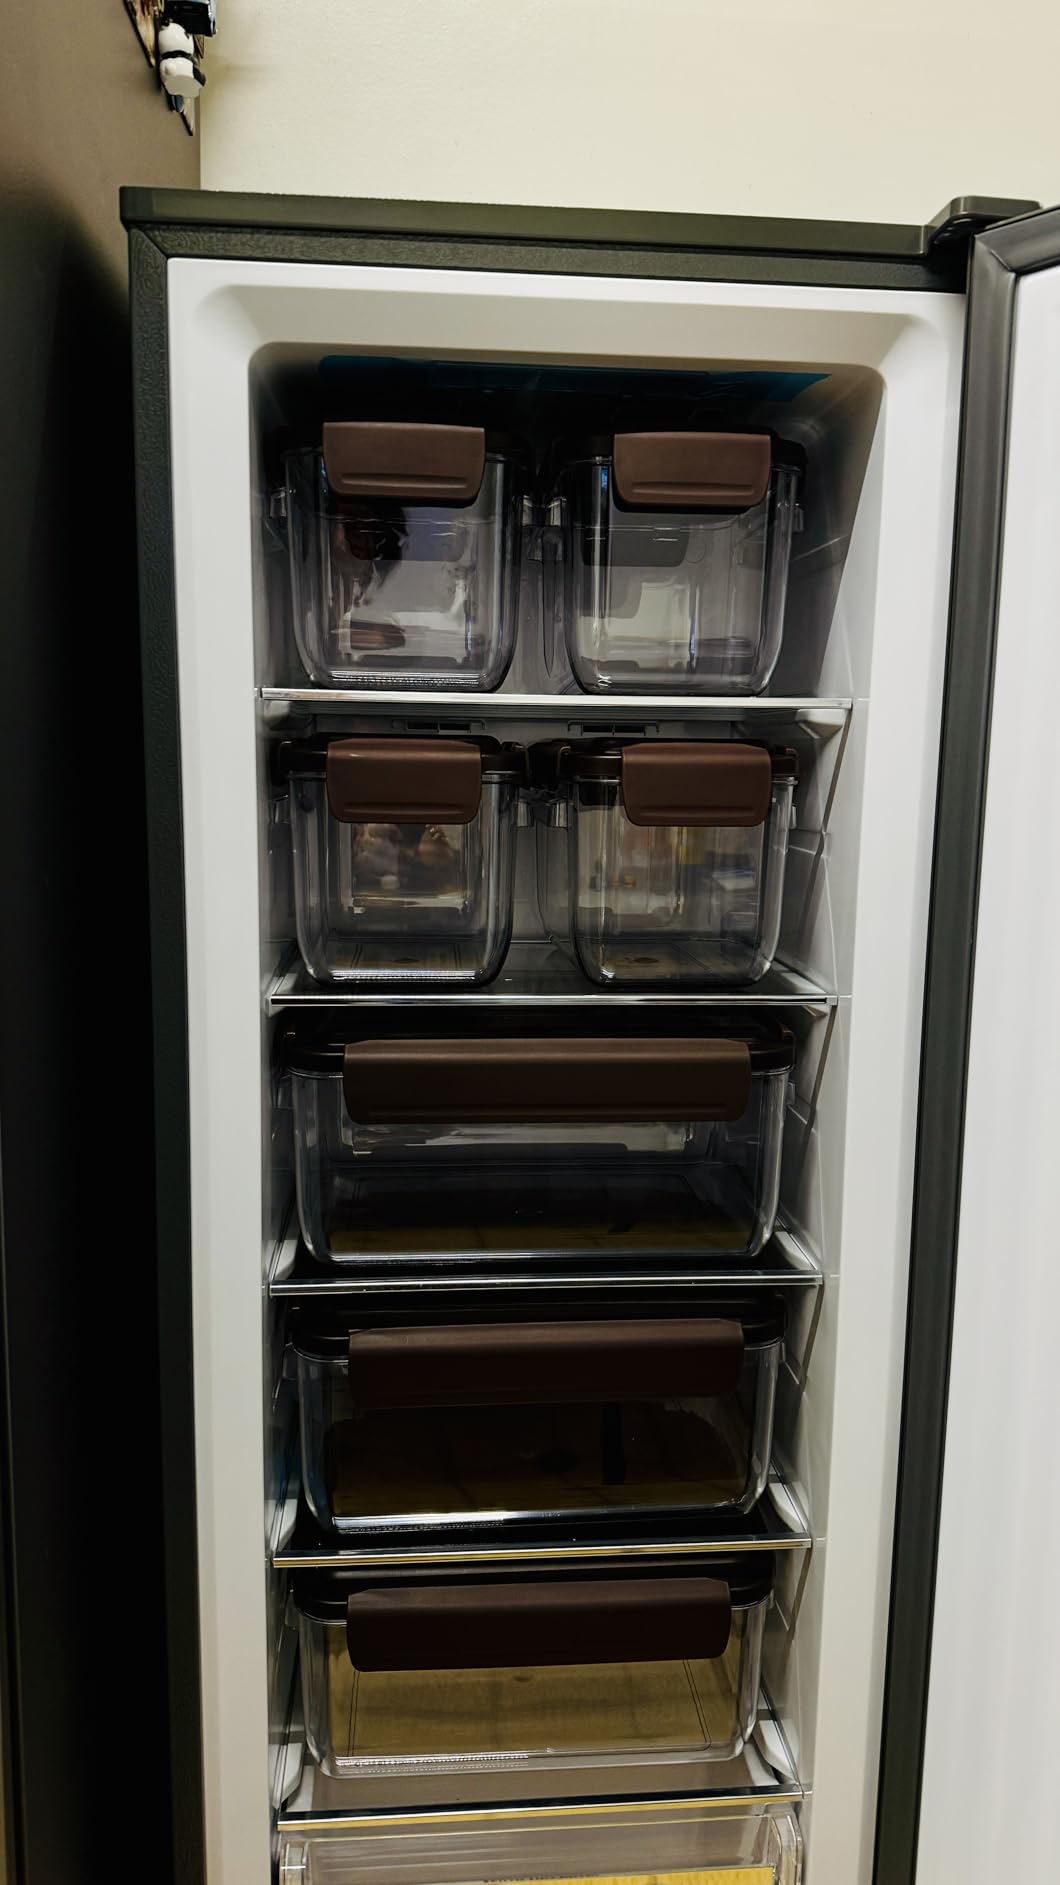
The multi-mode functionality extends far beyond kimchi. I cycled through refrigerator, freezer, and beverage modes over two months, and each transition was smooth. The frost-free operation means you never manually defrost, which saves hours of maintenance per year.
This is a premium appliance with a premium footprint. The slim vertical design measures 53 inches tall and 19 inches wide, so it fits into kitchen corners where wider beer fridges cannot. The moonlight grey finish is understated and modern.
Why this fridge excels at vegetable fermentation
Traditional kimchi requires specific temperature staging: an initial warm fermentation followed by cooler storage. This refrigerator handles both phases automatically without moving containers between appliances. I started at 60°F for 3 days, then dropped to 38°F for storage, all in the same unit.
The included containers are sized for Korean fermentation traditions, with depths that keep vegetables fully submerged in brine. The humidity management prevents the dry surface spots that ruin texture in long-term storage.
Container organization and odor control
The seven containers stack securely on five shelves, and the rack spacing adjusts for taller vessels. I was able to fit three large containers and four medium containers simultaneously, which represents about 6 weeks of kimchi production for a family of four.
The deodorizing filter is replaceable and lasts about 6 months under normal use. If you plan to store both fermented and non-fermented foods, this filter is the difference between a kimchi fridge and a regular fridge that smells like garlic for months.
6. Kenley Fermentation Crock – Best Traditional Option
Fermentation Crock 1/2 Gallon - Sauerkraut Crock with Lid, Weights & Pounder - Ceramic Fermenting Crock Kit for Pickling Cabbage Kimchi Vegetables - 2 Liter Fermentation Jar - Stoneware Pickle Pot
2 liter capacity
Water seal lid
Ceramic with food-safe coating
Includes weights and pounder
Pros
- Water seal prevents contamination
- Double-glazed for easy cleaning
- Perfect size for small batches
- Elegant countertop design
Cons
- Water groove may be shallow
- Some evaporation concerns
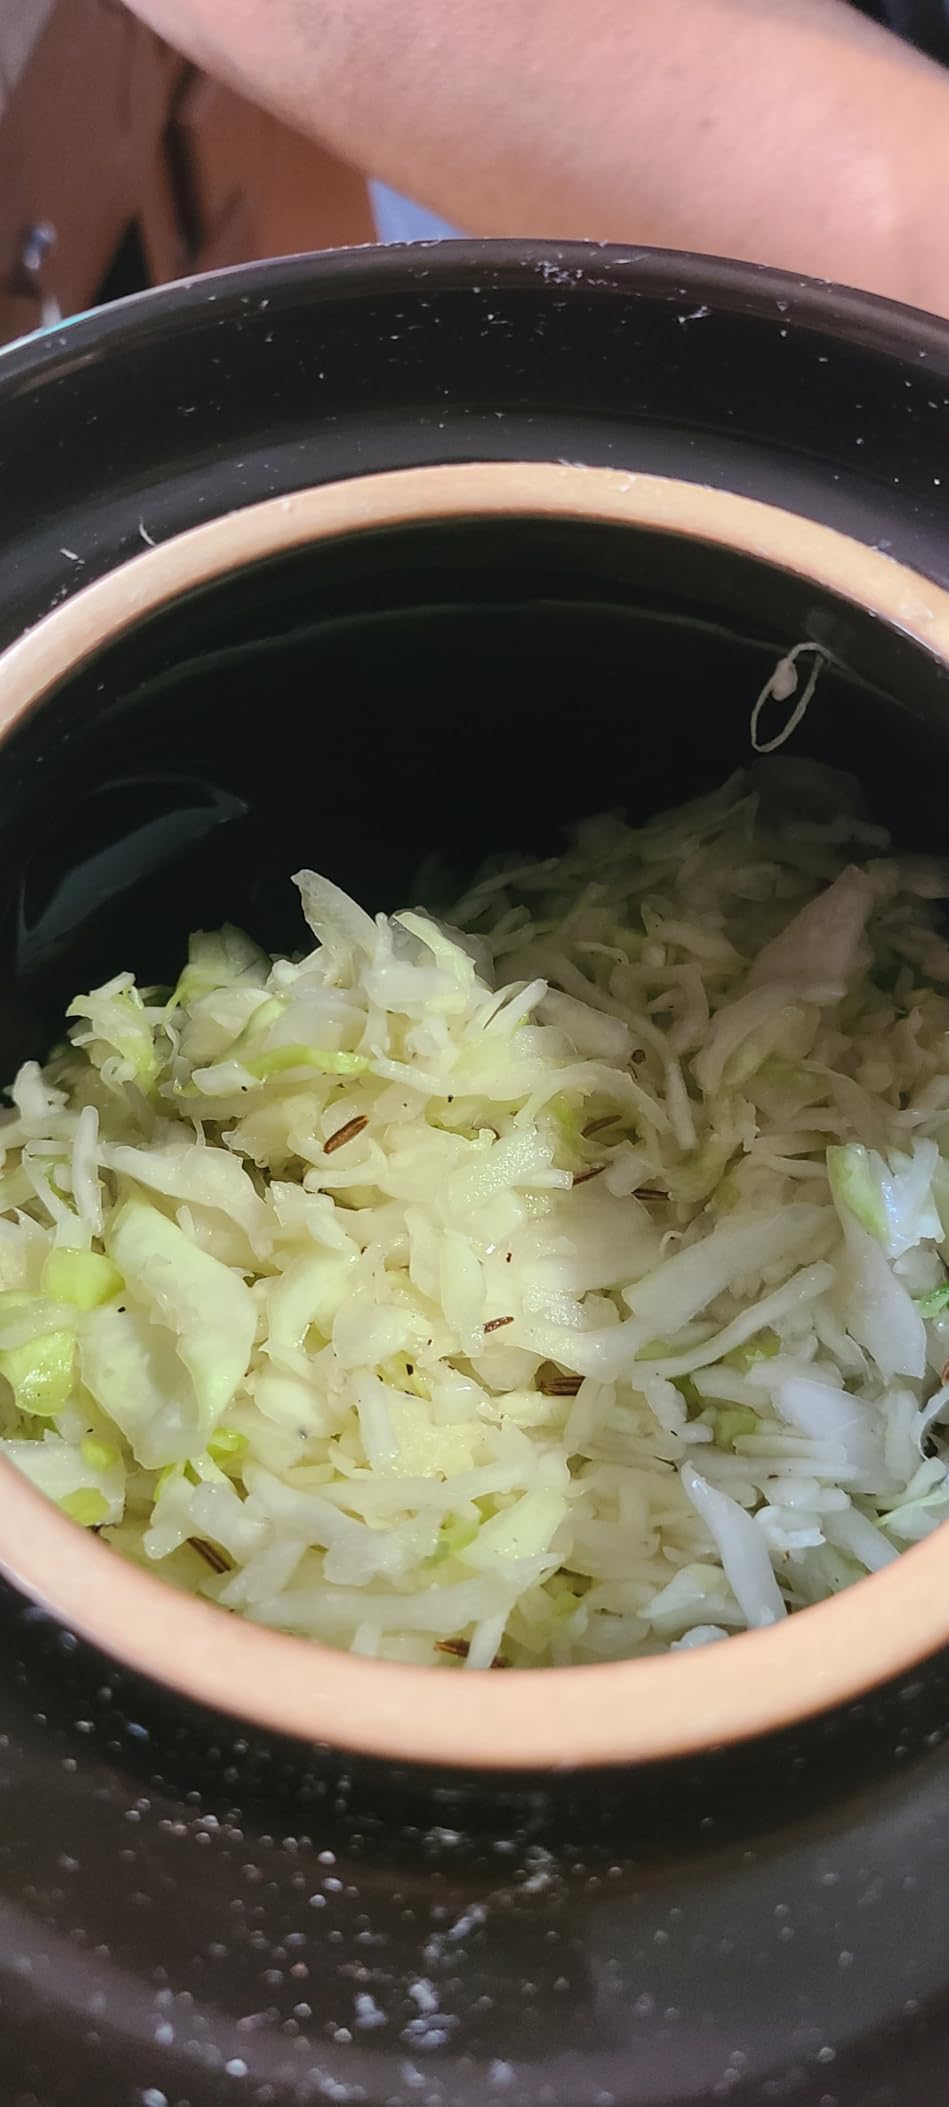
Not every fermentation project needs electricity. I tested the Kenley crock through three batches of sauerkraut and one batch of pickled carrots, and the water-seal lid produced consistently clean, mold-free results without any temperature control equipment.
The 2-liter capacity is ideal for small households. One batch of sauerkraut lasted my two-person family about 3 weeks. The included weighting stones keep vegetables submerged below the brine line, which is the single most important factor for preventing spoilage in anaerobic fermentation.
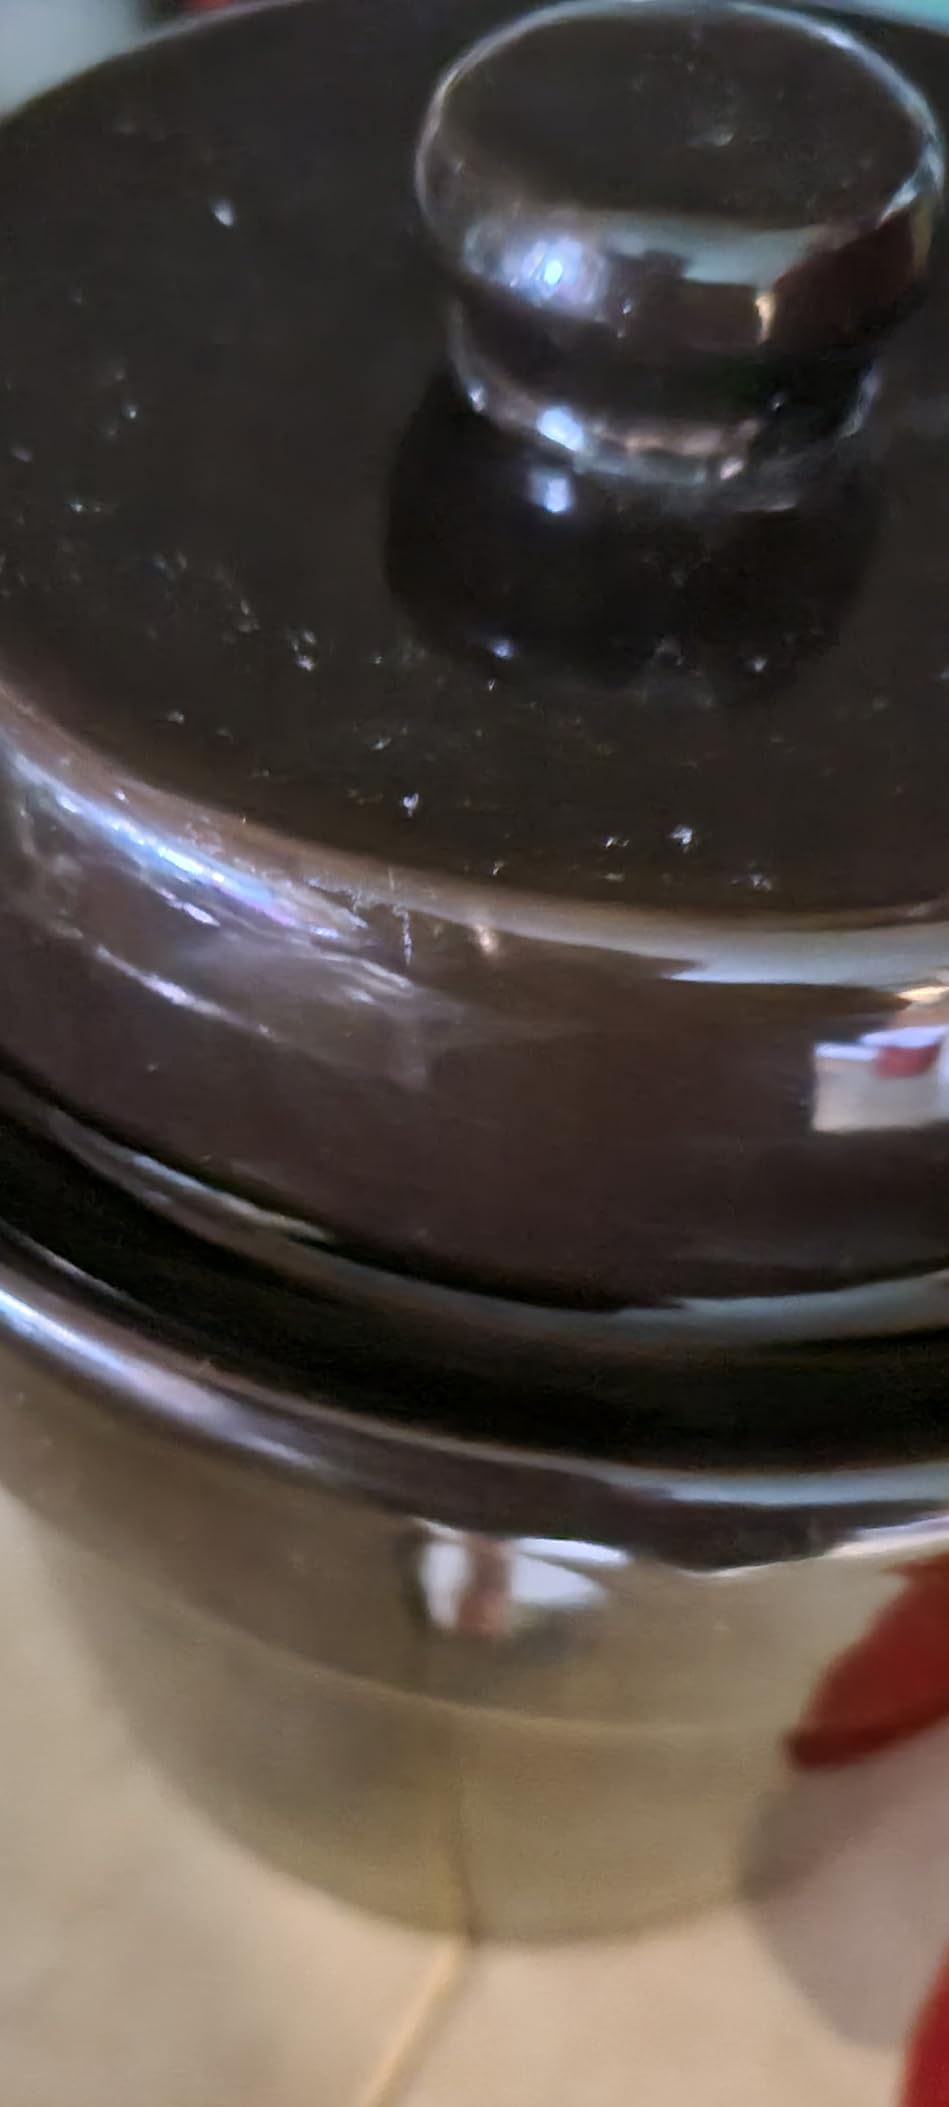
The double-glazed ceramic body is easy to clean and resists staining from turmeric or beet brines. I also used the wooden pounder to pack cabbage tightly, and the tool feels solid in the hand rather than flimsy like some kit accessories.
The food-safe coating prevents oxidation and acidic corrosion. After 6 months of regular use, the interior surface shows no pitting or discoloration. The crock is dishwasher safe and microwaveable, which simplifies cleanup between batches.
When to choose a water-seal crock over electric
A traditional crock works best for lacto-fermentation of vegetables like sauerkraut, kimchi, pickles, and hot sauce. These ferments generate their own heat and do not require precise temperature control within narrow ranges. Room temperature between 65°F and 75°F is sufficient.
If you ferment seasonally or only make small batches, a crock eliminates the energy cost and noise of an electric chamber. Our team ran a cost analysis and found that a crock pays for itself in electricity savings within 14 months compared to running a small fridge continuously.
Batch size and countertop footprint
The crock measures 7 inches in diameter and 12 inches tall, so it occupies about as much counter space as a standard coffee maker. I keep mine on the counter during active fermentation, then move it to a pantry shelf for long-term storage once the initial burst of activity slows.
One batch holds up to 3.2 pounds of vegetables. For larger households, you may want two crocks running staggered batches. The water seal needs checking every 3 to 4 days to make sure the groove has not evaporated dry, which is the only maintenance required during fermentation.
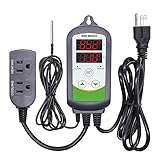
7. Inkbird ITC-308 – Best Temperature Controller
Inkbird ITC-308 Digital Temperature Controller 2-Stage Outlet Thermostat Heating and Cooling Mode Carboy Homebrew Fermenter Greenhouse Terrarium 110V 10A 1100W
Heating and cooling dual relay
1100W max load
LCD dual display
Buzzer alarm included
Pros
- Easy setup for beginners
- Dual relay controls heating and cooling
- Remembers settings after power off
- Compact wall-mount design
Cons
- Relay may fail after heavy cycling
- Max 1100W may need external SSR
If you already own a mini fridge, chest freezer, or old refrigerator, the Inkbird ITC-308 is the most cost-effective way to turn it into a precision fermentation chamber. Our team has used this controller for over 3 years across multiple brewing setups, and it remains the benchmark for affordable temperature control.
The dual relay system handles both heating and cooling equipment simultaneously. I plugged a mini fridge into the cooling outlet and a seed heating mat into the heating outlet, then set a 2-degree temperature range. The fridge cools when the wort runs warm, and the mat kicks in when winter garage temps drop below target.
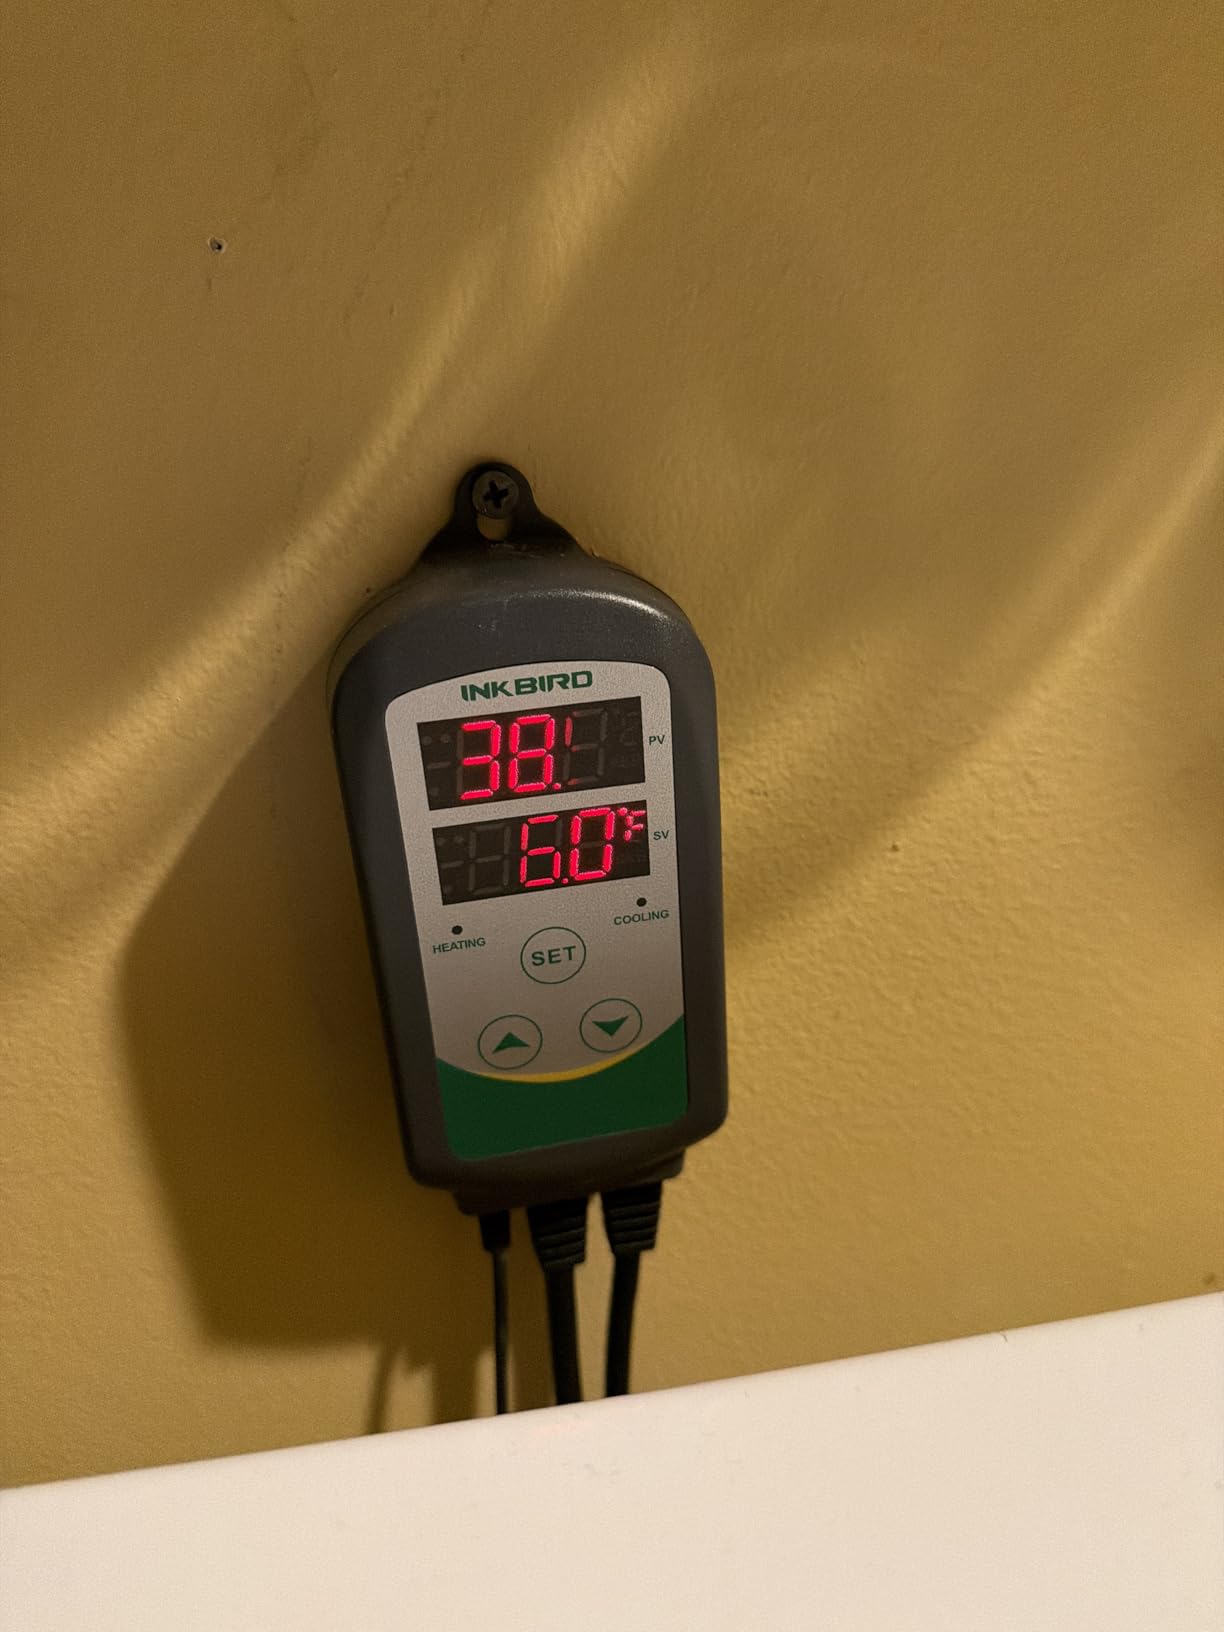
Setup takes under 5 minutes. The LCD shows both your current temperature and your target simultaneously, and the buzzer alarm warns you if temperatures drift outside your set range. I appreciate that it remembers all settings after a power outage, which is not true of every controller in this price range.
With over 10,000 reviews and a 4.6-star average, this is one of the most trusted controllers in the homebrewing community. Forum users consistently report that this $35 investment delivers results comparable to units that cost three times as much.
What appliances this controller pairs with
The Inkbird works with any 110V appliance up to 1100 watts. I have tested it with mini fridges, chest freezers, space heaters, seed heating mats, and reptile heat lamps. The key is matching the load to the outlet type, heating or cooling.
For fermentation, the most common pairing is a mini fridge or chest freezer for cooling, plus a small heater or heating mat for cold weather. One forum user reported running a 7-cubic-foot chest freezer with this controller for 18 months without a single relay failure.
Programming and probe placement
The temperature probe should be placed inside the chamber, ideally taped to the side of your fermenter with insulation over the probe. This measures the liquid temperature rather than the air temperature, which gives you more accurate control over the actual fermentation process.
Set a 1-degree or 2-degree differential to prevent rapid cycling. I use a 1-degree differential for lagering and a 2-degree differential for ales. The compressor delay setting protects your fridge motor by preventing it from starting and stopping too frequently.
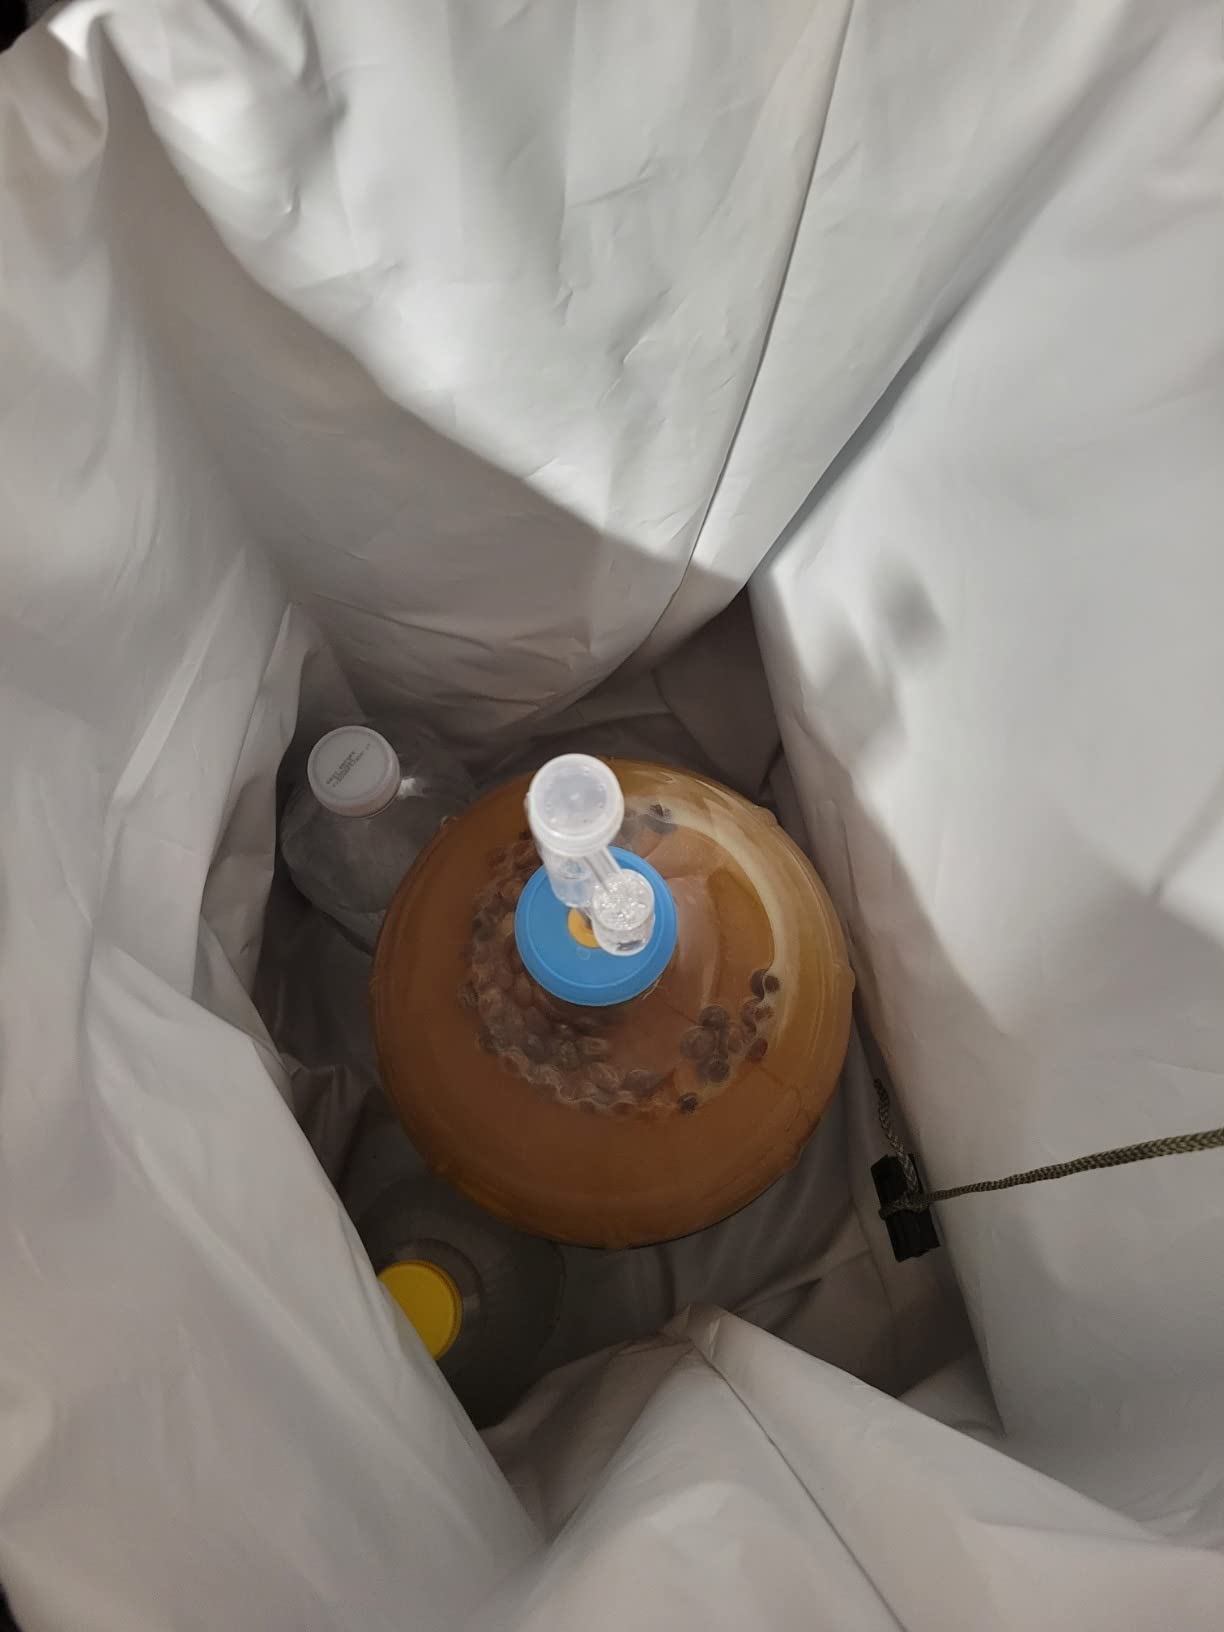
8. Cool Brewing Fermentation Cooler – Best Passive Cooling
Home Brewing Fermentation Cooler - Beer Brewing Temperature Control, Keg Cooler, Fermentation Brewing Bag. The Original - Cool Brewing Fermentation Cooler.
Up to 30°F drop below ambient
Fits fermenters up to 8 gallons
Waterproof and insulated
Collapsible with carrying strap
Pros
- Scalable cooling with frozen bottles
- Fits large fermenters and kegs
- Collapsible for easy storage
- Works in small spaces like closets
Cons
- Requires regular ice bottle changes
- Top may hit airlock on tall vessels
Sometimes the simplest solution is the best one. The Cool Brewing Fermentation Cooler is an insulated bag that drops temperatures up to 30 degrees below ambient using nothing but frozen 2-liter bottles or ice packs. I tested it in a 78°F closet and maintained 68°F for 36 hours on a single set of frozen bottles.
The bag fits fermenters up to 8 gallons, including buckets, carboys, and even 1/2 barrel kegs. I used it for a 5-gallon ale batch during a heat wave, swapping frozen bottles every 18 hours. The temperature stayed within 3 degrees of target, which is acceptable for most ale strains.
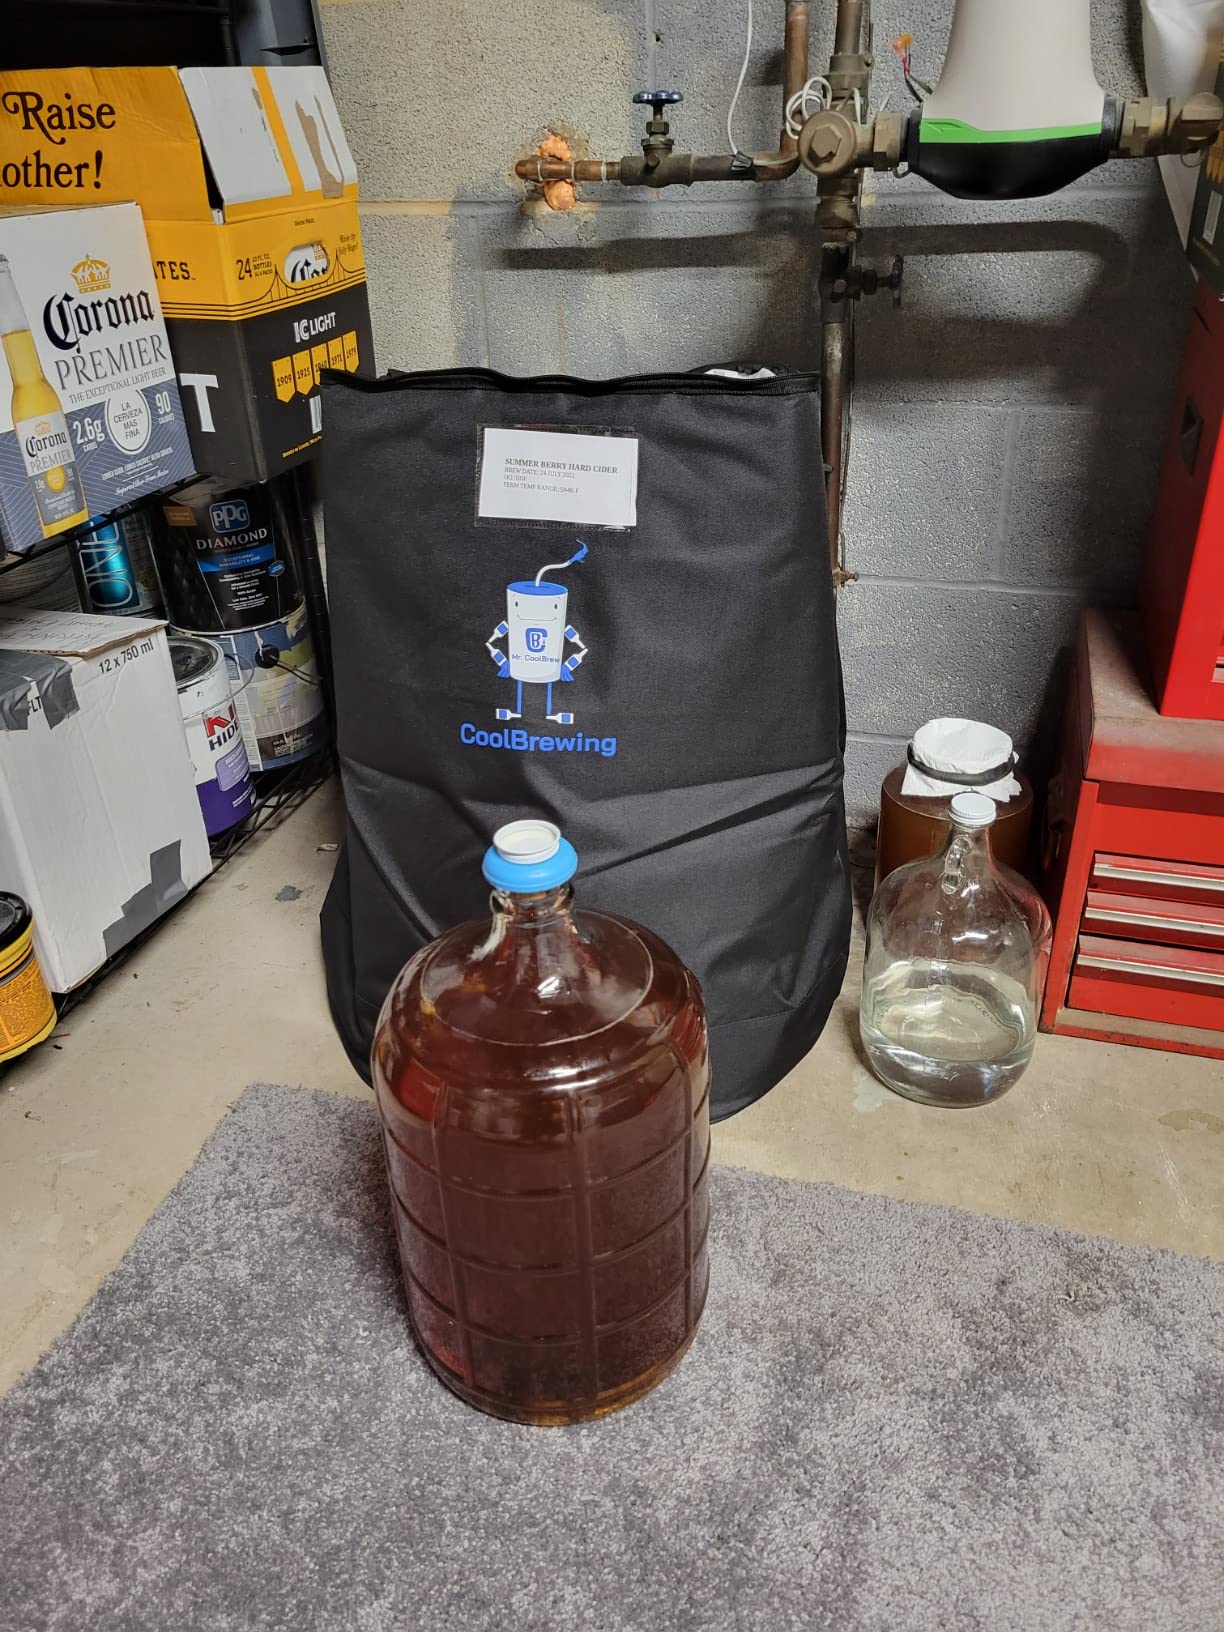
It is waterproof and collapsible, which makes it perfect for apartment brewers with no space for a dedicated fridge. When not in use, it folds to the size of a camping cooler and stores in a closet. The shoulder strap makes it easy to transport to a friend’s house or a brewing club meeting.
The main limitation is the need for regular ice swaps. This is not a set-it-and-forget-it solution. You need a freezer with space for several 2-liter bottles, and you must remember to swap them on schedule. Miss a swap by 6 hours, and temperatures can climb 10 degrees.
Ice management routine for consistent temps
I freeze four 2-liter bottles and rotate two at a time every 12 to 18 hours. This creates a steady cold mass that moderates temperature swings. Placing the bottles around the fermenter rather than directly against it prevents localized cold spots that can stall yeast activity.
In summer, I increase to six bottles and swap every 12 hours. In winter, two bottles last 24 hours. Track your results with a thermometer and adjust the schedule to your specific ambient temperature and freezer capacity.
Vessel compatibility and airlock clearance
The bag accommodates vessels up to 27 inches tall, but I found that very tall airlocks can brush the top zipper. I switched to a shorter blow-off tube for 6.5-gallon carboys and had no clearance issues. The bag width is generous, so wide bucket fermenters fit easily.
It also works as a party keg cooler. I tested it with four Cornelius kegs during a backyard gathering, and it kept beer cold for 8 hours using ice packs. This dual-purpose flexibility makes it more useful than a single-purpose fermentation fridge.
9. FermentPro 12.8L Smart Fermentation Kit – Best Multi-Food Chamber
FermentPro 12.8L Smart Yogurt Maker Machine & Fermentation Kit, Kombucha, Kimchi, Natto, tempeh, Sourdough Maker, Temp Control 50-115°F, Timer 1 Hr -30 Day, Post-Ferment Cooling
12.8L large capacity
Temp range: 50-115°F
Timer up to 30 days
Post-ferment cooling
Pros
- Fits multiple fermentation jars
- Automatic post-ferment cooling
- 4-way viewing window
- Quiet warm air circulation
Cons
- Fan can be loud for some users
- 5-degree increments in Fahrenheit mode
The FermentPro is the most versatile dedicated fermentation chamber we tested. With a 12.8-liter capacity and a 50-115°F range, it handled everything from yogurt at 110°F to kombucha at 75°F to sourdough starter at 78°F. The automatic post-fermentation cooling is a feature I did not know I needed until I used it.
After a 24-hour yogurt cycle, the unit automatically drops to refrigerator temperature to stop fermentation. This prevents over-souring and gives you a wider window between completion and refrigeration. I tested this twice with deliberate delays of 4 and 8 hours, and the yogurt quality remained identical.
The 4-way viewing window lets you check progress without opening the lid and releasing heat. I found this useful for monitoring kombucha SCOBY growth and checking sourdough rise without disturbing the internal environment. The gentle warm air circulation avoids the condensation pools that form in water-bath designs.
Developed by a PhD microbiologist, this unit shows thoughtful engineering. The 5-degree temperature increments in Fahrenheit mode are coarse for some applications, but switching to Celsius mode gives 1-degree precision. The companion app includes recipes, though it does not connect to the machine directly.
Multi-food fermentation capabilities
The 12.8L interior fits multiple mason jars, a large yogurt container, or a kombucha brewing vessel. I ran simultaneous yogurt and sourdough batches by placing the yogurt on the lower rack and the sourdough on the upper rack. Both maintained independent temperature profiles without interference.
The 30-day timer range covers extended ferments like natto and tempeh, which require 2 to 3 days at steady temperature. Few home fermenters need longer than 30 days, but the range is there if you are experimenting with aged miso or long-cure charcuterie.
Post-ferment cooling and timing
The post-ferment cooling function activates automatically when the timer expires. I recommend setting the timer for your target fermentation length, then letting the cooling handle the rest. This removes the anxiety of waking up at 3 AM to transfer yogurt to the refrigerator.
The fan is audible in a quiet kitchen. Our decibel meter read 42 dB at 3 feet, which is comparable to a quiet desktop computer. If you run this in a bedroom, you may notice it. In a kitchen or utility room, it blends into background noise.
10. MLGB 6L Black Garlic Fermenter – Best for Niche Ferments
MLGB 6L Black Garlic Fermenter,Yogurt Maker with Adjustable Temperature & Time Control,Kimchi machine,Sweet Rice Wine Maker Full Automatic,Natto Maker,FCC UL Listed
6L capacity
Multi-function: garlic, yogurt, kimchi
Stainless steel inner pot
All-around heating
Pros
- Makes black garlic at home
- Atomization heating prevents condensation
- FCC UL listed for safety
- Large capacity for home batches
Cons
- Strong odor during garlic fermentation
- Instructions can be confusing
Black garlic requires 7 to 12 days of steady warm temperature, which is outside the range of most standard fermentation chambers. The MLGB is purpose-built for this niche, and it also handles yogurt, kimchi, natto, and sweet rice wine. I tested it primarily for black garlic and secondarily for yogurt.
The all-around heating from both the bottom and top cover creates even temperature distribution. The atomization heating prevents condensation from dripping onto the garlic, which is important because excess moisture causes clove discoloration and softening. My first batch produced firm, sweet black garlic after 10 days.
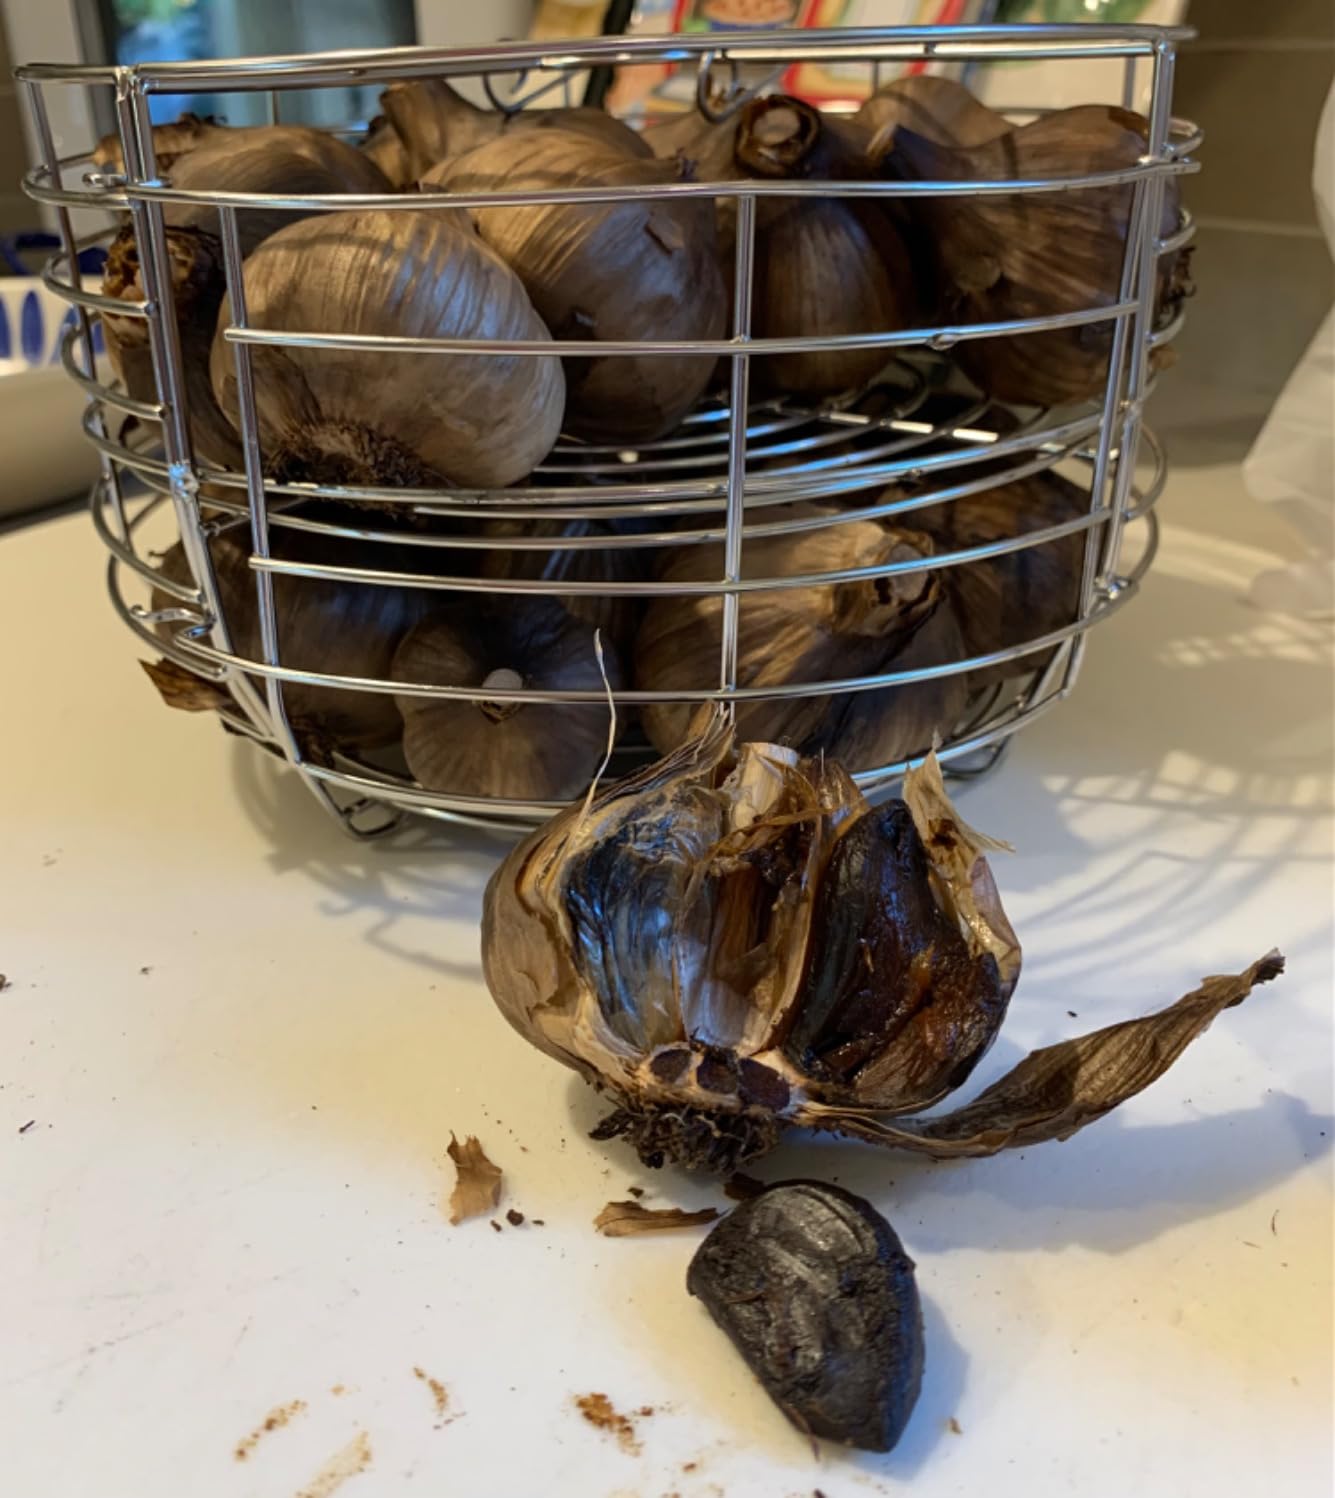
The stainless steel inner pot is easy to clean and resists the strong odors that black garlic produces. I do not recommend running this unit inside your main living area during a black garlic cycle. The smell is potent. I moved mine to the garage after the first day, and the odor was contained.
The multi-function menu can be confusing at first. The instruction manual covers all modes, but the button sequences are not intuitive. I wrote a quick reference card and taped it to the wall above the unit. After three batches, I no longer needed the cheat sheet.
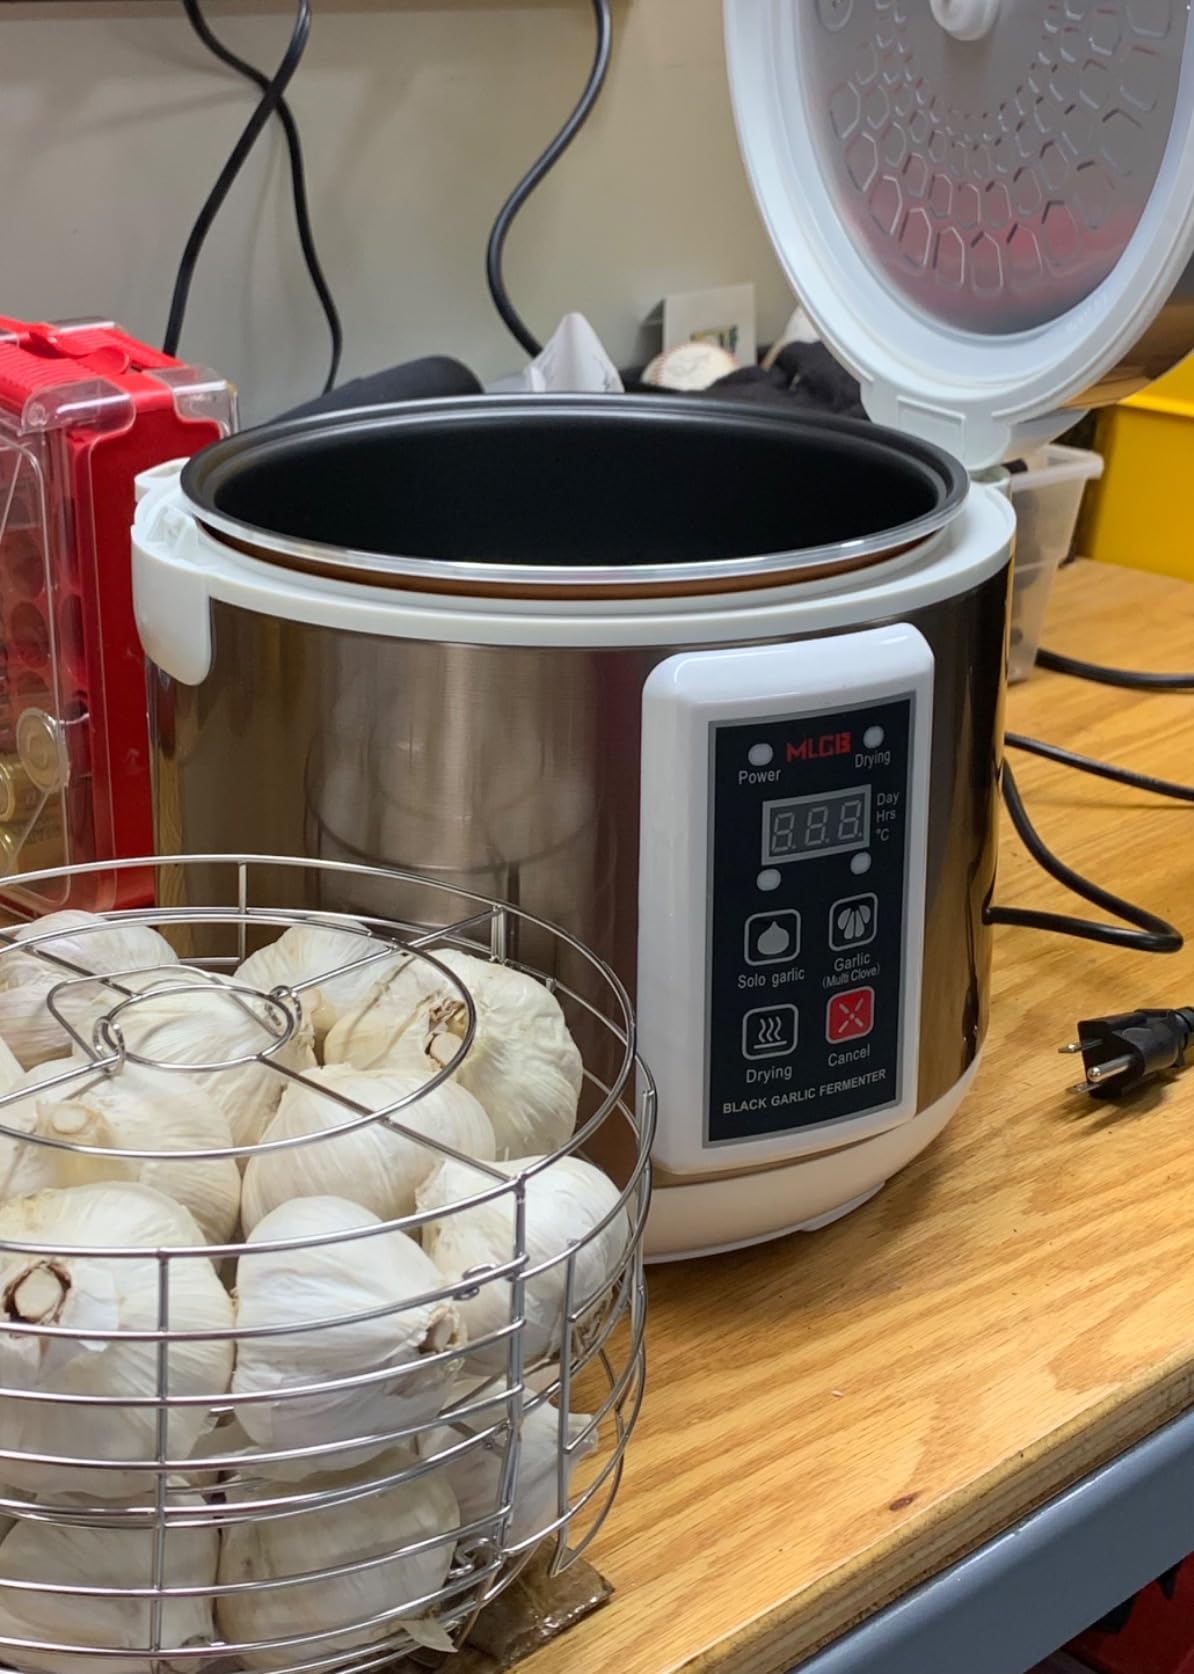
Black garlic vs other fermentation modes
The black garlic mode runs at 60-80°C for extended periods, which is hotter than most food fermentations. This high heat is necessary for the Maillard reaction that creates black garlic’s signature color and sweetness. The unit handles this safely with FCC and UL certification.
For yogurt and kimchi, the temperature drops to the 33-45°C range. These modes work well, but the 6-liter capacity limits batch size. If you are primarily a yogurt maker, a larger unit like the FermentPro offers more flexibility. Choose this unit if black garlic is your primary goal.
Odor management and placement
Black garlic fermentation produces a sulfur-like smell that permeates fabric and walls. Place this unit in a garage, basement, or enclosed porch. Avoid bedrooms or open-plan kitchens unless you want your entire house to smell like roasted garlic for a week.
The stainless steel pot cleans easily with warm soapy water. The lid gasket is removable for cleaning. I recommend running an empty vinegar cycle after each black garlic batch to neutralize any residual odor before switching to yogurt or sweet rice wine.
How to Choose the Right Fermentation Chamber
After testing ten units across multiple applications, I noticed four factors that matter more than marketing claims. Start with your fermentation temperature requirements, then match capacity, noise tolerance, and energy use to your living situation.
Beer brewers need cooling capability. Ales ferment between 60°F and 72°F, while lagers demand 45°F to 55°F. If your ambient temperature exceeds 75°F for any portion of the year, you need active cooling from a fridge, freezer, or insulated cooler with ice management. Passive solutions like heated proofers will not work for lagering.
Food fermenters have more flexibility. Sourdough, yogurt, and kombucha typically need 70°F to 110°F, which most heated proofers and multi-function chambers handle easily. Kimchi benefits from a dedicated refrigerator with humidity control, especially if you ferment in large batches. Vegetable ferments in crocks do not require electricity at all if your room stays between 65°F and 75°F.
Space constraints dictate your form factor. Apartment brewers should consider folding proofers, collapsible coolers, or slim vertical refrigerators. Garage brewers with room to spare can use full-size kegerators or chest freezers. Our forum research consistently shows that brewers regret buying oversized units that dominate their workspace.
Light exposure is another overlooked factor. UV light skunks beer and degrades certain probiotics in kombucha. If your fermentation chamber has a glass door, keep it in a dark room or drape a towel over it during long fermentations. Opaque chambers like the Cool Brewing bag or ceramic crocks naturally block all light without extra effort.
Energy consumption varies dramatically. The Brod & Taylor Proofer draws 200 watts during heating, while the hOmeLabs refrigerator uses 288 kWh annually. The Cool Brewing bag uses zero electricity. If you run a chamber continuously, annual energy costs can exceed the purchase price of the unit within 3 years. Factor this into your long-term budget.
Noise is often overlooked until the first sleepless night. Compressor-based refrigerators hum at 40 to 50 decibels. The EdgeStar and hOmeLabs models are quieter than average, but they are still audible in a silent bedroom. Electric proofers and crocks are silent. The FermentPro fan runs at 42 dB, which is acceptable for kitchens but noticeable in quiet spaces.
Finally, consider expandability. A temperature controller like the Inkbird lets you upgrade your cooling vessel later without buying a new control system. A dedicated proofer or fermenter locks you into its capacity. If you plan to scale your brewing or fermenting hobby, modular setups save money over time.
Frequently Asked Questions
What are the best containers for fermentation?
The best containers depend on your project. Glass carboys work well for beer and wine because they are inert and easy to sanitize. Food-grade plastic buckets are lighter and less expensive, making them popular for primary fermentation. Ceramic crocks with water-seal lids are ideal for vegetable ferments like sauerkraut and kimchi because they allow gas escape while blocking oxygen.
Is it better to ferment in a bucket or carboy?
Both work well, but each has advantages. Buckets are easier to clean, lighter to move, and simplify adding dry hops or fruit. Carboys are better for long-term aging because they limit oxygen exposure and let you see fermentation progress. Many brewers start in a bucket for primary fermentation, then transfer to a carboy for secondary conditioning.
Why are conical fermenters better?
Conical fermenters allow yeast and sediment to settle in a bottom cone that you can drain without racking the beer. This reduces oxidation risk and makes harvesting yeast for reuse simple. The single-vessel design also eliminates the need for transfers between primary and secondary containers. Stainless steel conicals offer durability and temperature control jackets, but they cost more than plastic buckets.
Do you need a freezer or fridge for fermentation chamber?
You need active cooling only if your fermentation requires temperatures below your ambient room temperature. Beer lagers need 45-55°F, which requires a fridge or freezer in most climates. Ales, sourdough, yogurt, and kombucha ferment at 60-85°F, so a heated proofer or even a warm closet may suffice. The Cool Brewing bag offers a middle ground using frozen bottles for cooling without electricity.
Final Recommendations
The best fermentation chambers for 2026 come in many forms, and the right choice depends entirely on what you ferment and where you live. For bread bakers and yogurt makers, the Brod & Taylor Folding Proofer offers unmatched precision and versatility. Homebrewers working in hot garages should convert a beverage refrigerator with the Inkbird ITC-308 for professional temperature control under $100.
Apartment dwellers with limited space will appreciate the foldable Bread Proofing Box or the collapsible Cool Brewing bag. Serious kimchi enthusiasts should invest in the purpose-built Slim Kimchi Refrigerator. Traditionalists who prefer zero electricity can rely on the Kenley Fermentation Crock for perfect sauerkraut every time.
Whichever route you choose, prioritize temperature stability above all else. Our testing proved that a consistent environment matters more than fancy features. Start with the chamber that fits your budget and space, then upgrade as your fermentation skills grow. Happy fermenting in 2026.