Trading in sideways markets can feel like watching paint dry. Prices chop back and forth, trending strategies fail repeatedly, and you start questioning whether there is any way to profit when nothing seems to move. I spent my first two years of options trading exactly this way, fighting the market instead of working with it. That changed when I discovered the iron condor strategy, a method designed specifically for neutral, range-bound conditions that has become a staple in my trading toolbox for 2026.
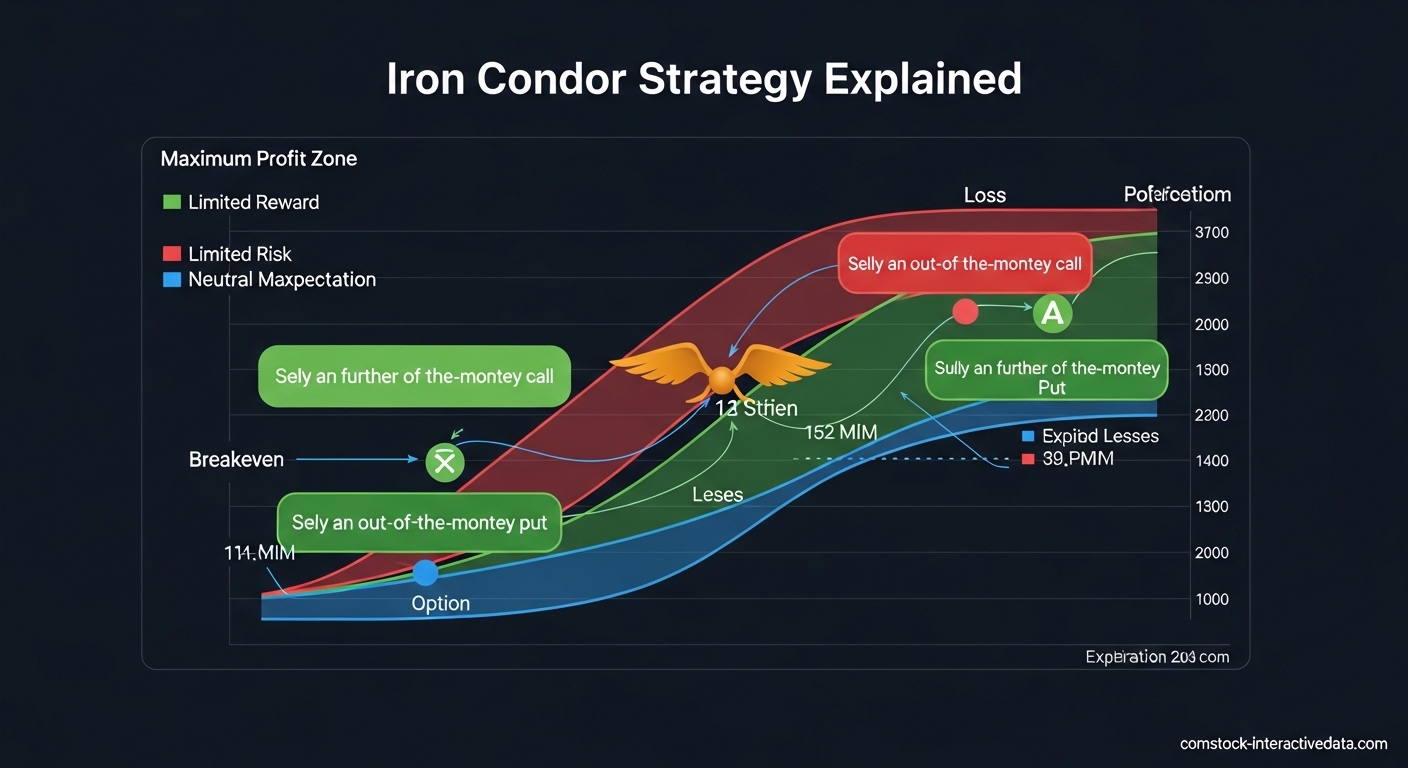
An iron condor is a four-leg options strategy that combines a bull put spread and a bear call spread to create a profit zone where the underlying asset can fluctuate without causing losses. You collect premium upfront by selling out-of-the-money options while buying further out-of-the-money options as protection, creating defined risk and limited profit potential. When constructed properly, iron condors offer a 70-80% probability of profit depending on how wide you set your strikes and the implied volatility environment.
This guide covers everything I have learned from trading hundreds of iron condors across different market conditions. We will break down the mechanics, calculate exact profit and loss scenarios, explore when to use this strategy, and discuss the risk management rules that keep your account safe. Whether you are new to options or looking to add a neutral strategy to your arsenal, this complete guide will give you the knowledge to trade iron condors with confidence.
Table of Contents
What Is an Iron Condor?
An iron condor is a multi-leg options strategy that profits when the underlying stock or index trades within a specific price range through expiration. The strategy combines two credit spreads: a bull put spread below the current market price and a bear call spread above it. You receive a net credit when you open the position, and that credit represents your maximum potential profit.
The iron condor gets its name from the shape of the profit and loss diagram. The body of the condor is your profit zone between the two short strikes, while the wings represent your long option protection that limits potential losses. This structure offers a unique advantage: you know your exact maximum profit and maximum loss before you ever click the submit button.
Each iron condor contains four individual options contracts with different strike prices. All contracts share the same expiration date and the same underlying security. You are essentially betting that the stock will stay between two price boundaries, and you get paid upfront for taking that risk.
The Four Legs Explained 2026
Understanding each component of the iron condor is essential before you start trading live capital. The four legs work together to create your profit zone while defining your risk parameters. Let me break down exactly what each leg does.
Leg 1: Sell an Out-of-the-Money Put
The first leg involves selling a put option with a strike price below the current market price of the underlying. This short put generates premium income and creates the lower boundary of your profit zone. If the stock stays above this strike through expiration, this leg expires worthless and you keep the full premium.
The short put is the income generator on the downside. You want the stock to stay above this strike so the put expires worthless. The strike selection here determines your probability of success on the lower end.
Leg 2: Buy a Further Out-of-the-Money Put
The second leg is your protection. You buy a put option with a strike price even lower than your short put. This long put limits your downside risk if the stock drops significantly. The difference between your short put strike and long put strike is called the width of the put spread or the lower wing.
Without this protective long put, your risk would be substantial if the underlying dropped sharply. The long put ensures your maximum loss is capped at the width of the spread minus the net credit received.
Leg 3: Sell an Out-of-the-Money Call
The third leg mirrors the put side but on the upside. You sell a call option with a strike price above the current market price. This short call generates additional premium and creates the upper boundary of your profit zone. If the stock stays below this strike through expiration, this leg expires worthless and you keep the premium.
Your short call strike and short put strike together form the body of your condor. The distance between these two strikes is your profit zone where maximum gain occurs.
Leg 4: Buy a Further Out-of-the-Money Call
The fourth leg provides upside protection. You buy a call option with a strike price higher than your short call strike. This long call limits your losses if the stock rallies strongly. The difference between your short call strike and long call strike is the width of the call spread or the upper wing.
When you combine all four legs, you have limited risk in both directions. Your maximum loss cannot exceed the wing width minus the net credit collected when you entered the trade.
How Iron Condors Work?
The iron condor profits from time decay and a contraction in implied volatility while the underlying stays within a defined range. You are essentially acting as an insurance company, collecting premiums from buyers who want protection against large moves. As time passes and the stock stays relatively flat, the value of the options you sold decreases, allowing you to buy them back at a lower price or let them expire worthless.
Picture a price chart with your short put strike near the bottom and your short call strike near the top. The area between these two lines is your profit zone. If the underlying price finishes anywhere within this zone at expiration, all four legs expire worthless and you keep the entire net credit received when you opened the position. This makes iron condors particularly attractive during periods of low volatility when large moves are less likely.
The strategy benefits from theta decay, which accelerates as expiration approaches. Options lose value fastest in the final 30 days before expiration, which is why most iron condor traders target the 30-45 days to expiration (DTE) range. You want to be in the trade long enough to capture meaningful time decay but not so long that you expose yourself to unexpected events.
Profit Potential and Maximum Profit
Your maximum profit with an iron condor is limited to the net credit you receive when opening the position. This credit is the sum of the premiums collected from selling the short put and short call minus the cost of buying the protective long put and long call. If the underlying stock closes between your two short strikes at expiration, all options expire worthless and you realize this maximum profit.
Let me illustrate with a practical example. Suppose XYZ stock trades at $100. You sell a $95 put for $1.50, buy a $90 put for $0.50, sell a $105 call for $1.50, and buy a $110 call for $0.50. Your net credit is $2.00 per share, or $200 per contract. If XYZ stays between $95 and $105 through expiration, you keep the full $200. This represents your maximum possible gain on the trade.
Maximum profit occurs regardless of where the stock finishes within the profit zone. Whether it closes at $96, $100, or $104, your result is identical. This is different from directional strategies where your profit varies based on how far the stock moved in your favor.
Risk Parameters and Maximum Loss
The defining characteristic of an iron condor is defined risk. You know your maximum loss before entering the trade, which makes position sizing straightforward and eliminates the possibility of catastrophic blowups from gap moves. Your maximum loss equals the width of either spread minus the net credit received.
Using our previous example, the put spread width is $5 ($95 short put minus $90 long put). The call spread width is also $5 ($110 long call minus $105 short call). With a $2.00 net credit, your maximum risk is $3.00 per share, or $300 per contract. This occurs if the underlying finishes below your long put strike or above your long call strike at expiration.
The defined risk feature is what attracts many traders to iron condors over undefined risk strategies like naked puts or strangles. Even in a worst-case scenario, such as a company buyout announcement or earnings surprise, your loss cannot exceed the calculated maximum. This allows for sound sleep and rational decision-making throughout the trade.
Probability of profit typically ranges from 70-80% for standard iron condor constructions. This high win rate appeals to income-oriented traders, though it is important to remember that your average winner will be smaller than your average loser. Successful iron condor trading requires managing many small wins against occasional larger losses.
Breakeven Points Calculation
Every iron condor has two breakeven points: one below the current price and one above. The underlying must stay between these two points for the trade to be profitable at expiration. Understanding how to calculate these levels helps you assess whether the trade fits your market outlook and risk tolerance.
The lower breakeven equals your short put strike minus the net credit received. In our XYZ example with a $95 short put and $2.00 net credit, the lower breakeven is $93. If XYZ closes at $93 at expiration, the $95 put you sold is worth $2.00, exactly offsetting your collected premium. Any price below $93 produces a loss.
The upper breakeven equals your short call strike plus the net credit received. With a $105 short call and $2.00 credit, the upper breakeven is $107. If XYZ closes at $107, the $105 call you sold is worth $2.00, again offsetting your initial credit. Any price above $107 produces a loss.
Your profit zone extends from $93 to $107 in this example, giving the stock a $14 range to fluctuate while still achieving profitability. This wide profit zone is one reason iron condors are popular for neutral market outlooks.
When to Use Iron Condors?
Iron condors excel in specific market conditions and should be avoided in others. The ideal environment features low implied volatility, sideways price action, and minimal expectation of large catalysts. Understanding when to deploy this strategy separates successful traders from those who struggle with consistent losses.
Ideal Market Conditions
Low implied volatility environments produce smaller credits but higher probability of success. When IV rank is below 30, options are relatively cheap, and the market is not pricing in large moves. These conditions favor iron condors because the actual moves tend to stay within expected ranges.
Range-bound markets with clear support and resistance levels provide visual confirmation for where to place your short strikes. If a stock has traded between $80 and $100 for three months, you have reasonable evidence that an iron condor positioned outside this range has a good chance of success.
High implied volatility environments actually produce larger credits but require caution. While the extra premium is tempting, elevated IV often precedes significant moves. If you sell iron condors when VIX is above 30, understand that gap risk increases substantially.
When to Avoid Iron Condors?
Avoid trading iron condors immediately before earnings announcements. Stocks can move 10-20% overnight on earnings surprises, easily blowing through both legs of your condor. Wait until after earnings volatility subsides, or move your strikes much further away to account for the expected move.
Trending markets punish iron condor traders. When a stock breaks out to new highs or breaks down to new lows with momentum, the probability of staying within a range drops dramatically. Use technical analysis to identify trending conditions and switch to directional strategies instead.
Low liquidity situations create problems with wide bid-ask spreads and difficulty exiting positions. Only trade iron condors on underlying securities with substantial open interest and daily volume. Major index ETFs like SPY, QQQ, and IWM are popular choices for this reason.
Strike Selection Guide
Selecting appropriate strikes determines your probability of success, risk-reward ratio, and overall trade characteristics. There are two primary methods for choosing where to place your short strikes: delta-based selection and expected move positioning.
Delta-Based Selection
Many experienced traders use delta as a proxy for probability. The delta of an option roughly approximates the probability of that option expiring in-the-money. A 0.16 delta option has approximately a 16% chance of finishing ITM, meaning an 84% probability of expiring worthless.
For iron condors, selecting short strikes with 0.16 to 0.20 delta on both sides creates a position with approximately 70-80% probability of profit. Lower deltas mean higher probability but lower credits. Higher deltas increase premium but reduce win rates.
My personal approach targets the 0.16-0.18 delta range for short strikes. This provides a reasonable credit while maintaining a high probability of success. I adjust based on overall portfolio exposure and current volatility conditions.
Expected Move Method
The expected move calculation provides another framework for strike selection. By positioning your short strikes outside the expected move, you align your trade with market expectations for the magnitude of price movement through expiration.
To calculate expected move, multiply the stock price by the implied volatility (as a decimal) by the square root of days to expiration divided by 365. For a $100 stock with 20% IV and 30 days to expiration: $100 × 0.20 × √(30/365) = $100 × 0.20 × 0.287 = $5.74 expected move.
In this example, placing your short put strike around $94 and short call strike around $106 positions you just outside the expected one standard deviation move. This approach provides statistical backing for your strike selection rather than arbitrary choices.
Expected Move Calculation
The expected move formula gives traders a quantitative framework for understanding how far a stock might reasonably move over a specific time period. This calculation is essential for iron condor traders because it helps position short strikes outside the range where the market expects the underlying to trade.
The formula is: Expected Move = Stock Price × Implied Volatility × √(Days to Expiration / 365)
Let me walk through a detailed example. Suppose you are analyzing an iron condor on SPY, which currently trades at $500. The implied volatility for the 30-day options is 16%. First, convert IV to a decimal: 0.16. Then calculate the square root of days to expiration divided by 365: √(30/365) = √0.082 = 0.287. Now multiply all factors: $500 × 0.16 × 0.287 = $22.96 expected move.
This calculation suggests SPY has a 68% probability of staying within a range of $477.04 to $522.96 over the next 30 days (one standard deviation). Positioning your iron condor short strikes outside this range, perhaps at $475 and $525, gives you a statistical edge based on market pricing.
Many brokers display the expected move directly on their options chains, saving you the calculation. However, understanding the math helps you verify broker data and adjust for your specific trade parameters. The expected move changes daily as the underlying price and implied volatility fluctuate.
Time Frame and DTE Recommendations
The ideal time frame for iron condors balances time decay acceleration against gamma risk exposure. Most successful iron condor traders target the 30-45 days to expiration range as the sweet spot for this strategy.
Time decay, represented by the Greek letter theta, accelerates as expiration approaches. Options lose value slowly when they have months remaining but lose value rapidly in the final 30 days. By entering iron condors with 30-45 DTE, you capture this acceleration while still having time to manage the position if needed.
Trades with less than 21 DTE experience extreme gamma risk. Gamma measures how much delta changes as the underlying price moves. Near expiration, gamma spikes dramatically, meaning small price moves cause large changes in your position value. This can turn a winning trade into a loser overnight as expiration approaches.
Avoid 0DTE (zero days to expiration) iron condors unless you are an experienced trader with specific expertise in same-day expiration management. While the premiums can be attractive, the risk of large losses from even small adverse moves is substantial. Build experience with longer-dated trades first.
Position Sizing Rules
Proper position sizing separates traders who survive long-term from those who blow up their accounts during inevitable losing streaks. Iron condors have high win rates but can produce significant drawdowns when they do lose. Conservative position sizing protects your capital during these periods.
The golden rule is to risk no more than 1-2% of your account on any single iron condor trade. If you have a $50,000 account, your maximum risk per trade should be $500-1000. Since your maximum loss is known when you enter the trade, you can calculate exactly how many contracts to trade.
In our XYZ example with $300 maximum risk per contract, a trader with a $50,000 account risking 2% could trade three contracts maximum ($900 total risk). This preserves capital for the next trade even if this one hits maximum loss.
Forum discussions reveal that position sizing errors cause more account blowups than poor strategy selection. The infamous Captain Condor blowup that traders reference involved oversized positions relative to account value. Multiple losses in sequence destroyed the account because each trade risked 10-15% of capital rather than the recommended 1-2%.
Consider portfolio heat as well. Portfolio heat is your total risk across all open positions. Even if each individual trade risks only 2%, having ten similar iron condors open simultaneously creates 20% portfolio heat. This concentration risk can devastate accounts during market-wide volatility expansion events.
Iron Condor vs Iron Butterfly
Traders often compare iron condors with iron butterflies, another neutral income strategy. Understanding the differences helps you choose the right tool for specific market conditions and your personal risk tolerance.
| Characteristic | Iron Condor | Iron Butterfly |
|---|---|---|
| Short Strikes | Two different strikes (separate put and call) | Same strike (at-the-money or near) |
| Profit Zone Width | Wider range for profit | Narrow range for maximum profit |
| Maximum Profit | Lower credit received | Higher credit received |
| Probability of Profit | Higher (70-80%) | Lower (50-60%) |
| Risk Profile | Lower risk, lower reward | Higher risk, higher reward |
| Best Market Condition | Expecting range-bound movement | Expecting very little movement |
The iron butterfly uses the same strike for both short options, typically at-the-money or very near to it. This concentrates maximum profit at a single price point but requires the underlying to stay extremely close to that point. The result is higher premium collection but lower probability of achieving maximum profit.
Choose iron condors when you expect the underlying to stay within a broad range but are not certain exactly where it will finish. Choose iron butterflies when you have high conviction that the stock will pin to a specific level, such as after a strong move has exhausted itself. Most income traders prefer iron condors for their higher win rates and more forgiving profit zones.
Assignment Risk and Management
Assignment risk occurs when the holder of an option you sold exercises their right to buy or sell the underlying. With iron condors, this risk applies specifically to your short options when they are in-the-money as expiration approaches. Understanding when assignment happens and how to handle it is essential for iron condor traders.
Early assignment typically happens when short options are deep in-the-money and have little time value remaining. For short puts, this usually occurs when the put is ITM and the extrinsic value is less than the dividend amount (if a dividend is pending). For short calls, early assignment becomes likely when the call is ITM and approaches ex-dividend date.
Pin risk occurs when the underlying price is very near your short strike at expiration. You are uncertain whether you will be assigned or not, and any after-hours movement could change the outcome. Traders often close positions before expiration to eliminate pin risk, accepting a slightly lower profit in exchange for certainty.
If you are assigned on one leg of your iron condor, do not panic. Your long option provides defined risk protection. If assigned on a short put, you buy the underlying at the strike price, but your long put gives you the right to sell at the lower strike, limiting your loss to the spread width. Close the assigned position promptly to eliminate directional exposure.
Most traders avoid holding iron condors through expiration to eliminate assignment complications entirely. Closing at 50% of max profit or a few days before expiration removes assignment risk while still capturing meaningful gains.
Adjustment Techniques
Even well-constructed iron condors sometimes require adjustment when the underlying moves toward one side. Knowing when and how to adjust separates advanced traders from beginners who simply accept losses. The goal of adjustments is to reduce risk while maintaining some profit potential.
Rolling the Untested Side
When the underlying approaches your short call strike, the put side becomes your untested side. You can roll the untested put spreads closer to the current price to collect additional premium. This increases your overall credit and widens your breakeven on the challenged side.
For example, if XYZ rises to $103 and you have a $95/$90 put spread, you might roll the put spread up to $100/$95. You close the original spread and open a new one closer to the money, collecting additional credit. This credit improves your overall position and gives you more room on the call side.
Converting to an Iron Butterfly
Another adjustment involves closing the untested side entirely and converting your iron condor into an iron butterfly. This concentrates your risk on the challenged side but eliminates risk on the side that is clearly not threatened.
Using our example where XYZ rises to $103, you might close the $95/$90 put spread entirely, leaving only the call spread. You then adjust your call spread strikes or add a new short call closer to the money, creating a butterfly structure. This is an advanced technique best reserved for experienced traders.
When Not to Adjust?
Sometimes the best adjustment is no adjustment at all. If the underlying has moved so far that rolling would significantly increase risk or reduce potential reward beyond acceptable levels, closing the position for a managed loss is the prudent choice. Preservation of capital matters more than attempting to salvage every trade.
Experienced traders typically set adjustment triggers at specific price levels, such as when the underlying touches the short strike or when the delta of the short option reaches 0.30. Predefining these rules removes emotion from the decision-making process.
Profit Taking and Exit Strategy
Knowing when to exit a winning trade is as important as knowing when to enter. Iron condor traders use several methods to determine exit points: profit percentage targets, time-based exits, and technical triggers.
The most common profit-taking rule involves closing the position at 25-50% of maximum profit. If you collected a $2.00 credit initially, you would close the position when you can buy it back for $1.00-1.50. This captures a significant portion of the potential gain while reducing the risk of late-trade reversals.
Research from experienced traders suggests that holding iron condors past 50% profit rarely pays off. The remaining time decay is slow, and the risk of adverse moves increases as expiration approaches. Taking profits at 25-50% and redeploying capital into new trades typically produces better long-term results.
Stop loss rules are equally important. Many traders set stops at 2x the premium collected. In our $2.00 credit example, you would exit if the position value reaches $4.00, representing a $2.00 loss. This prevents small losses from becoming large ones during gap moves or volatility expansion.
Time-based exits trigger a few days before expiration regardless of profit or loss. Closing positions with 7-10 days remaining eliminates pin risk and assignment complications. Some traders close at 21 DTE to avoid gamma risk entirely, accepting smaller but more consistent profits.
Common Mistakes to Avoid
Learning from others’ mistakes accelerates your progress as an iron condor trader. Forum discussions and trading communities reveal patterns of errors that consistently cause problems for newer traders.
Chasing Premium by Moving Strikes Too Close
The temptation to collect more credit leads some traders to place short strikes too close to the current price. While this increases potential profit, it dramatically reduces probability of success. A strike at 0.30 delta has roughly 30% chance of expiring ITM, meaning your iron condor has reduced odds of winning. Stick to 0.16-0.20 delta for consistent results.
Holding Too Close to Expiration
Gamma risk near expiration can turn small adverse moves into significant losses. As expiration approaches, your position becomes increasingly sensitive to price changes. Close positions with at least a week remaining to avoid gamma risk and pin risk complications.
Ignoring Liquidity
Wide bid-ask spreads on illiquid options erode profitability and make exiting positions expensive. Only trade underlying securities with tight spreads, typically defined as penny increments or less than 1% of the option price. Major index ETFs and large-cap stocks usually provide sufficient liquidity.
Poor Timing Around Events
Earnings announcements, FDA decisions, economic releases, and geopolitical events can cause massive moves that destroy iron condor positions. Check the earnings calendar before entering trades. Avoid holding through known events unless you have deliberately positioned strikes far outside the expected move.
Emotional Decision Making
The high win rate of iron condors can create overconfidence. When a loss does occur, some traders immediately enter a new position to win back the money, often with poor strike selection or oversized positions. Follow your predefined rules regardless of recent results.
Iron Condor Strategy: Frequently Asked Questions
What is the success rate of the iron condor strategy?
The iron condor strategy typically achieves a 70-80% success rate when constructed with standard parameters. Using short strikes at the 16-20 delta level creates positions with approximately 70-80% probability of profit. However, the average winning trade is smaller than the average losing trade, requiring disciplined risk management to achieve long-term profitability. Win rates vary based on strike selection, with wider spreads producing higher win rates but lower credits per trade.
How risky is the iron condor?
The iron condor is considered a limited-risk strategy because maximum loss is defined when you enter the trade. Risk equals the width of the spread minus the net credit received. However, gap risk exists where overnight moves can push the underlying through both short and long strikes. Position sizing limits should keep individual trade risk at 1-2% of account value. Portfolio heat from multiple correlated positions poses the greatest risk, as market-wide volatility can cause simultaneous losses across all open iron condors.
What’s the best time to use iron condors?
The best time to use iron condors is during low volatility, range-bound market conditions when implied volatility rank is below 30. Ideal underlying securities show clear support and resistance levels with a history of trading sideways. Avoid iron condors before earnings announcements, during trending markets with strong momentum, and when major economic events are scheduled. High implied volatility environments produce larger credits but require caution as they often precede significant price moves.
Which is better, strangle or iron condor?
Iron condors and short strangles both profit from neutral price action but differ in risk profile. Short strangles offer higher premium collection since they omit the protective long options, but they carry undefined risk if the underlying makes extreme moves. Iron condors provide defined, limited risk at the cost of lower premium. Iron condors suit traders prioritizing capital preservation and defined risk parameters. Short strangles appeal to experienced traders willing to accept undefined risk for higher returns and willing to actively manage positions during adverse moves.
How to adjust a losing iron condor?
Common adjustment techniques include rolling the untested side closer to collect additional premium, converting to an iron butterfly by closing the untested side, or simply closing the position to preserve capital. Roll the untested side when the underlying approaches one short strike, bringing the opposite side closer to increase credit. Set adjustment triggers before entering the trade, such as when the underlying touches the short strike or the short option delta reaches 0.30. Sometimes the best adjustment is closing for a managed loss rather than increasing risk through complex adjustments.
Conclusion
The iron condor strategy offers options traders a powerful tool for generating income in neutral, range-bound markets. By combining a bull put spread and bear call spread, you create defined risk parameters and a wide profit zone where the underlying can fluctuate without causing losses. The strategy excels when implied volatility is low, the underlying shows sideways price action, and you position your short strikes outside the expected move.
Success with iron condors requires more than just understanding the mechanics. Position sizing at 1-2% risk per trade protects your account during losing streaks. Taking profits at 25-50% of maximum potential ensures consistent results without holding through gamma risk near expiration. Avoiding earnings announcements and major events eliminates gap risk that can destroy otherwise sound positions.
If you are new to iron condors, start with paper trading to practice strike selection and management techniques. Focus on highly liquid underlyings like SPY and QQQ where bid-ask spreads are tight. Build experience with 30-45 DTE trades before considering shorter time frames. The iron condor strategy rewards patience, discipline, and proper risk management with consistent returns in the right market conditions for 2026 and beyond.