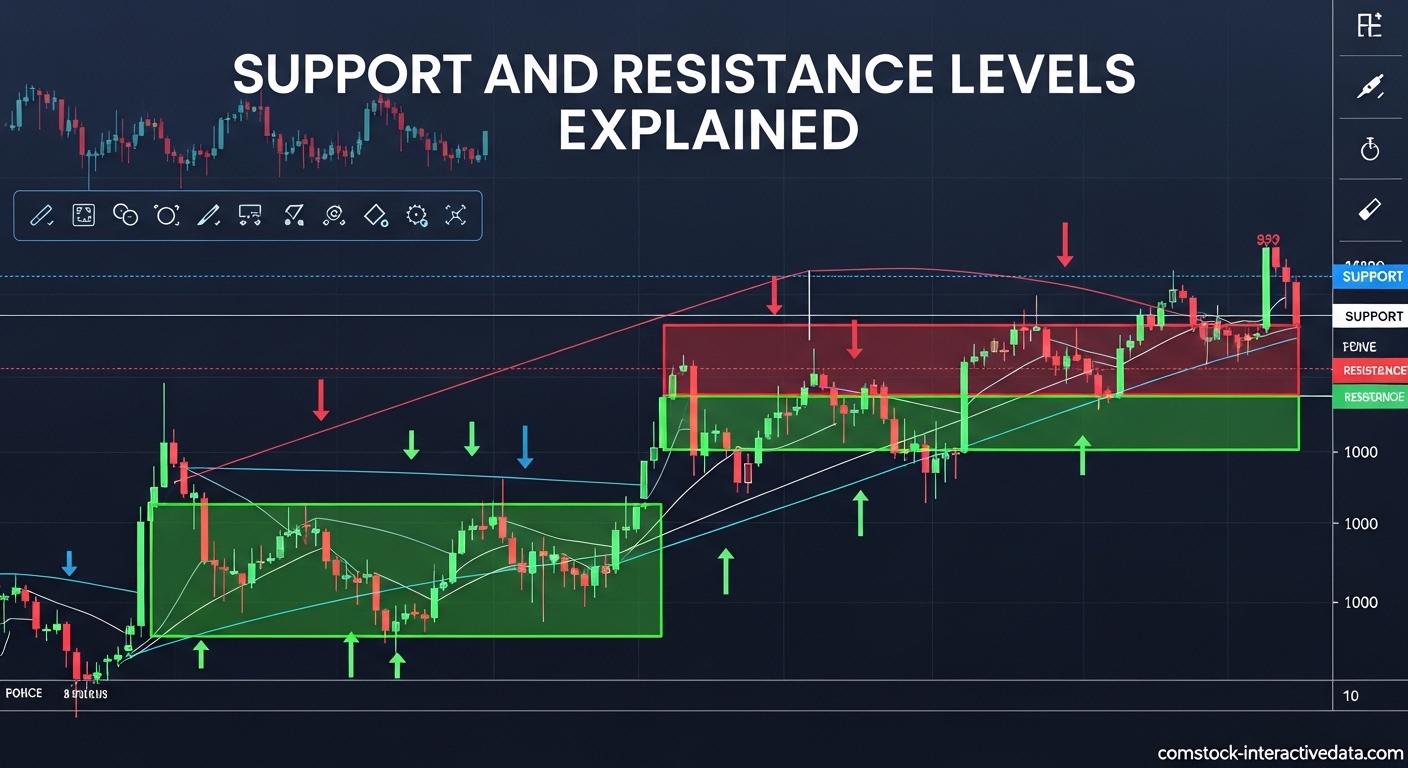
Support and resistance levels are price points on a chart where buying and selling pressure converge, causing price movements to pause or reverse due to supply and demand imbalances. These horizontal zones act as barriers that prevent price from moving freely in one direction. Understanding how to identify support and resistance levels is essential for any trader who wants to make informed decisions about when to enter and exit positions.
In this guide, I will walk you through everything our team has learned about support and resistance over years of active trading. You will discover multiple methods for finding these key levels, understand the psychology behind why they work, and learn practical strategies to apply them in your own trading. Whether you are a day trader, swing trader, or long-term investor, mastering these concepts will significantly improve your technical analysis skills.
By the end of this article, you will know exactly how to draw accurate support and resistance levels, distinguish between major and minor zones, and use these levels to manage risk effectively. Let us dive into the fundamentals that form the backbone of price action trading.
Table of Contents
Key Takeaways
- Support and resistance levels are price zones where buying or selling pressure halts price movement due to supply and demand imbalances.
- These levels help traders identify optimal entry points, exit points, and stop-loss placement for better risk management.
- The most reliable methods for finding levels include historical price data, round numbers, trendlines, and moving averages.
- Major levels form from multiple touch points across longer timeframes, while minor levels may only last hours or days.
- Support can become resistance and vice versa when broken, creating new trading opportunities on retests.
- Avoid common mistakes like drawing too many levels or treating zones as exact price lines rather than areas.
What Is Support?
A support level is a price zone where buying pressure (demand) is strong enough to prevent the price from falling further. Think of support as a price floor where the market has historically shown willingness to purchase an asset, creating a barrier that halts downward movement. When price approaches this level, buyers step in aggressively because they perceive value at that price point.
Support forms for several reasons. First, as price drops to an area where buyers previously found value, those who missed the earlier opportunity often step in to establish positions. Second, traders who sold earlier may see the lower price as an attractive re-entry point. Third, institutional algorithms frequently have buy orders programmed at key historical levels, adding significant buying pressure.
In practical terms, you can identify support by looking at historical price charts and finding areas where price consistently bounced upward after declining. These zones often correspond to previous lows, consolidation areas, or round numbers that carry psychological significance. The more times price touches a support level without breaking below it, the stronger that support becomes in the eyes of market participants.
What Is Resistance?
Resistance is the opposite of support, acting as a price ceiling where selling pressure (supply) overwhelms buying pressure and stops price advances. When price approaches a resistance level, sellers emerge to take profits or establish short positions, creating a barrier that prevents further upward movement. This supply zone represents the point where the market has historically rejected higher prices.
Resistance levels develop when sellers previously established dominance at a specific price range. Traders who bought at lower prices see the resistance zone as an opportunity to take profits. Others who missed earlier selling opportunities wait for price to return to that level to exit positions at breakeven. Additionally, short sellers often target resistance areas to enter new positions betting on price rejection.
You can spot resistance on charts by identifying price peaks where upward movement consistently stalled or reversed. Previous highs, psychological round numbers, and areas with heavy consolidation often become resistance zones. Like support, resistance strengthens with each successful rejection, as more market participants recognize and act on that level.
Why Support and Resistance Matter in Trading?
Support and resistance levels form the foundation of technical analysis because they provide a framework for understanding market behavior and making trading decisions. Our team has found that these levels help us identify optimal entry points where risk-to-reward ratios favor our positions. When price approaches a strong support level, we have a logical area to place stop-loss orders just below the zone, minimizing potential losses if the level breaks.
These levels also serve as targets for taking profits. When buying near support, resistance zones provide logical exit points where selling pressure historically emerges. Conversely, when shorting near resistance, support levels offer targets for covering positions. This framework removes emotional decision-making from trading and replaces it with objective price-based criteria.
Beyond individual trades, support and resistance help traders understand the broader market structure. A series of higher highs and higher lows indicates an uptrend with support levels holding firm. Lower highs and lower lows signal a downtrend where resistance keeps capping advances. Recognizing these patterns allows traders to align their strategies with the prevailing market direction rather than fighting against it.
From a risk management perspective, support and resistance levels help determine position sizing. When a clear support level exists relatively close to the entry point, traders can take larger positions with controlled risk. When support is far away or unclear, smaller positions are warranted. This dynamic position sizing based on technical levels has helped our team preserve capital during uncertain market conditions.
How to Identify Support and Resistance Levels?
Identifying support and resistance levels requires a systematic approach that combines multiple methods for confirmation. The first principle our team follows is viewing these levels as zones rather than exact price lines. Markets are not precise machines, and price often pierces a level slightly before reversing or consolidates within a range rather than touching a specific number.
Start by analyzing higher timeframes first, as levels visible on daily or weekly charts carry more significance than those on 5-minute charts. Once you identify major levels on higher timeframes, drill down to your trading timeframe to find more precise entry and exit zones. This top-down approach ensures you are aware of significant barriers that could affect price action on your trading timeframe.
The most reliable levels have multiple touches over time, with price reversing or consolidating at approximately the same area. A level tested three or more times generally carries more weight than one tested only once. Volume analysis adds another layer of confirmation, as strong support or resistance often coincides with above-average trading volume as buyers and sellers battle for control.
Method 1: Historical Price Data
The most fundamental method for finding support and resistance involves analyzing historical price action to locate swing highs and lows. Start by scanning your chart from left to right, identifying points where price made a clear peak (resistance) or trough (support) before reversing direction. These swing points represent areas where supply or demand previously overwhelmed the opposing force.
Look for levels where price has reversed multiple times over various timeframes. A zone that acted as resistance six months ago and then became support three months later carries significant weight. Extend horizontal lines across your chart from these key swing points and observe how price behaves when it returns to those areas.
Recent price action deserves more attention than historical levels from years past, though major historical highs and lows never truly expire. Focus primarily on levels from the past 3-6 months for active trading, while keeping major historical levels marked for context. When multiple swing points cluster near the same price, that confluence creates an even stronger support or resistance zone.
Volume analysis enhances this method significantly. When you see price reversing at a level on high volume, that indicates genuine institutional participation rather than random price noise. Our team specifically looks for volume spikes at key levels as confirmation that we are looking at significant support or resistance rather than minor pauses in price movement.
Method 2: Round Numbers
Round numbers like $100, $150, or $1000 often act as psychological support and resistance levels because humans naturally gravitate toward whole numbers when thinking about value. These levels represent mental anchors where traders place orders, set targets, and make decisions. In forex markets, round numbers ending in 00 or 50 (like 1.1000 or 1.1050) frequently serve as barriers.
The psychology behind round numbers relates to cognitive bias. When asked to estimate value, people tend to default to multiples of 5 or 10. This anchoring effect creates clusters of buy and sell orders near round numbers, effectively making them self-fulfilling support and resistance levels. As price approaches these figures, the concentration of orders naturally slows or reverses movement.
In cryptocurrency trading, round numbers are particularly significant due to the retail-heavy participant base. Bitcoin at $30,000 or $40,000 becomes a magnet for attention and order flow. Stock traders watch $50, $100, and $200 levels closely, especially for large-cap names where these figures represent psychological milestones.
However, round numbers work best as supplementary confirmation rather than standalone levels. When a round number aligns with historical support or resistance from swing points, that confluence creates a particularly reliable zone. Our team marks round numbers on our charts but requires additional technical evidence before trading based solely on these psychological levels.
Method 3: Trendlines
Trendlines provide dynamic support and resistance that slope upward or downward rather than remaining horizontal. An uptrend line connects a series of higher lows, acting as dynamic support that buyers can reference for entry points. A downtrend line connects lower highs, serving as dynamic resistance that sellers can use for shorting opportunities.
To draw a valid trendline, you need at least two clear touch points, though three or more create stronger levels. Connect the most recent significant swing lows for uptrends or swing highs for downtrends. The trendline should not cut through candlestick bodies, though touching wicks is acceptable. The more times price respects the trendline without breaking it, the more significant that trendline becomes.
Our team follows specific rules for drawing trendlines that have improved our accuracy considerably. First, use the bodies of candles rather than wicks when possible, as bodies represent where most trading actually occurred. Second, focus on the most recent three significant touches rather than trying to connect points from months ago. Third, avoid forcing trendlines to fit; if price does not respect a line naturally, that line has no predictive value.
A trendline break often signals a potential trend change or at least a deeper correction. When price closes decisively beyond a trendline that has held for multiple touches, the dynamic support or resistance has failed. However, our experience shows that waiting for a retest of the broken trendline before entering in the new direction improves success rates significantly.
Method 4: Moving Averages
Moving averages serve as dynamic support and resistance levels that adjust with price movement rather than remaining fixed. Common periods like the 50-day, 100-day, and 200-day moving averages are widely followed by institutional traders, creating self-fulfilling support and resistance zones. When price approaches these averages, algorithms and human traders alike take notice.
The 200-period moving average on daily charts represents a particularly significant level that separates long-term bullish and bearish market conditions. Price trading above the 200-day MA generally indicates bullish sentiment, while trading below suggests bearish conditions. Our team watches this level closely for major trend determination and potential reversal signals.
For shorter-term trading, the 20-period and 50-period moving averages on hourly or 4-hour charts provide actionable support and resistance. These faster-moving averages help identify entry points during trending markets, as price often pulls back to these averages before continuing the trend. The key is matching your moving average period to your trading timeframe.
Multiple moving averages clustering together creates confluence that strengthens the support or resistance. When the 50-period and 200-period moving averages align near the same price, that zone becomes particularly significant. Our strategy includes marking major moving averages on all charts and treating them as potential reversal zones when price approaches.
Major vs Minor Support and Resistance Levels
Not all support and resistance levels carry equal significance. Major levels represent significant supply or demand zones that have been tested multiple times across extended periods, often spanning weeks or months. These levels can halt strong trends and frequently produce substantial reversals when reached. Minor levels, by contrast, are less significant zones that may only hold for hours or days before breaking.
Major levels typically form from historical price extremes, long-term consolidation areas, or significant volume clusters. These zones have proven their importance by reversing price multiple times over various market conditions. When price approaches a major level, our team prepares for significant reactions rather than minor pauses. Breaks of major levels often signal genuine trend changes rather than temporary breaches.
Minor levels arise from recent swing points within the current trend or consolidation pattern. While these levels can provide short-term trading opportunities, they break more easily than major levels. Price might respect a minor support level once or twice before slicing through it during the next test. Our team uses minor levels for scalp trades or precise entry timing within broader major level contexts.
To distinguish between major and minor levels, consider the timeframe, number of touches, and volume at the level. A level visible on weekly charts with five touches over six months and high volume on each test qualifies as major. A level only visible on 15-minute charts with two touches qualifies as minor. Understanding this distinction prevents overcommitting to trades at weak levels while ensuring you respect strong ones.
The Psychology Behind Support and Resistance
Support and resistance levels work because of predictable human behavior patterns among market participants. Understanding these psychological dynamics helps explain why levels hold and why they eventually break. The three primary groups driving price action at these levels are the buyers who missed the move, the sellers looking to exit at breakeven, and the breakout traders waiting for confirmation.
When price drops to a support level, buyers who missed the initial rally see an opportunity to enter at a better price. Their buy orders create the demand that halts the decline. Conversely, when price rises to resistance, sellers who bought lower see their chance to take profits, while those who bought at the previous high look to exit at breakeven. This concentration of selling pressure creates the resistance barrier.
The breakeven effect is particularly powerful. Traders who bought at a previous high and watched price fall carry emotional baggage associated with that level. When price returns to their entry point after a decline, they exit immediately to avoid further pain, creating selling pressure. This behavior explains why previous highs often become resistance and why resistance becomes support once breached, as those same traders have already exited.
Anchoring bias also contributes to level significance. Humans anchor their perception of value to recent prices, making round numbers and previous extremes psychologically important. Once enough participants anchor to a specific level, their collective behavior makes that level self-fulfilling. Our team has observed this phenomenon repeatedly, where levels that should theoretically matter little become significant simply because enough traders are watching them.
Finally, fear and greed create feedback loops at support and resistance. As price approaches support, fear of missing out drives buying. As price approaches resistance, fear of giving back profits drives selling. Greed motivates buyers to wait for better prices at support and sellers to hold for higher prices at resistance. These emotional forces concentrate at key levels, amplifying their significance.
Support and Resistance Role Reversal
One of the most powerful concepts in technical analysis is role reversal, where broken support becomes resistance and broken resistance becomes support. This phenomenon occurs because market participants who missed the initial breakout wait for price to return to the broken level for a second chance to enter. Their collective action creates new pressure in the opposite direction at the same price zone.
When support breaks, the buyers who previously defended that level are proven wrong and often exit their positions. Meanwhile, sellers gain confidence and establish new short positions. When price returns to test the broken support from below, the combination of stopped-out buyers and new sellers creates resistance. This retest offers an excellent short entry opportunity with a clear stop-loss above the former support zone.
Conversely, when resistance breaks, the sellers who defended that level are forced to cover their shorts, while buyers gain confidence. If price pulls back to test the broken resistance from above, covering shorts and new buyers stepping in create support at the former resistance zone. This retest offers a favorable long entry with a stop-loss below the former resistance area.
Our team waits for confirmation before assuming a role reversal has occurred. A single candle closing beyond a level does not guarantee reversal. We look for a clear break with follow-through, then wait for the retest before entering. This patience has saved us from false breakouts that quickly reverse back into the previous range.
Volume plays a crucial role in validating role reversals. A breakout on high volume suggests genuine conviction and increases the probability of successful role reversal. A breakout on low volume may indicate lack of participation and higher chances of failure. We always check volume patterns when analyzing potential role reversal setups.
Trading Strategies Using Support and Resistance
Support and resistance levels provide the foundation for multiple trading strategies that our team uses regularly. The most basic approach is range trading, which involves buying near established support and selling near established resistance within a consolidation zone. This strategy works best when price is moving sideways without a clear trend, and it requires patience to wait for price to reach the edges of the range.
For range trading, we enter long positions when price approaches support with bullish reversal candlestick patterns, placing stop-losses just below the support zone. We take profits near the resistance zone or trail stops as price moves in our favor. For short positions, we enter near resistance with bearish reversal patterns and target support. The key is ensuring the range is wide enough to provide favorable risk-to-reward ratios.
Breakout trading offers another approach, where we enter positions when price decisively breaks through support or resistance with conviction. A support breakout signals potential further downside, while a resistance breakout suggests continued upward movement. We look for breaks accompanied by above-average volume and enter on the close beyond the level or on the retest if one occurs quickly.
Pullbacks to support or resistance in trending markets provide excellent entry opportunities with the trend. In an uptrend, we wait for price to pull back to a support level or moving average, then enter long when bullish price action confirms the level is holding. In a downtrend, we wait for price to rally to resistance before entering short. This approach allows us to enter at better prices than chasing momentum.
Confluence trading combines multiple support or resistance factors for higher-probability setups. When a historical support level aligns with a round number and a moving average, the probability of that zone holding increases significantly. Our best trades occur at these confluence zones where multiple technical factors align. We prioritize these setups over trades based on single factors.
Risk management remains essential regardless of the strategy used. We never risk more than 1-2% of our trading capital on any single support or resistance trade. Stop-losses always go beyond the level being tested, accounting for the zone concept rather than exact prices. Taking partial profits at logical targets while letting winners run with trailing stops has improved our long-term profitability considerably.
Common Mistakes to Avoid
After years of trading and coaching other traders, our team has identified several common mistakes that consistently cause problems when working with support and resistance. The most frequent error is drawing too many levels on charts, creating analysis paralysis. When every minor swing point becomes a marked level, charts become cluttered and confusing. We recommend limiting yourself to 3-5 significant levels per chart, focusing only on zones with multiple touches and clear significance.
Another major mistake is treating support and resistance as exact price lines rather than zones. Price rarely stops precisely at a single number, instead reversing within a small range. Traders who place stops exactly at support or orders exactly at resistance often get stopped out by minor wicks or miss fills by small amounts. Give your levels breathing room of 1-3% depending on the asset’s volatility.
Failing to consider timeframe context leads to poor decisions. A level visible only on 5-minute charts carries far less weight than one visible on daily charts. Traders who panic when a minor 15-minute support breaks often exit positions that would have been profitable if held. Always check higher timeframes before making decisions based on lower timeframe level breaks.
Not adjusting levels as new price information arrives creates outdated analysis. Support and resistance evolve as markets change. A level that mattered three months ago may be irrelevant now, while new levels form from recent price action. We review and update our marked levels weekly, removing obsolete ones and adding newly significant zones.
Finally, entering before confirmation causes many traders to catch falling knives or chase false breakouts. Wait for price to actually reach your level and show signs of respect before entering. A candlestick reversal pattern, volume spike, or clear bounce provides the confirmation needed for entry. Patience at key levels separates profitable traders from impatient ones who enter prematurely.
Best Timeframes for Different Trading Styles
Choosing the right timeframe for identifying support and resistance depends entirely on your trading style and holding period. Scalpers who hold positions for minutes need to focus on 1-minute and 5-minute charts, looking for minor levels that form from recent price action. These traders accept that their levels break frequently and adjust positions quickly when they do.
Day traders who close all positions by market end typically use 15-minute and hourly charts for primary analysis. These timeframes provide enough detail for precise entries while filtering out much of the noise present on 1-minute charts. Day traders should still check daily charts for major levels that might interfere with their intraday trades.
Swing traders holding positions for days to weeks rely primarily on daily and 4-hour charts. These timeframes show significant support and resistance that takes substantial volume to break. Levels from daily charts often provide multiple trading opportunities over several days as price oscillates around them. Swing traders can ignore minor intraday level breaks that do not affect the bigger picture.
Position traders and investors with month-long horizons focus on weekly and monthly charts. These timeframes reveal major structural levels that define long-term trends. A level visible on a monthly chart may hold for years and can withstand significant temporary breaches before ultimately breaking. Position traders use these major levels for strategic decisions rather than tactical entries.
Multiple timeframe analysis provides the best results regardless of your trading style. Start with higher timeframes to identify major levels, then drill down to your trading timeframe for precise entry and exit timing. When a level exists on multiple timeframes simultaneously, that confluence creates the strongest support or resistance. Our team never enters a trade without first checking at least two timeframes above our trading timeframe.
Frequently Asked Questions
How to identify resistance and support levels?
Start by examining historical price charts for areas where price consistently reversed direction. Look for swing highs to identify resistance and swing lows for support. Extend horizontal lines from these points and mark zones where price reacted multiple times. Confirm levels using volume analysis, round numbers, trendlines, and moving averages. Focus on zones with at least three touches over extended periods for strongest reliability.
What is R1, R2, R3, and S1, S2, and S3?
These are pivot point levels calculated using the previous trading period’s high, low, and close prices. R1, R2, and R3 represent first, second, and third resistance levels above the pivot point. S1, S2, and S3 represent first, second, and third support levels below the pivot point. These mathematical levels help traders identify potential intraday support and resistance zones based on prior price action.
What is the 3 5 7 rule in trading?
The 3 5 7 rule refers to a risk management and timeframe selection framework. It suggests using 3 timeframes for analysis, risking no more than 5% of capital per strategy, and holding positions for 7 times your average win duration when trends are strong. Some traders also interpret it as a pattern recognition rule where price often completes moves in 3, 5, or 7 wave sequences before reversing.
How are support levels determined?
Support levels form when buying pressure overwhelms selling pressure at a specific price zone. They are determined by historical price action where declines halted and reversed due to concentrated demand. Key factors include multiple price touches, high volume at the level, psychological round numbers, and market participants’ breakeven points from previous trades. True support exists where buyers consistently step in to establish positions.
What is the easiest way to find support and resistance levels?
The easiest method involves three steps: First, scan charts for obvious swing highs and lows where price reversed sharply. Second, extend horizontal lines from these points across the chart. Third, identify where multiple lines cluster or where price has tested the same area multiple times. Use a top-down approach starting with weekly or daily charts, then refine on lower timeframes for precision.
What is the 90% rule in trading?
The 90% rule states that approximately 90% of retail traders lose money consistently in financial markets. This statistic emphasizes the difficulty of trading success and the importance of proper education, risk management, and psychological discipline. The rule serves as a warning that trading is not easy money and requires treating it as a serious profession with continuous learning and capital preservation as top priorities.
What is the best timeframe to trade support and resistance?
The best timeframe depends on your trading style. Scalpers use 1-5 minute charts. Day traders prefer 15-60 minute charts. Swing traders focus on 4-hour and daily charts. Position traders use weekly and monthly charts. Always analyze multiple timeframes, starting with higher periods for major levels and drilling down for precise entries. Levels visible across multiple timeframes carry the most significance.
What is the 3 5 7 rule in forex?
In forex trading, the 3 5 7 rule often refers to a wave counting and position sizing approach. Some traders use it to identify potential reversal points after 3, 5, or 7 consecutive candles in one direction. Others apply it to pip targets, aiming for 30, 50, or 70 pips depending on market volatility. Risk management variations suggest risking 3 pips to make 5, or 5 pips to make 7, maintaining positive risk-to-reward ratios.
Conclusion
Support and resistance levels remain among the most fundamental and reliable tools in technical analysis because they reflect real supply and demand dynamics in financial markets. Throughout this guide, we have explored how to identify support and resistance levels using historical price data, round numbers, trendlines, and moving averages. These methods, when combined with an understanding of market psychology, provide a robust framework for making informed trading decisions.
The concepts covered here, from major versus minor level distinctions to role reversal dynamics, form the foundation upon which successful trading strategies are built. Our team has found that traders who master these basics before moving to complex indicators achieve better long-term results. The simplicity of support and resistance analysis is actually its greatest strength, allowing you to focus on price action rather than complicated mathematical formulas.
As you apply these techniques to your own trading, remember that consistency and patience matter more than perfection. Start by marking levels on a few charts daily, observing how price behaves when it reaches those zones. Over time, pattern recognition will become automatic, and you will develop an intuitive sense for which levels matter most. Keep your risk management strict, your analysis objective, and your learning continuous.
Now that you understand support and resistance levels explained in detail, the next step is practice. Open your charts and begin identifying these key zones on your preferred markets. Test the strategies outlined here with small position sizes until you build confidence. With dedication and disciplined application, these timeless technical analysis principles can become a cornerstone of your trading success in 2026 and beyond.